The Ultimate Guide to Dehydrating Food
This post may contain affiliate links.

Everything you need to know to start dehydrating your own backpacking meals: the benefits of dehydrating food, what ingredients dehydrate the best, proper food handling procedures, the best way to store dehydrated food, and much more!
We resisted buying a food dehydrator for years, relying exclusively on store-bought ingredients for backpacking trips. We didn’t know anything about dehydrating and we thought it was going to be way too complicated to learn. But, after picking up a dehydrator few years ago, we realized how wrong we were!
Dehydrating has completely changed the way we approach food in the backcountry. It has opened up an entirely new world of meal options and has reduced our price per meal. It is also a lot of fun and pretty easy to learn.
If you’re interested in getting into food dehydrating or want to expand your knowledge about the process, then this guide is for you! We will walk you through everything so you can start dehydrating and storing meals for your next backpacking trip.

How the dehydrating process preserves food
Through low heat and steady airflow, dehydrating removes enough moisture from food through evaporation to inhibit the growth of bacteria, yeast, and mold.
Dehydrating is one of the oldest methods of food preservation and has been used effectively since the dawn of civilization. So, you know, a pretty good track record!
There are a number of different types of dehydrators and dehydrating techniques including air dehydrating and oven dehydrating, but this guide will focus on dehydrating food using an electric food dehydrator.
Why dehydrate food For backpacking
Diversify Your Meal Options: There are only so many store-bought backpacking meal options available, and not all of them sound very tasty. You can expand your backpacking menu by making your own meals.
Control Nutritional Profile: Everyone has different nutritional needs. Dehydrating your own backpacking meals allows you to control the final product. Less salt? More protein? Gluten-free? You decide!
Lower Cost: Relying exclusively on store-bought backpacking meals can cost a small fortune. Over time, dehydrating your own meals allows you to dramatically reduce the cost per meal.
Faster Cooking Times: By preparing dehydrated food at home you need less time (and fuel) to rehydrate it in the field. This is particularly true for grains, legumes, and vegetables.
Preserve Perishables: Some foods would be impossible to safely bring backpacking without preserving them through dehydration, such as meat and fresh produce.
Weight and Space Savings: Dehydrating your food will dramatically reduce its weight while retaining its nutritional value. Plus, dehydrated food packs down to a fraction of its freeze-dried counterpart.
Choosing a food dehydrator
Buying your first dehydrator can be a bit overwhelming. There are a ton of different models, features, and price points to choose from. Here are some things to consider as well as a few of our top recommendations.
Adjustable temperature settings: In our opinion, this feature is non-negotiable. In order to safely dehydrate different types of ingredients, you need to be able to choose the right temperature.
On/off timer: Some dehydrators have a programmable timer that will allow you to automatically shut down the machine after a given amount of time. We personally find this feature to be unnecessary, especially since drying times can differ so dramatically. (It’s dry when it’s dry, regardless of how long it “should” take.)
Fan position: Front loading dehydrators have their fan and heating element in the back of the machine and will blow the hot air across the trays (horizontal flow). This tends to be more efficient and results in more even drying. Stackable dehydrators have their fans and heating elements on the top or bottom of the unit, which then blows air up or down through an open column in the middle of the trays (vertical flow). These are less efficient and can result in uneven drying unless you reshuffle the order of the trays periodically, but they are usually less expensive.
Capacity: Consider how much food you will be dehydrating. If you need to dry a lot in a shorter period of time, you will want to look at models with higher capacities. If you are only going to dehydrate a few days’ worth of food at a time for weekend trips, you can get away with a smaller capacity unit.
Side Note: One of the benefits of some of the stackable models is that you can add and subtract trays to fit your current batch.
Materials: Dehydrators can be made of plastic or metal. There are a number of BPA-free plastic dehydrators on the market, but they may not be dishwasher safe if that’s important to you. Metal dehydrators are generally more expensive, but if you want to put the trays in the dishwasher or if you want to avoid plastic altogether, this might be the better option. Some front-loading models have glass doors so you can visually check on the progress without having to open the unit.
Storage: If storage space is a concern, a stackable unit might be a better option for you since it can be disassembled and stored in pieces, whereas a solid unit will take up more space.
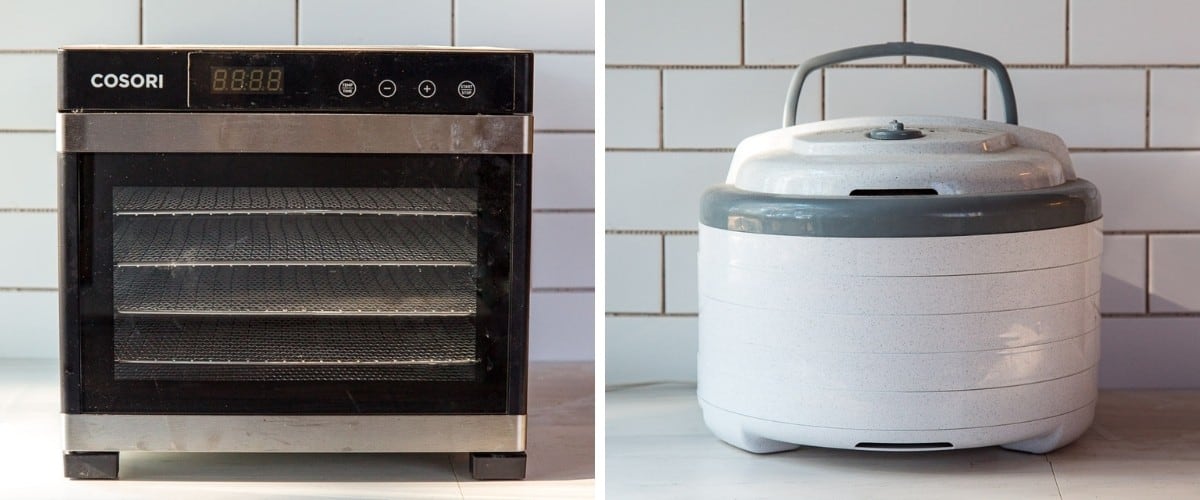
TL;DR what dehydrator should I buy?
We own a Nesco Snackmaster FD-75A and a COSORI Premium Dehydrator and would recommend either.
For a lower cost, vertical flow machine, the Nesco Snackmaster FD-75A is a great option if you’re just getting started but don’t want to make a big investment just yet. This is the model we used for our first couple of years of dehydrating. It has variable temperature settings (95F-160F), is BPA free, allows us to change the number of trays depending on the load (each tray has .8sqft capacity and you can use up to 12 trays or 9.7 sqft), and disassembles for easier storage. You can often find it for less than $65 or $70, which is a great deal for this model (MSRP is $89).
If you want to start with a horizontal flow machine, we can recommend the COSORI Premium Dehydrator. It has six trays with a 6.5sqft total capacity, the trays are dishwasher safe, it’s very quiet, and it’s less expensive than some of the other front-loading dehydrators with the same features like a transparent door and timer. We recently upgraded to this model and have been very happy with it.
Good foods to dehydrate
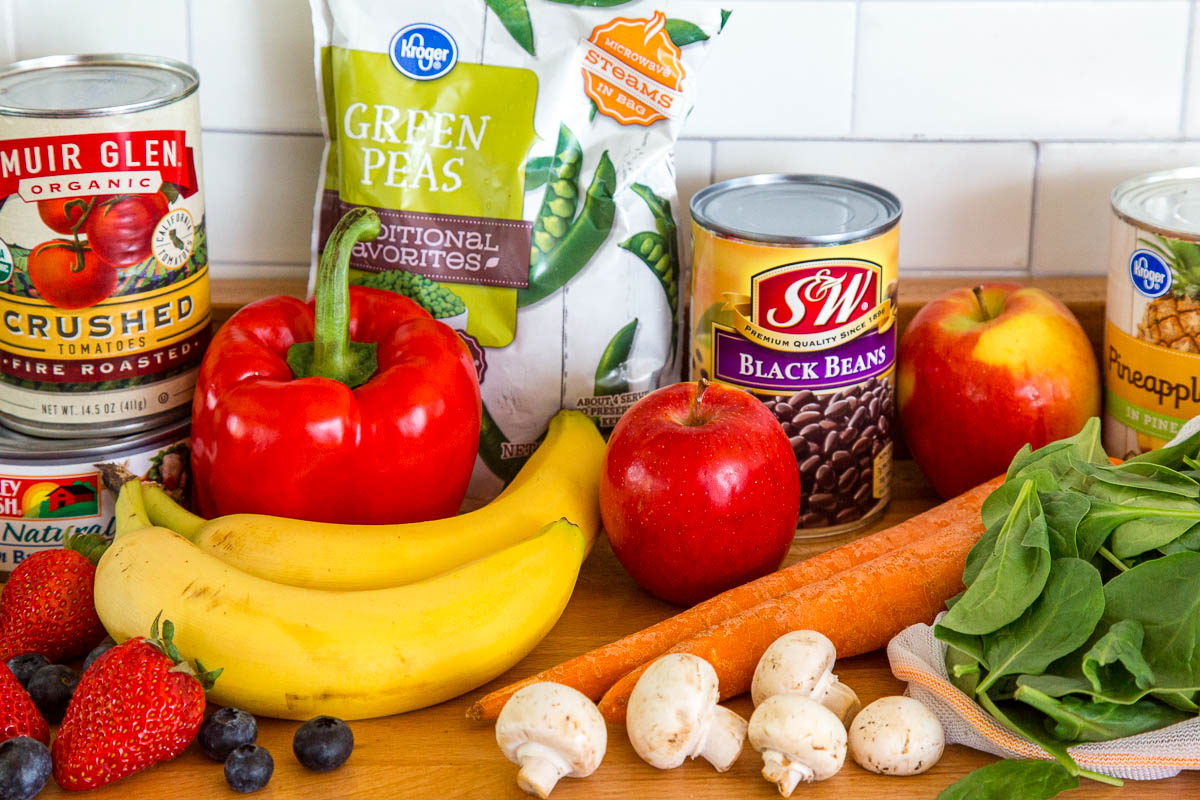
Many foods lend themselves well to dehydration, such as:
↠ Fruits
↠ Vegetables
↠ Legumes like beans and lentils
↠ Grains, rice, and pasta
↠ Low-fat meats and seafood
↠ Herbs
↠ Sauces (that are fat, dairy, and egg-free)
What foods do NOT dehydrate well?
While a lot of food can be dehydrated, there are a few that should be avoided entirely for food safety or effectiveness reasons, such as:
↠ Fats: Proper dehydration relies on the evaporation of moisture, and unfortunately, fats do not evaporate. This will leave moisture in the food, which can cause it to spoil, or go rancid.
↠ Nut butter: Nut butter is too high in fat to dehydrate. However, there are commercially available peanut butter powders that have had the fats removed.
↠ Avocados (too high in fat)
↠ Olives (too high in fat)
↠ Dairy: Dairy products are generally not safe to dehydrate due to the high chance of food poisoning. There are some commercially available alternatives such as butter powder, powdered milk, sour cream powder, and cheese that you can add to your dehydrated backpacking meals.
↠ Eggs: Eggs are not safe to dehydrate due to the high chance of food poisoning; salmonella, common with eggs, thrives in the temperature range used during dehydration. If you want to have eggs in the backcountry, we highly recommend OvaEasy.
↠ Store-bought condiments: not all condiments are good candidates for dehydration. Many contain ingredients that should not be dehydrated (oils, fats, eggs, or dairy) or are loaded with sodium or preservatives. If you want to dehydrate condiments, make sure you read the label.
Dehydration temperatures
It’s important to dry food at the correct temperature. Too low of a temperature, and you could be leaving the food in the “danger zone” for too long and risk bacterial growth. Too high of a temperature, and you risk case hardening.
Case hardening occurs when the exterior of the food dries too quickly and forms a tough case around the outside, which will prevent the interior from properly dehydrating, trapping moisture inside which can cause mold and spoilage during storage.
Food that has case-hardened can look properly dehydrated since the exterior has dried, so it’s important to avoid it altogether by using the right temperature. It is always a good idea to check a few pieces by slicing them in half, squeezing them, and seeing if any moisture presses out.
Here are the dehydration temperature guidelines for different types of food:
95°F Herbs
125°F Vegetables
125°F Beans and Lentils
135°F Fruit
145°F Grains
145°F Pre-cooked Meats
160°F Meat, Seafood
165°F Poultry
As you can see, there is quite a variation in temperatures, which is why it’s important to make sure you’re grouping foods together appropriately if you’re dehydrating more than one type of ingredient at the same time (like when dehydrating full meals).
If you need to speed up the dehydration process, just turning up the heat is not the best option, as it increases the risk of case hardening. Instead, you can either cut your food into thinner/smaller pieces or load less into your dehydrator.
Dehydrating ingredients vs dehydrating meals
You can dehydrate batches of single ingredients and assemble your meals later, or you can prepare and then dehydrate complete meals.
The key to dehydrating complete meals is to make sure that all the ingredients can be dehydrated at more or less the same temperature to prevent case hardening of ingredients.
Additionally, if dehydrating full meals, you should ensure that the entire meal contains very little fat, as it will affect the shelf life of the final product.
Ingredients like cheese and oils should be brought along and added during the rehydrating process. We use these double-locking silicone humangear GoToobs to bring oils with us out into the backcountry.
How to prepare food and equipment for dehydrating
Are you familiar with the 6 Ps? Proper preparation prevents piss poor performance. This concept totally applies to dehydrating. Here are a few ways to prep your food for success.
Start with a clean station
Before getting started, make sure you thoroughly clean and dry all surfaces, equipment, and your hands. You don’t need to wear gloves (those protect your hands, not what you’re touching), but we recommend washing your hands frequently when handling food before and after it has been dehydrated.
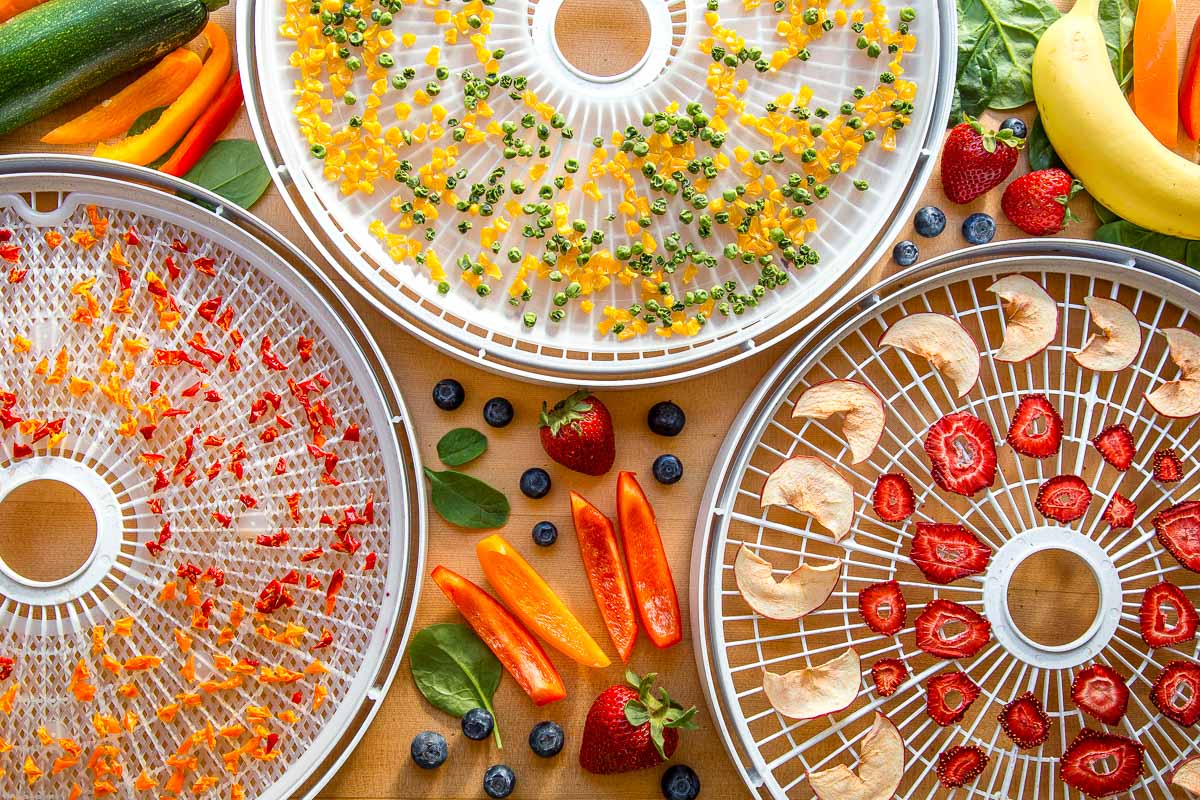
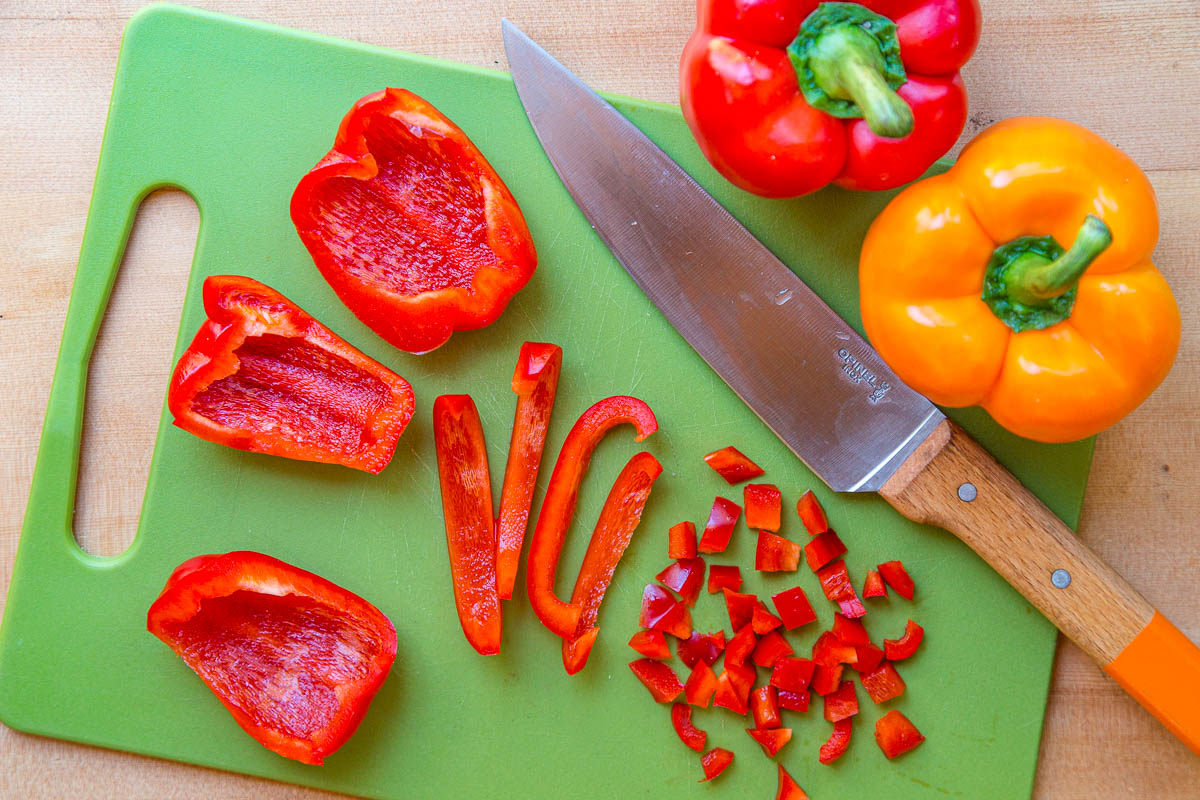
Cut everything into uniform pieces
One of the keys to even drying is to ensure that your food is uniformly sized. For things like corn or peas, you don’t have to do anything. They are small enough. But for larger fruits and vegetables that will need to be sliced or chopped, it is important to cut everything into evenly sized pieces.
For slicing, a mandoline will allow you to slice in uniform thickness and will make quick work of the task (but be super careful, it’s literally the most dangerous kitchen appliance in existence.) Consider using safety gloves or using this finger-safe plunger-style mandoline). An egg slicer is also good for smaller items like mushrooms and strawberries, or larger items like bananas and zucchinis if first broken down into smaller sections.

Pretreating
Pretreatment refers to a range of different processes performed on fruits and vegetables prior to dehydrating in order to retain color and flavor, improve rehydration time and texture, and increase their shelf life.
Not all fruits and vegetables “require” pretreatment, but generally speaking, it is a good idea.
Ascorbic Acid (for fruits): Soaking fruit in an ascorbic acid (vitamin C) solution will help prevent browning. Mix 1 teaspoon of powdered ascorbic acid into two cups of water, and soak sliced fruit for 3-5 minutes before draining. You can use the same solution for two batches.
Fruit Juice (for fruits): Fruits high in citric acid, like lemons, limes, and oranges, can be used to make a pre-treatment solution. Place cut fruit into a bowl with enough juice to cover. Soak 3-5 minutes before draining. You can use the juice for two batches before replacing it. *This method is not as effective as using an ascorbic acid solution and will alter the flavor of your fruit as well.
Blanching or steaming (for vegetables): Blanching (dipping food in boiling water and then rapidly cooling in cold water) or steaming can help vegetables retain their color, and can reduce rehydration time. This method is generally used for vegetables that you would not eat raw, or particularly tough vegetables like carrots.
Sulfite Dip (for fruits and vegetables): Sulfite dips are an option if you’re planning on storing fruit long term. It can cause reactions in people who have sulfite sensitivities or asthma, so we don’t personally have any experience with this method. You can read more about it here.
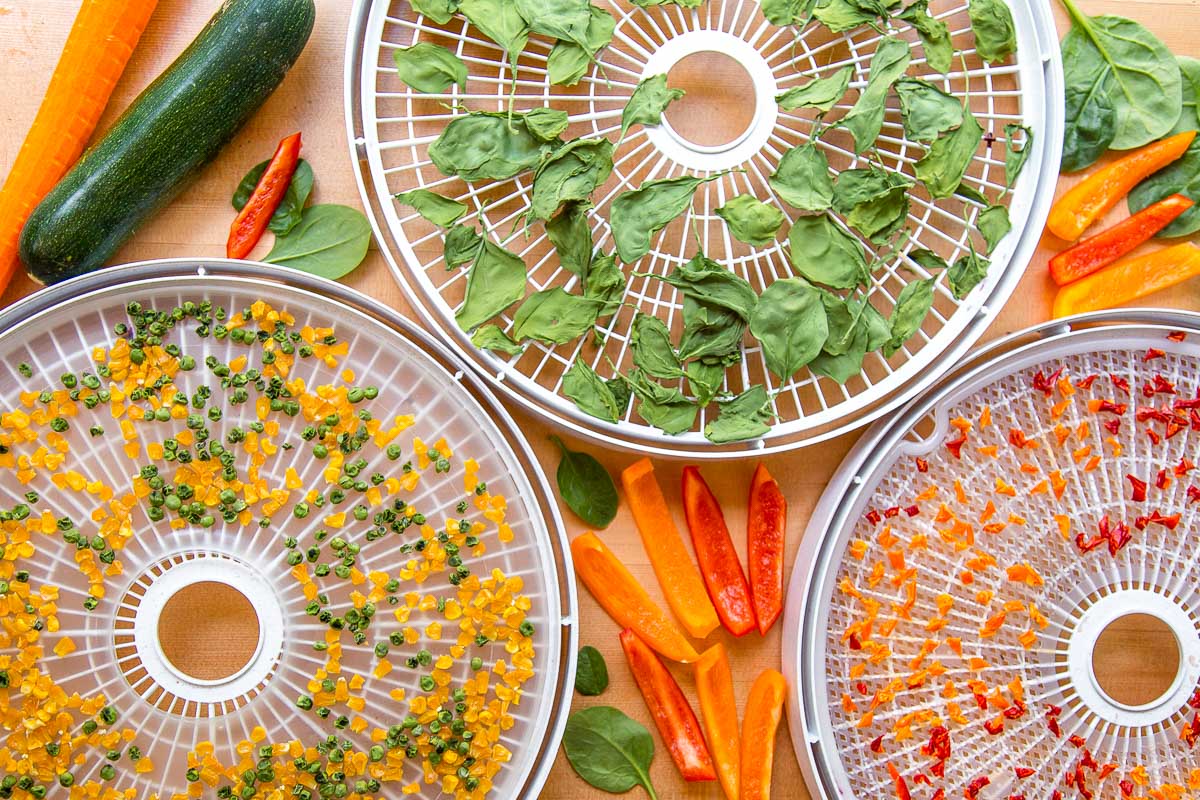
How to dehydrate vegetables
We love dehydrating vegetables to add to our backpacking meals!
Steam or blanch vegetables that you would not eat raw, or that are particularly tough or fibrous: carrots, corn, asparagus, broccoli, green beans, potatoes, and sweet potatoes. Bell peppers do not need to be steamed or blanched, though they will rehydrate faster if they are. Soft vegetables like spinach, mushrooms, celery, onions, okra, and zucchini don’t need to be steamed/blanched.
Most vegetables should be thinly sliced (~⅛” thick) or cut into small pieces. Some veggies like corn, peas, and spinach don’t need to be cut at all.
Protip: Using frozen vegetables (that have been thawed) is a great time-saving hack since they are already cut and blanched for you! Just spread them out on your dehydrator trays and you’re ready to go.
Vegetables should be dehydrated at 125F until crisp or hard. This will take anywhere from 4-12+ hours depending on the vegetable, size, dehydrator, dehydrator load, humidity in your house, etc. It is not possible to over-dehydrate vegetables when using the proper temperature (but you can scorch them if dehydrated at too high of a temperature).
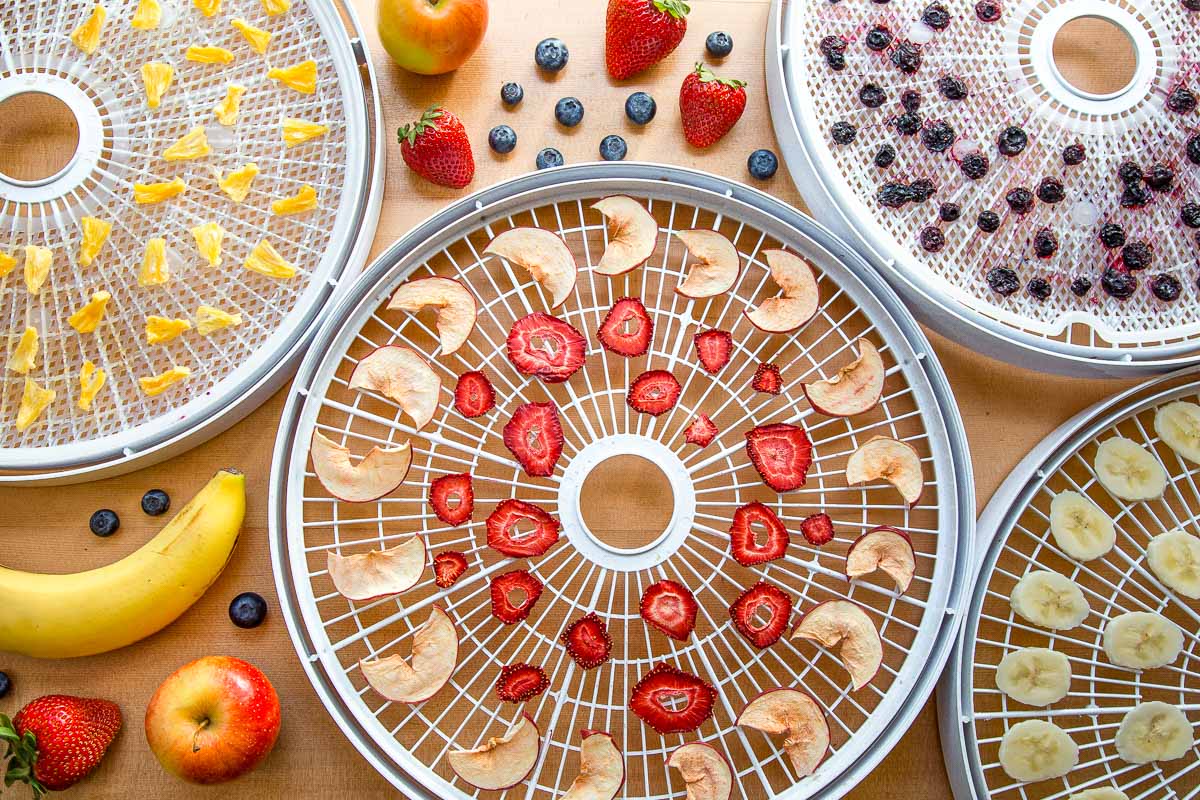
How to dehydrate fruit
Dehydrated fruit is great for snacking on during the day, or adding to breakfasts like oatmeal and quinoa porridge.
Fruit can either be sliced thin (apples, bananas, strawberries, kiwi), cut into small pieces (pineapple, apples), left whole (raspberries, blueberries), or pureed and dried into fruit leathers.
Be sure to thoroughly wash any fruits that will be dried with the skin on, as most have a waxy coating (naturally, or added to protect it). Some fruits, like whole blueberries, grapes, and cherries, should be blanched in hot water, followed quickly by an ice bath, to crack the skin to promote better dehydration. This process is referred to as “checking”.
Fruit should dehydrate in a single layer (no overlapping!) at 135F. Drying time will vary widely depending on the specific fruit. Apple slices may be done in as little as 6 hours, whereas whole blueberries and cherries could need multiple days.
Protip: Just buy freeze-dried blueberries from Trader Joe’s, our blueberry dehydration test took 3 days!
Fruit is done dehydrating when it becomes leathery and is no longer sticky. Cut a few pieces in half and squeeze them – you shouldn’t be able to squeeze out any moisture.
Let the fruit cool and then condition (read about conditioning here) before storing.
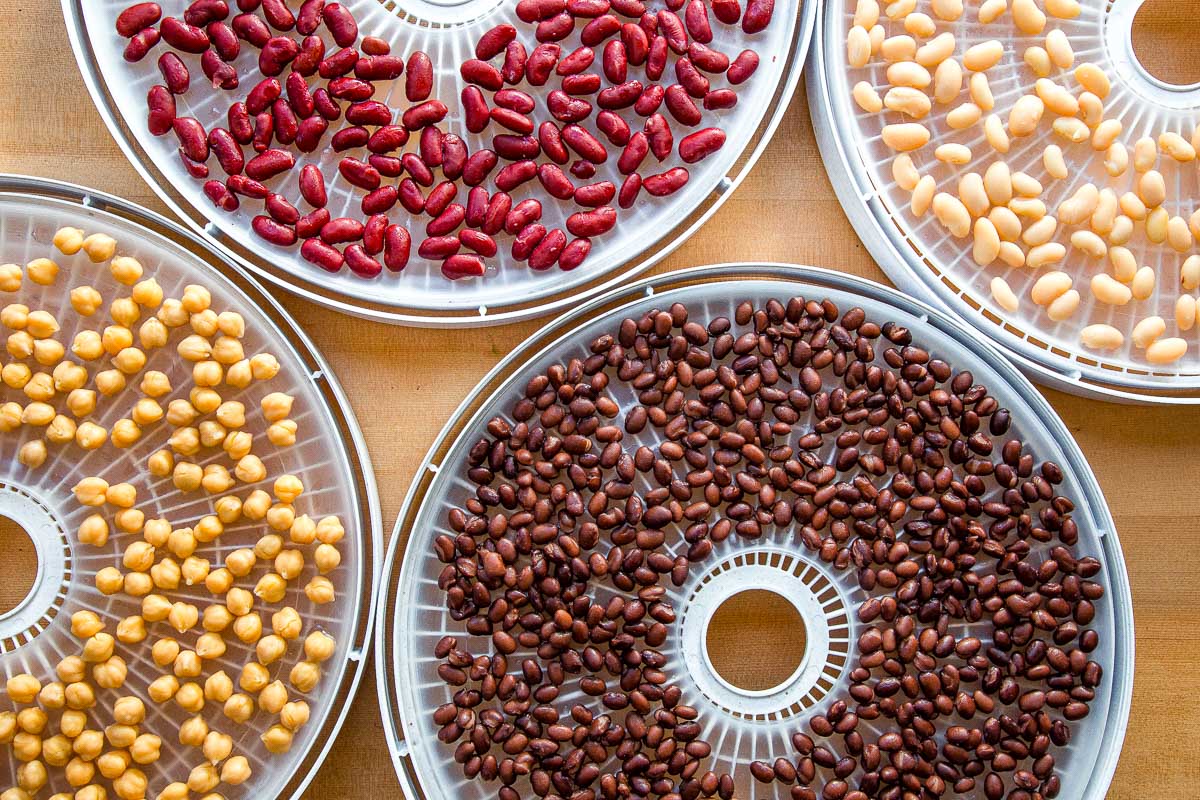
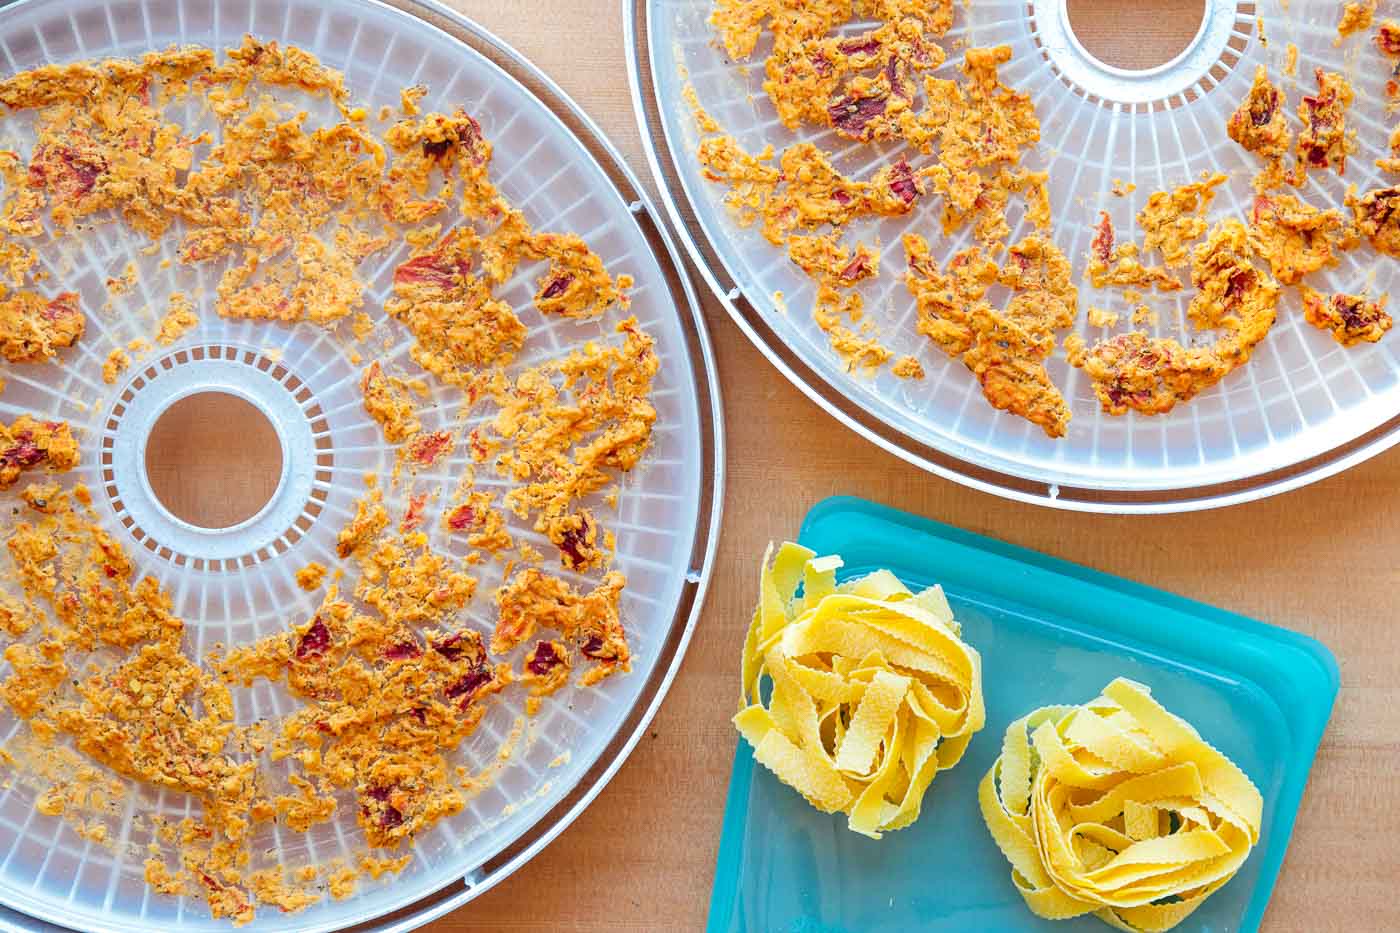
How to dehydrate grains, legumes, and pasta
Dehydrating pre-cooked grains, rice, and legumes like beans and lentils will save you a ton of weight and cooking time on the trail.
Grains + rice
Cook rice and grains as usual in water or non-fat broth. Rice will rehydrate best if cooked just shy of al dente. Dehydrate at 145F for 6-12 hours, until completely dried and hard.
We’ve seen some online resources state that rice/grains can be dehydrated at temperatures as low as 125F, but there is a type of bacteria (B. cereus) that can cause food poisoning and thrives on cooked rice at temperatures lower than 135F, so we suggest following the recommendation of 145F for rice and grains (source).
Beans and lentils
Canned beans will dehydrate and rehydrate the best, though home pressure cooked beans also work. Lentils can be cooked on the stovetop until tender, or you can use canned lentils (Trader Joe’s also carries pre-steamed lentils).
Dehydrate at 125F until hard or crunchy, 6-12 hours. Beans do have a tendency to split while they are rehydrating. This has never bothered us personally, and it does allow them to rehydrate faster than if they were to remain whole. We’ve read some accounts that cooking beans until they are only slightly underdone can help prevent splitting (but we have not tried this ourselves).
Pasta
Some pasta shapes lend themselves better than others to dehydrating and rehydrating, and many times we don’t even bother dehydrating pasta if we know we will be rehydrating a meal by simmering it (vs soaking in hot water). Ultimately, there is not a significant weight difference in uncooked vs cooked and dehydrated pasta, only a change in the on-trail cooking method, so it’s your call if you want to spend the time dehydrating it.
To dehydrate pasta, cook it as normal, then drain and spread evenly on your dehydrator trays, preventing as much overlap as possible. Dehydrate at 135F until dry and brittle, 6-12 hours (you should be able to snap a piece of spaghetti when you bend it).
How to dehydrate meat
Lean meat can be dehydrated if cooked to a safe temperature (160F for beef or 165F for poultry) and then dehydrated at 145F until completely dried (Source: USDA).
Ground beef
Use the leanest ground beef you can find. Ground beef will rehydrate best if mixed with breadcrumbs or ground oats (a trick we learned from Backpacking Chef). For 1 lb raw beef, mix in ½ cup breadcrumbs and work it into the meat. You can also add dried spices into the meat if you want to flavor it (try cumin, coriander, chili, and garlic powder for taco crumbles!).
Cook the beef-breadcrumb-mixture in a nonstick skillet over medium-high, breaking it apart with your spatula so that you end up with nice crumbles. Once it’s cooked through (beef needs to cook to 160F), remove from the heat and chop into small pieces if needed. Blot with a paper towel to remove as much fat as possible.
Spread evenly on mesh dehydrator trays and dehydrate at 145F for 6-12 hours, until hard and dry. A few times during the drying process, blot the meat with a paper towel to absorb any fat that has surfaced, and if using a vertical flow dehydrator, reshuffle the trays.
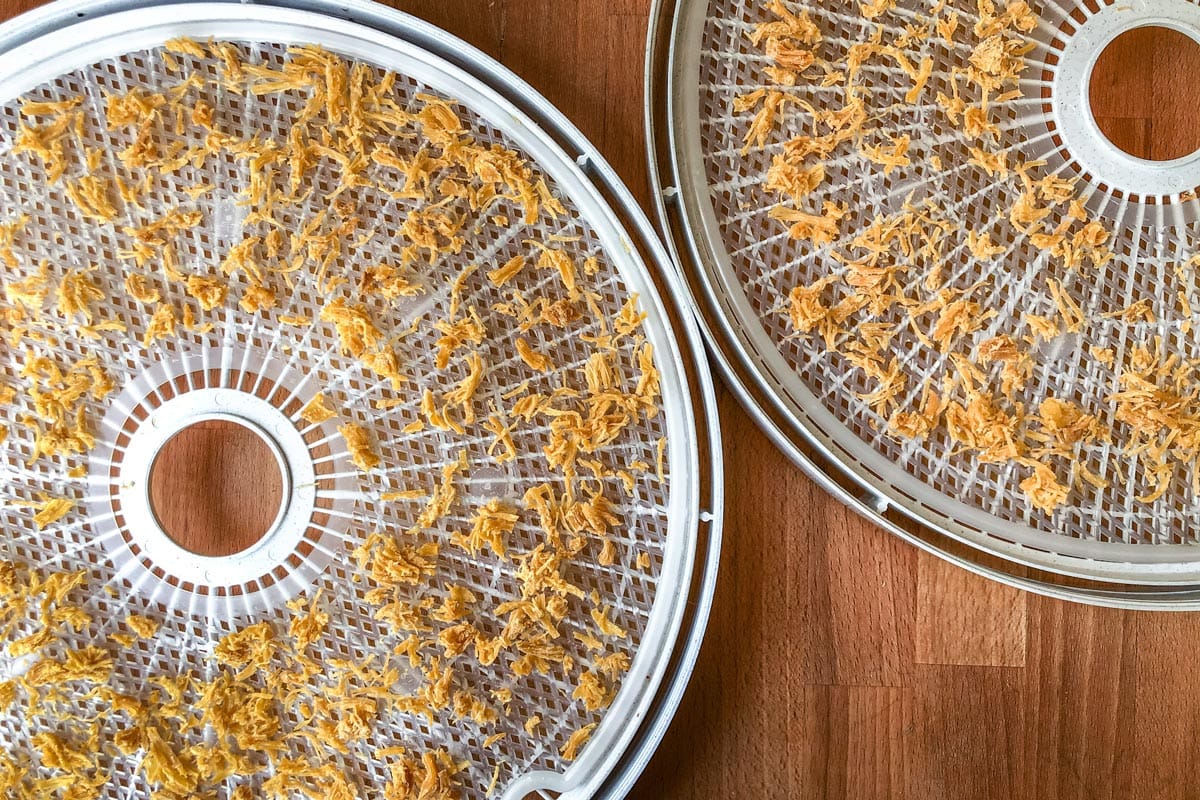
Chicken
Pressure-cooked chicken will give you the best results when rehydrating. You can buy pre-cooked canned chicken (which is pressure-cooked in the can), or pressure-cook it yourself using an Instant Pot. White meat is preferable as it contains less fat.
If using canned chicken, rinse and blot dry with a paper towel. If you’re cooking the chicken yourself, cook the chicken to 165F, shred, rinse and blot dry with a paper towel. Spread chicken in an even layer on mesh dehydrator sheets. Dry at 145F for 6-12 hours, until completely dry.
A few times during the drying process, blot the chicken with a paper towel to absorb any fat that has surfaced, and if using a vertical flow dehydrator, reshuffle the trays.
Ground turkey
Like ground beef, ground turkey will rehydrate best if mixed with breadcrumbs or ground oats. For 1 lb raw turkey, mix in ½ cup breadcrumbs and work it into the meat.
Cook the turkey in a nonstick skillet over medium-high, breaking it apart with your spatula so that you end up with nice crumbles. Once it’s cooked through (poultry needs to cook to 165F), remove from the heat and chop into small pieces if needed. Blot with a paper towel to remove any fat.
Spread evenly on mesh dehydrator trays and dehydrate at 145F for 6-12 hours, until hard and dry.
A few times during the drying process, blot the turkey with a paper towel to absorb any fat that has surfaced, and if using a vertical flow dehydrator, reshuffle the trays.
How to safely store dehydrated food
After you’ve dehydrated your food, you’re going to want to store it so it’s ready for your next adventure!
How long does dehydrated food last?
Most home dehydrated food, when prepared and stored correctly, can last for months and up to a year. But a lot depends on the storage method and storage environment.
- Fruits & Vegetables: 1 year for fruit, about 6 months for vegetables at 60F (source: NCHFP), though vacuum sealing can extend the shelf life.
- Fruit leathers: up to a month at room temperature, or a year in the freezer (source: NCHFP).
- Meat: 1 to 2 months (source: USDA), or 6 months if vacuum sealed and frozen (source: The Dehydrator Cookbook).
- Grains, Beans, and Rice: 1 year (source: The Dehydrator Cookbook).
Of course, some report that their dehydrated food lasts much longer than the timeframes listed above, but these are the general guidelines we follow based on the listed sources. And, some foods may not last as long due to dehydrating and storage conditions. When in doubt, discard any questionable food!
Conditioning
Conditioning is an important final step, primarily for dehydrated fruits, before packing them away for storage. Here is what the NCHFP has to say about it:
“When dried fruit is taken from the dehydrator or oven, the remaining moisture may not be distributed equally among the pieces because of their size or their location in the dehydrator. Conditioning is a process used to equalize the moisture and reduce the risk of mold growth.” (source)
To condition, cool the dried fruit to room temperature and store it, loosely packed in a clear, airtight non-plastic container such as a large glass jar. Let it sit for a week, checking daily for any signs of moisture or condensation. If you see any, put the fruit back into the dehydrator to dry longer. If you see any mold growth during this time, toss the entire batch. Shake the jars each day to keep the fruit from sticking together, potentially creating moisture pockets.
After a week, if there are no signs of moisture or mold, you can package and store the fruit using one of the methods below.
You do not need to condition vegetables, as much more of the moisture is removed during the dehydrating process and it’s easier to tell if they are fully dried, but it doesn’t hurt to condition them anyway. By conditioning, you can avoid the risk of spoiling the rest of your meal due to improperly dried ingredients.
Storage methods & considerations
There are a few environmental factors that affect the shelf life of dehydrated foods:
Temperature: Even when properly dried and sealed, temperature will still affect the shelf life of your food. For example, food stored at 60F has twice the shelf life as food stored at 80F (source: NCHFP).
Moisture: The whole point of dehydrating food is to remove as much moisture as possible so that the food can be safely stored without it spoiling, so the last thing you want to do is re-introduce moisture during the storage process!
Oxygen: Oxidation will cause your food to break down, lose flavor, and shorten the shelf life.
Light: Like oxygen, light will break down the food and cause off-flavors, loss of nutrients, and shorten the shelf life.
The solution is to store your dehydrated food in airtight containers in a cool, dry, dark place with good ventilation. Let the food cool completely before transferring to a storage container, which will help prevent condensation.
Sanitize your hands and containers before handling food for storage and make sure everything is completely dry.
Resealable container with refrigeration: If you’re making food for a trip that’s in the next week or two (and you’re not sending it in a resupply), you can store it in a zip-top bag in the fridge. Be sure to let the food come up to room temperature before opening the bag, to prevent introducing moisture via condensation. This method is not suitable for longer-term storage since these types of bags are not truly “airtight”. For this, really like these reusable bags from ReZip.
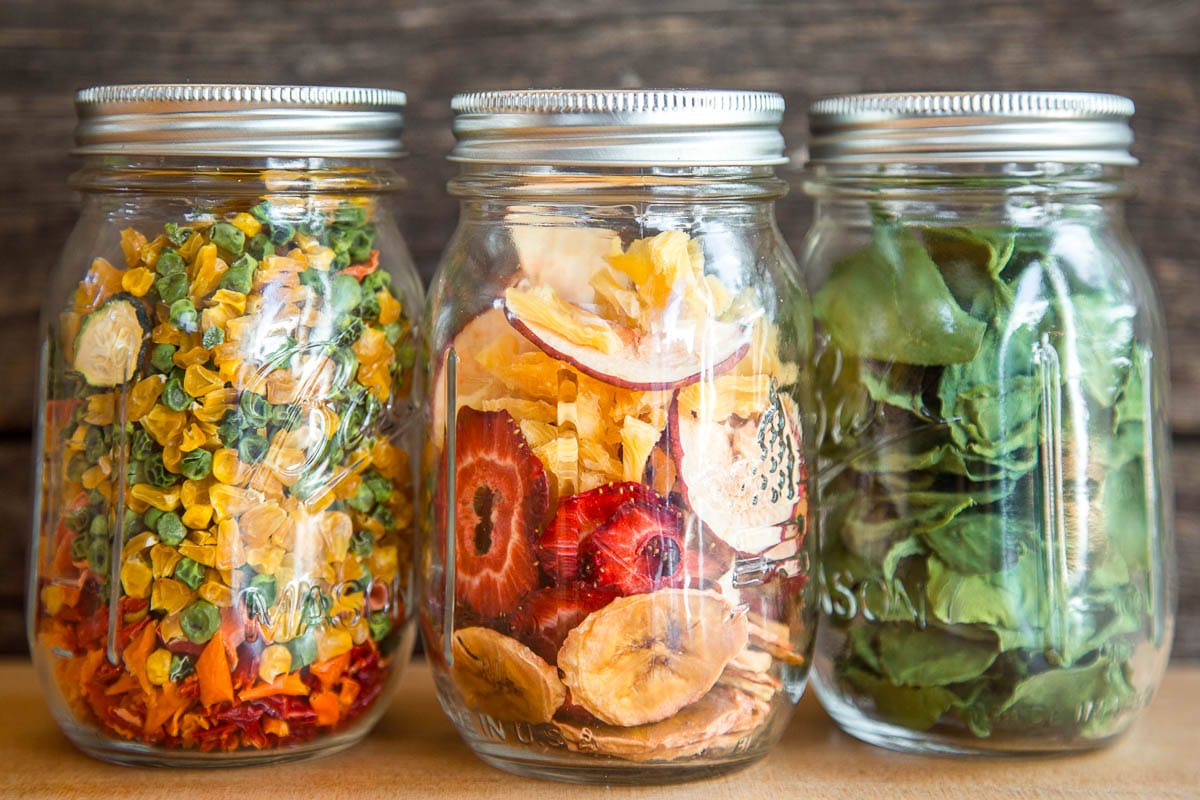
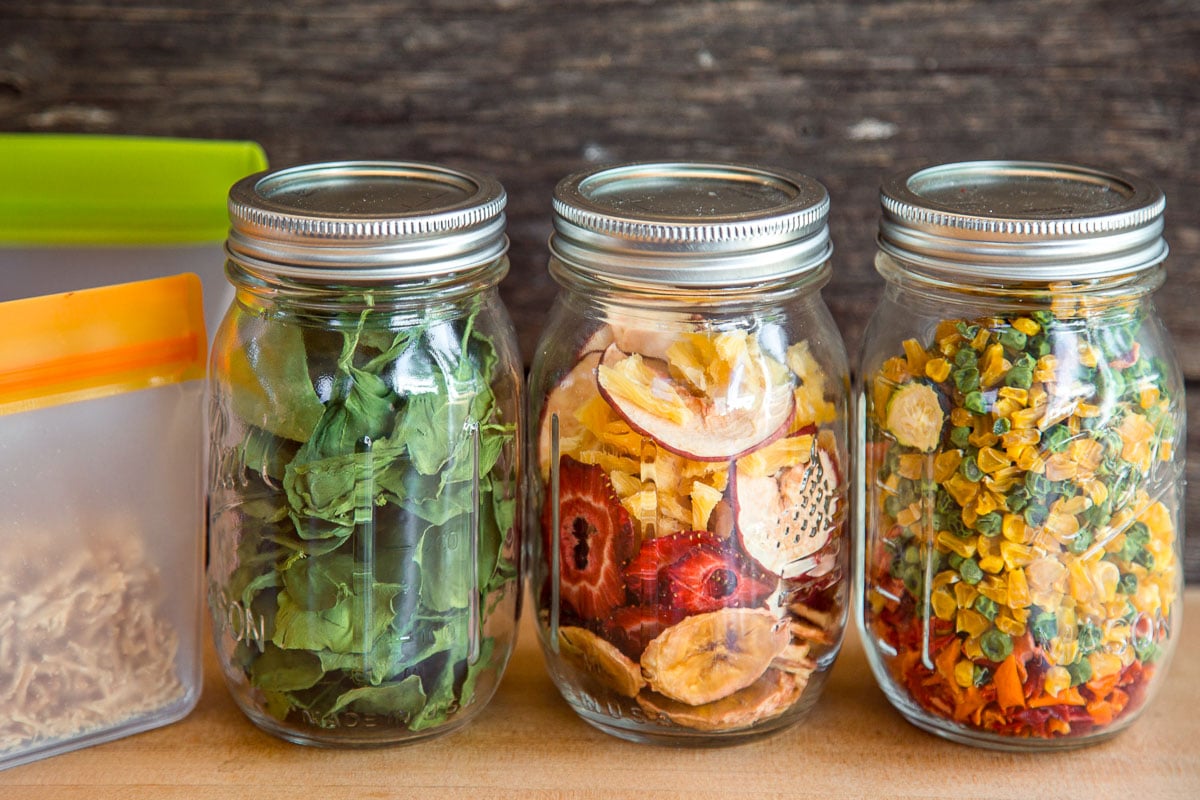
Airtight Containers: Properly dried food can be stored in an airtight glass or hard plastic container that has an airtight seal, such as canning jars. Store in a cool, dark, dry place. We use Ball Mason Jars.
Vacuum Sealing: This method is good for longer-term storage. The process removes all the oxygen from the container to extend the shelf life of the food. There are two ways of accomplishing this:
↠ Vacuum Sealing (bags): Vacuum sealing your meals in vacuum seal bags is a good option for long-term storage, such as sending with resupply boxes. Food Saver makes a wide range of vacuum sealing products.
↠ Vacuum Sealing (jars): A great option for storing larger quantities of dehydrated meals or ingredients until you’re ready to assemble and portion them out into individual meals. If you’re going to open and reseal the jars, we’d recommend adding a desiccant packet (be sure to re-vacuum seal after each time you open the jar!) to absorb any moisture re-introduced while the jar was unsealed. We use this handheld vacuum sealer and jar attachments to do this.
Mylar Bags (with O2 absorber for longer-term storage): This is a good option if you want to store your food for longer time periods, but don’t want to invest in a vacuum sealer. If your mylar bags are temperature rated as such (like these ones), you can also add boiling water right into the mylar bag to rehydrate your food, so cleanup will be easier on the trail.
Desiccant packets vs oxygen absorber packets
Depending on your storage method, you might consider including either a desiccant packet or an oxygen absorber packet.
Desiccant packs remove moisture. Can be used when vacuum sealing (especially jars that will be opened and resealed), but is not necessarily required if the ingredients are properly dried and handled.
Oxygen absorbers remove… oxygen. They are good to use in heat-sealed mylar bags or in canning jars if you don’t have a vacuum sealer.
How to rehydrate dehydrated food in the field
Rehydration is a factor of water, heat, and time. Generally speaking, you want to add as much water back into the food as you took out in the dehydration process. You can figure this out by weighing the food before it goes into the dehydrator, then subtracting the dehydrated weight, and that number is the amount of water you would want to add back in when rehydrating.
To be honest, we are never that precise, and our general rule is to add water to just cover the ingredients in the pot, adding more or less depending on our ideal consistency of the final meal. This is an imperfect system but it works fairly well. Remember, you can always add more water if needed!
Here are three methods for cooking and rehydrating your meals:
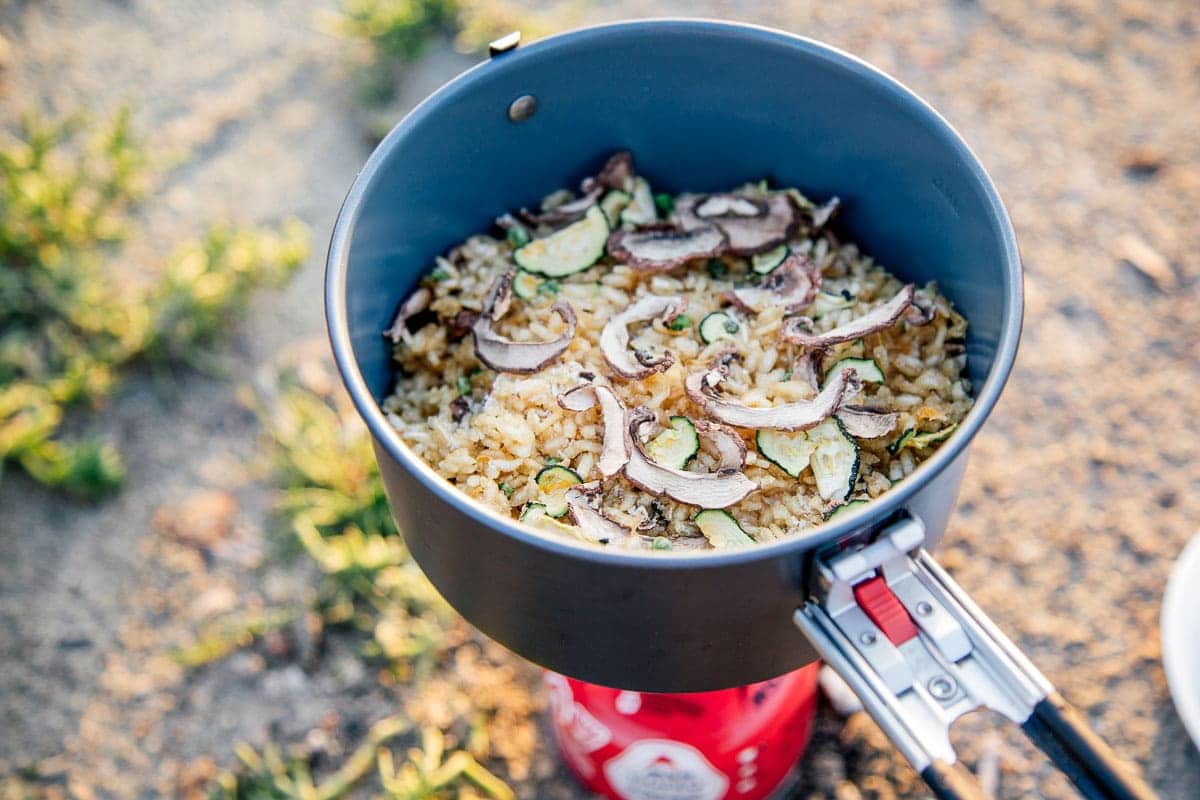
Soak & Simmer: This is the fastest method, but uses the most fuel. Add your meal and water to your pot and let it soak for a bit, maybe while you set up camp or do chores (keep within arms reach if in bear country). Then, simmer the meal until it has rehydrated. Lower the heat towards the end to avoid scorching.
Soak, Simmer & Set: This method takes a bit longer but uses far less fuel than the previous method. It’s also a great option if you use a backpacking stove like a JetBoil which doesn’t have great simmer control. Same as above: add your meal and water to your pot and let it soak for a bit. Then, cover and bring the meal to a rapid simmer for a few minutes before turning off the heat. Place the pot in a cozy (if you’re using a Jetboil or Windburner stove, the insulating wrap should be sufficient). Let the meal rehydrate, stirring after 10 minutes. You can put it back on the heat if it cools too much before it’s done.
Boil in Bag: If you pack your meals in mylar bags that are heat-rated 212F or above, you can pour boiling water right into the bag, seal, and let it rehydrate (stir the food after 10 minutes). Placing the bag in a cozy will help retain heat. This method will take the longest, usually 15-20 minutes but sometimes longer depending on the food and altitude. However, it is the most fuel-efficient and there’s no pot to clean afterward.
Recipe inspiration
Here are some of our favorite dehydrated meals on our site. See our full index of dehydrated recipes here. We’re always adding more recipes, so be sure to sign up for our newsletter below to keep up to date!
Breakfasts
↠ Apple Cinnamon Quinoa Porridge
↠ Strawberries and Cream Quinoa Porridge
↠ Raspberry & Coconut Quinoa Porridge
↠ Blueberry Coconut Oatmeal
Dinners
↠ Tortilla Soup
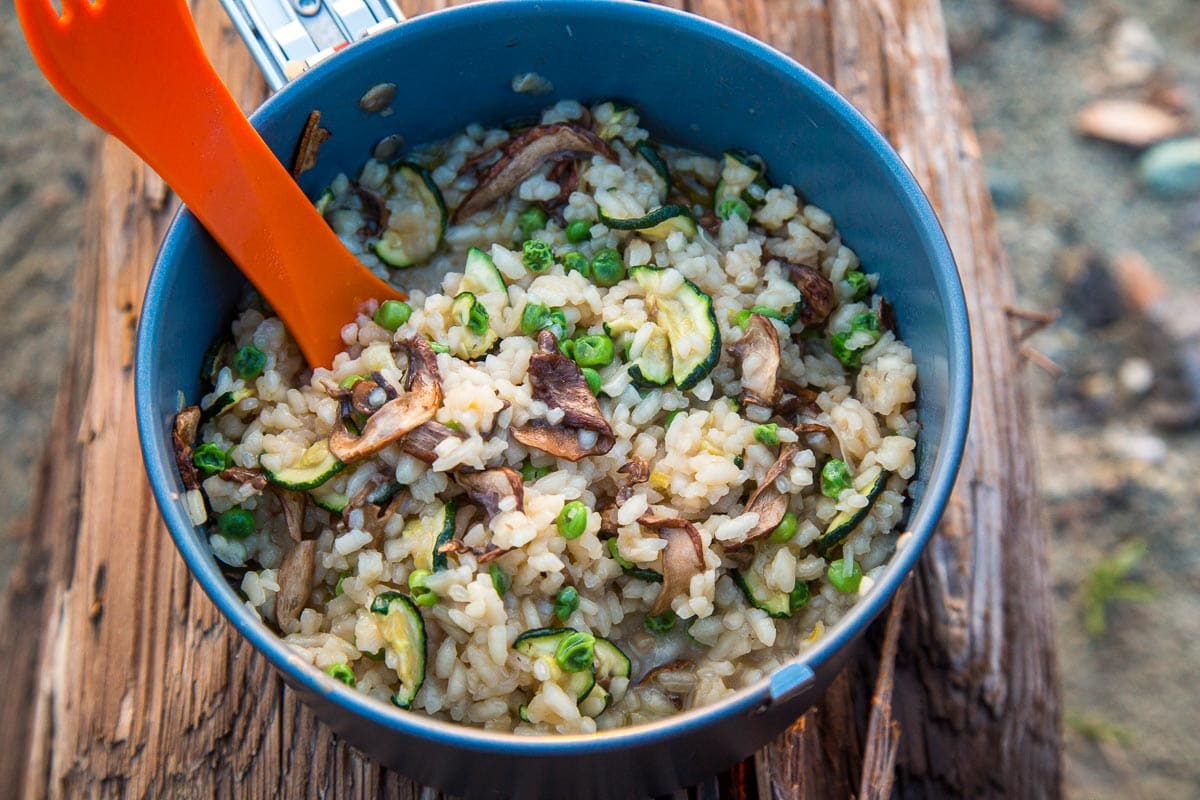
↠ Risotto with Vegetables
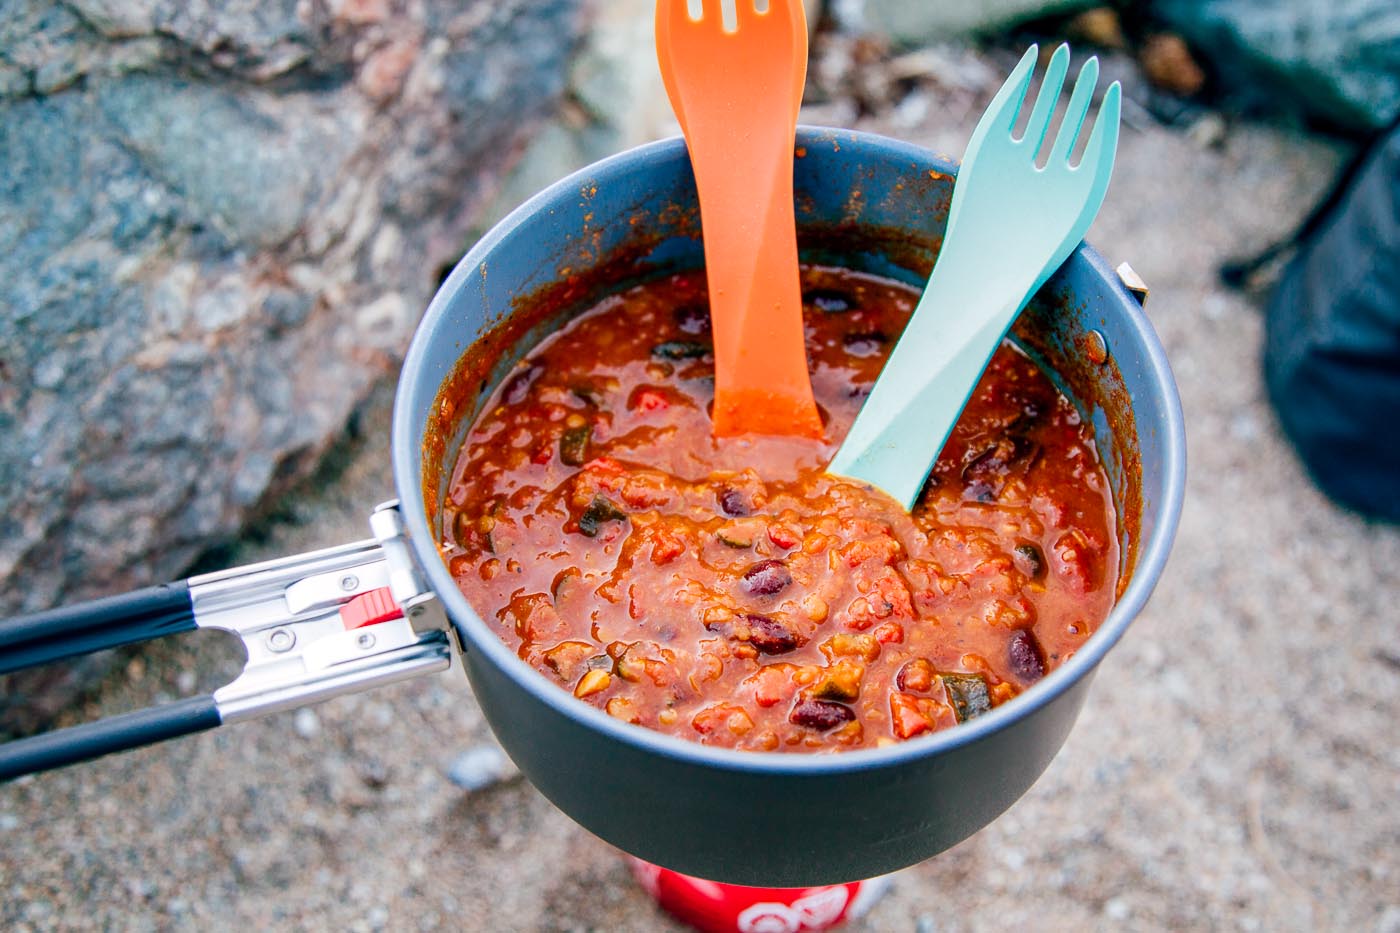
↠ Red Lentil and Bean Chili
↠ Pasta Primavera
↠ Red Lentil Marinara
↠ Sweet Potato Peanut Stew
↠ Minestrone Soup
Snacks
↠ How to Make Beef Jerky
↠ Tie-Dye Fruit Leather
↠ Chili Spiced Fruit Leather
↠ Teriyaki Beef Jerky
Desserts
Sources
Utah State University: Pretreatments to Prevent Darkening of Fruits Prior to Canning or Dehydrating
USDA: Jerky and Food Safety
National Center for Home Preservation: Packing and Storing Dried Foods
National Center for Home Preservation: Drying Fruit Leathers
University of Georgia: Preserving Food – Drying Fruits and Vegetables
The Dehydrator Cookbook for Outdoor Adventurers by Julie Mosier
This article is super helpful, thank you so much! I’ve been backcountry camping for years but have never gone the food dehydrator route. I will be this year, so I’m grateful for this article as a resource!
Is it possible to get this in a PDF format so I can print it out and save it?
Other than printing the whole page as a pdf, unfortunately, no. Not yet anyway. But that is a really great suggestion and we are going to look into providing PDF version.
Dehydrating is not only good for backpacking, but for convenience at home. When certain items are on sale, buy extra and dehydrate as much as you can, store them, and then you have them in the pantry waiting to be used when you need them.
This is such a great method when you consider the food that could be lost in refrigerators and freezers due to power outages. A power outage will never affect your dried foods.
Great point! Also when certain produce comes into season dehydrate as much as you can! A big harvest of zucchini? Way too many apples? Dehydrate them for later.
“If you need to speed up the dehydration process, just turning up the heat is NOT an option.”
I disagree to a point. If the food is still very wet you can boost the heat about 20°F above the recommended amount until it is no longer very wet. This is due to water evaporating off the food and carrying heat off with it so that although the dehydrator is 20°F higher the food itself won’t surpass it’s maximum recommended heat. This can cut drying times in half without negatively effecting the food dried so long as the heat is reduced to the recommended heat after 2-3 hours.
Thanks for the response. Under the conditions you mentioned: 1.) starting with very wet food 2.) temporarily increasing the temp then return back to the recommended temp – we agree with you. Under those circumstances, the risk of hard-casing is probably very minimal. And you probably can speed up the drying process a little bit. However, since we are attempting to give direction to a wide-range of dehydrator users (a lot of first-timers), we often rely on the simplest and safest option. Which for most people is going to be: set it to the appropriate temperature and walk away. Thanks for sharing. It’s a very valid insight. Sounds like it isn’t your first dehydrating rodeo!
It really nice article. Thank for sharing this article.
Angel Food cake sliced into thin strips makes great cookie type snacks. I use the crumbs in the jar I store them in as a desert topping or over cereal. I call them angel cookies.
I was dehydrating tomatoes and watermellon at 125 degrees F and realized that my dehydrator must have timed out due to my mistake in setting the timer. The food was 6 hours into 24 hour drying time and may have been off several hours (still quite warm inside dehydrator). Is the food safe to continue drying and eat? I don’t know what to do as this represents a good part of garden harvest. A stupid beginners mistake! Any thoughts on what to do helpful. If not safe to eat, do I just clean and disinfect the racks on the inside? what about fan. I have an excalibur.
Hi Ana, I don’t feel 100% confident in answering this from a food safety perspective. I think the “official” answer for food safety would be “better safe than sorry.” However, since the dehydrator was still warm it sounds like the food wasn’t sitting for hours. Personally, I would turn the dehydrator back on and finish drying them. Then I would put them into containers (but not vacuum sealed) and keep an eye on them for a few days. Does any mold develop? Do they start to smell off? But, ultimately, you’ll have to judge what you’re comfortable with.
In terms of the racks, just wash and sanitize as you would after any batch. For the fan, you’ll want to check the instruction manual, though I don’t think you’d have to disinfect it in this case.