How to Make an Insulated Cozy for Backpacking
This post may contain affiliate links.

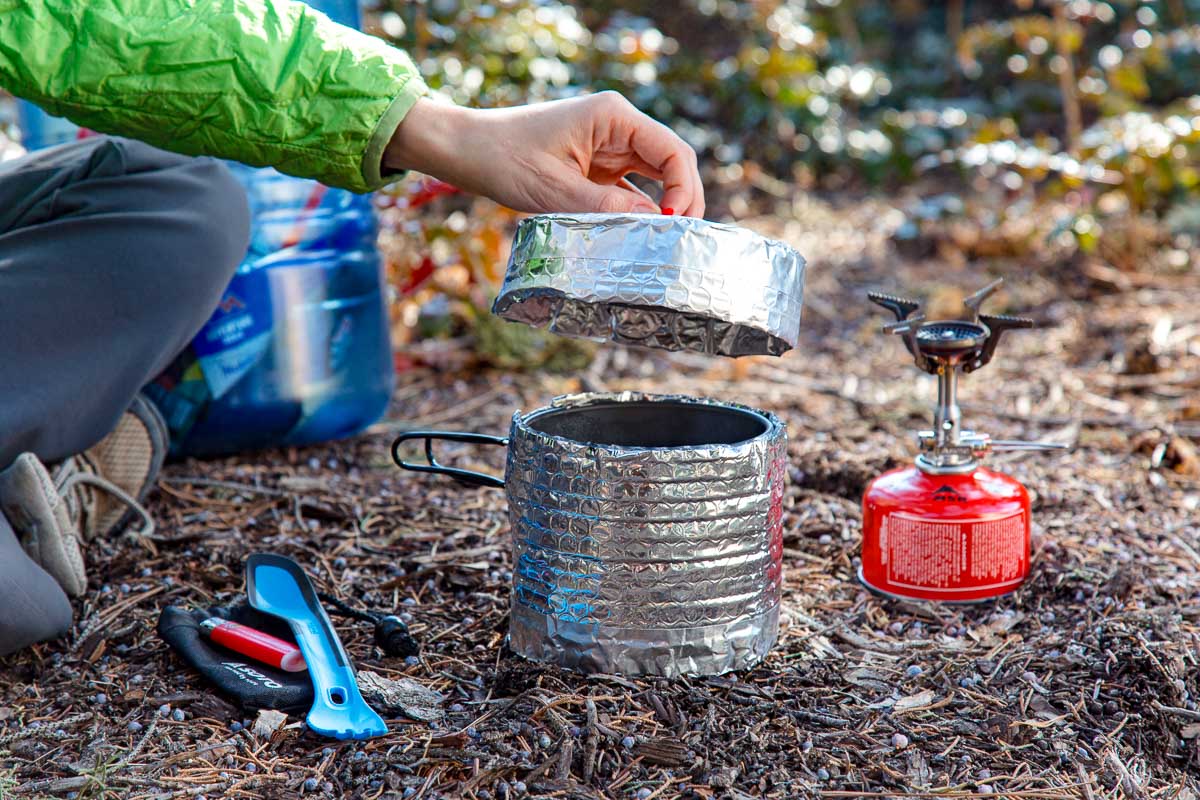
Save fuel, streamline your cooking process, and keep your food warmer, longer with a DIY insulated cozy. This simple and inexpensive backpacking hack is a great way to improve the performance of your backpacking pots, cups, and even just-add-water meal pouches.
One of the simplest and cheapest ways to improve your backpacking cooking experience is to make yourself an insulated cozy. In this guide, we’ll explain the many benefits of a cozy, the material you will need to make one, and step-by-step guides to make your own pot cozy or insulated meal pouch!

What is a backpacking cozy?
A backpacking cozy is an insulating sleeve designed to reduce heat loss from pots, mugs, or anything else you want to keep warm.
What can I make cozy for?
Single-walled backpacking pots and mugs are great candidates!
Most backpacking pots are made out of thin and highly heat conductive materials like aluminum or titanium.
This makes them excellent at transferring heat from your stove to the water inside of them, but that transfer of energy also works in reverse.
If it’s cold outside or particularly windy, the pot will rapidly and evenly cool—and with it the food inside. Placing a pot into a cozy provides an insulating layer to slow down that process.
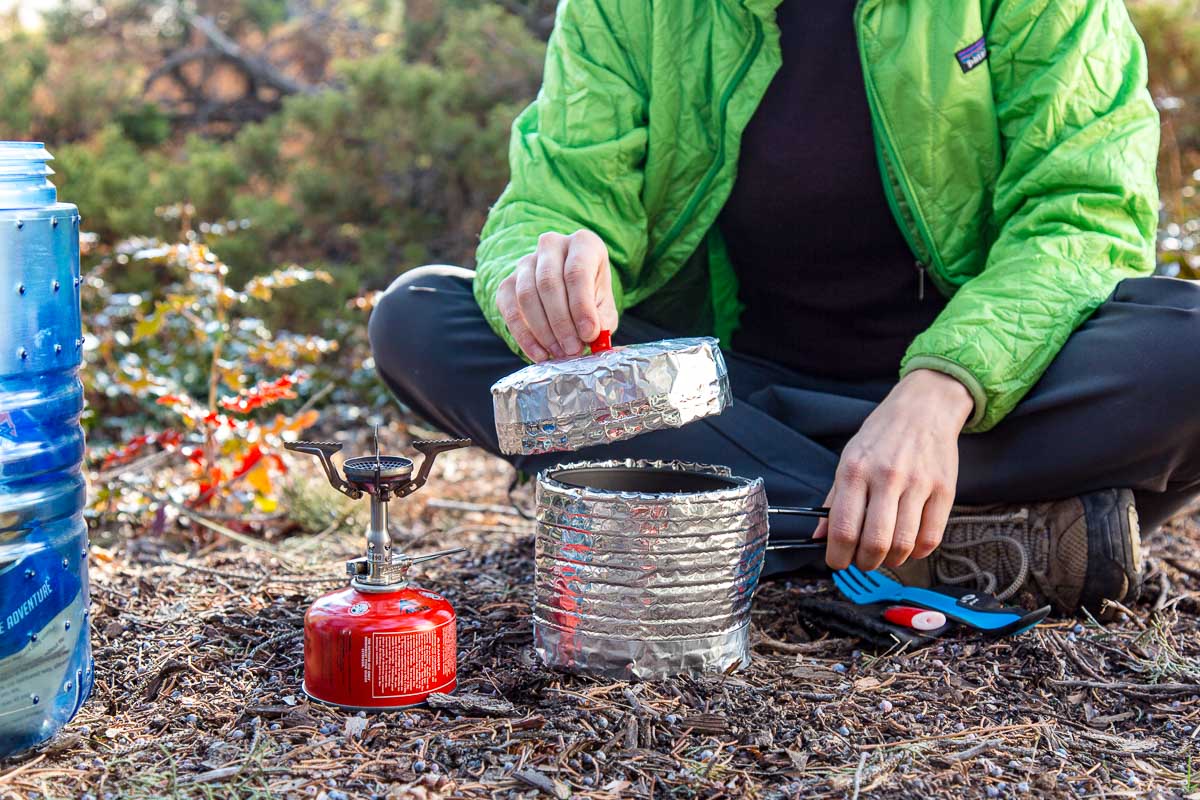
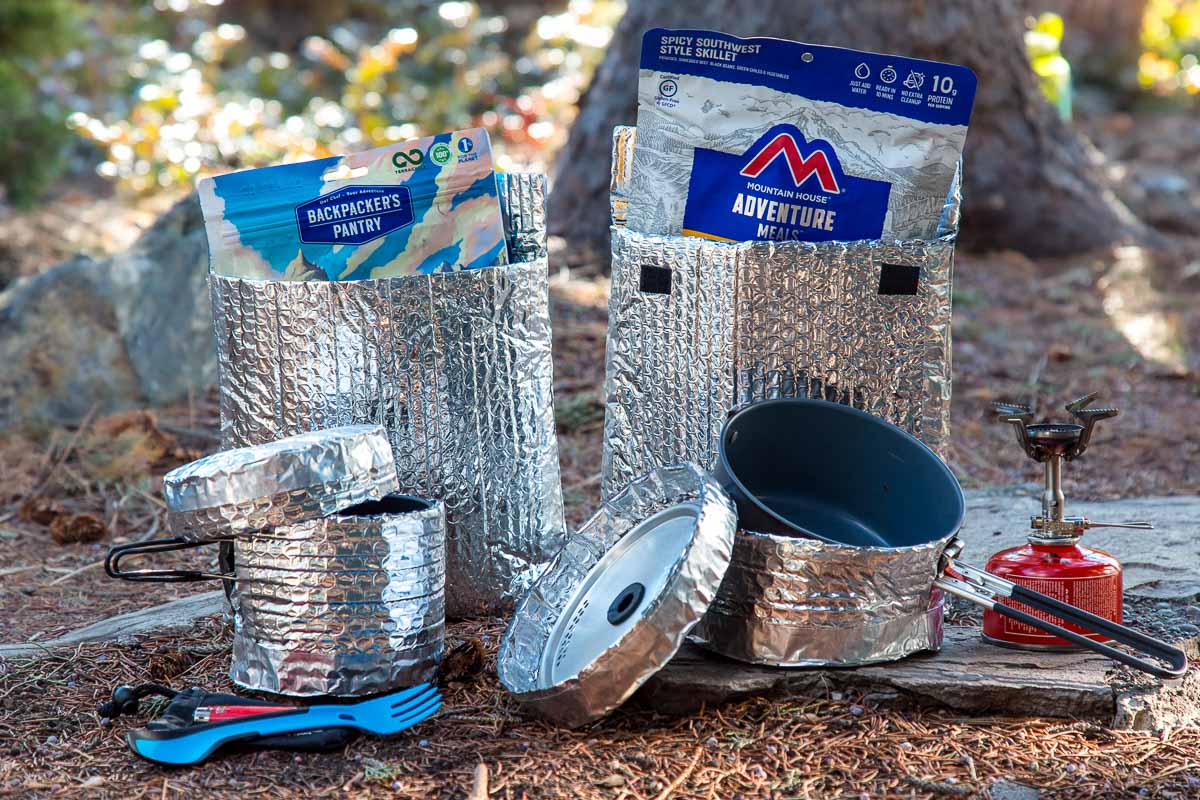
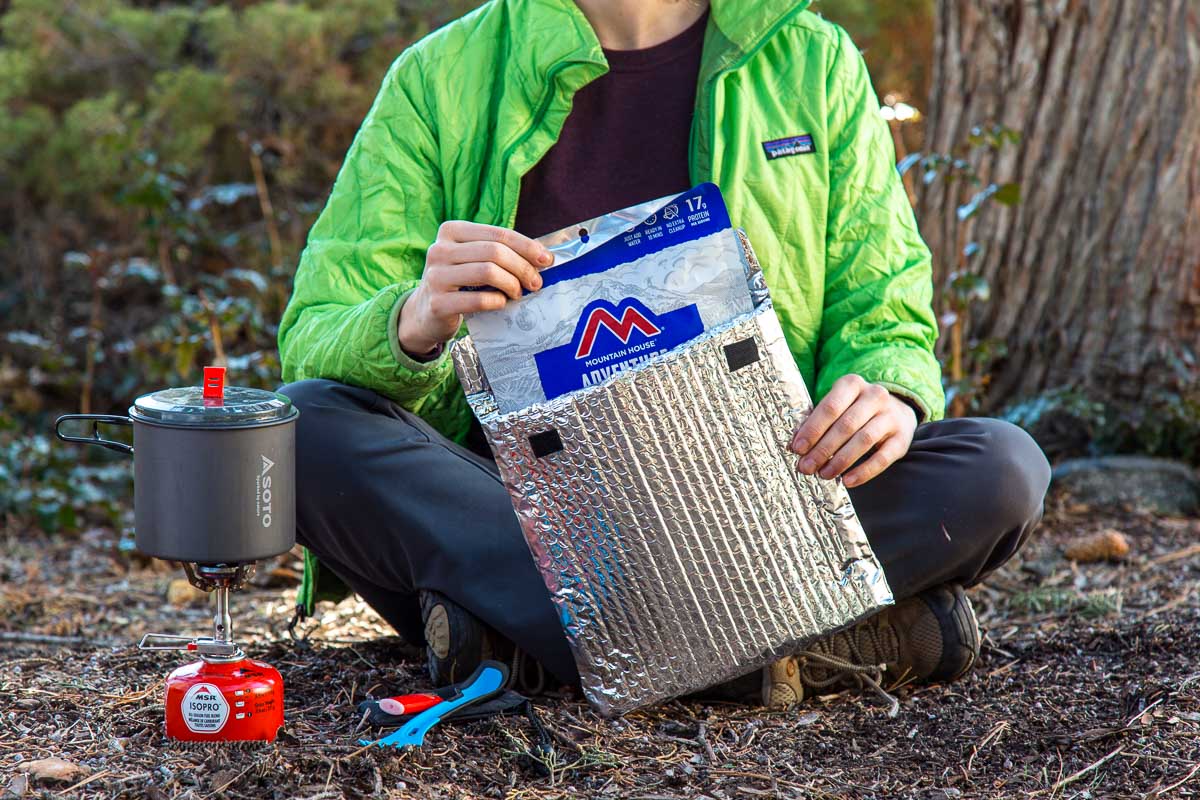
Another great application for a cozy is with just-add-water backpacking meals. Freeze-dried brands like Backpacker’s Pantry and Mountain House come in super thin mylar bags which have virtually zero insulative qualities.
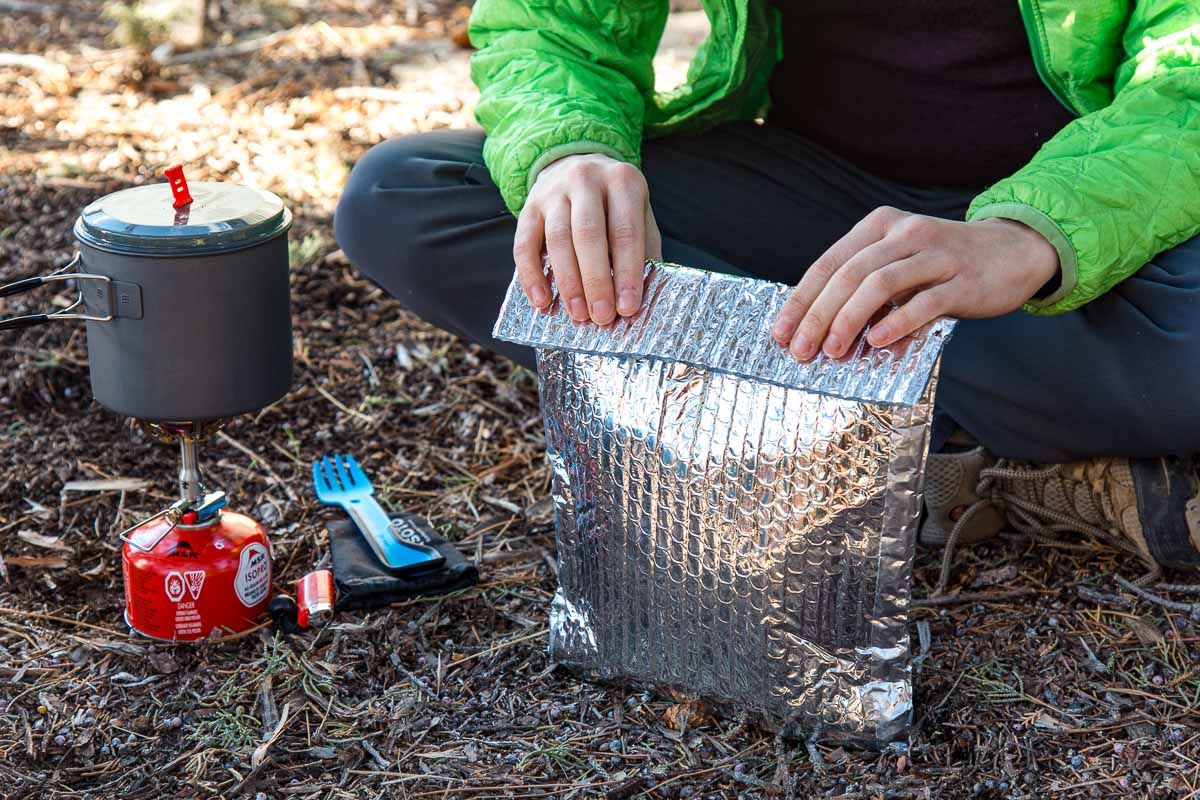
Placing your boil-in-bag meal inside of an insulated cook pouch will trap the heat inside. This will speed up the cook time, and keep your food warmer for a lot longer.
Bonus: When you’re not using your insulated cozy envelope, it can double as a cushy sitting pad!
When should you use a cozy?
While an insulated cozy is useful any time of year, the maximum benefit comes when it’s particularly cold outside: think cooler shoulder seasons, high altitude, and even windy conditions.
Anything that might steal thermal energy from your pot, an insulated cozy will be helpful. Even on summer trips, it can be quite chilly in the mornings.
How does this save fuel?
Many homemade dehydrated meals need to be cooked for 10-15 minutes. Maintaining a simmer to cook for that length of time can consume a lot of fuel, particularly if it’s windy out.
Since the insulated cozy does such a good job of retaining heat, it allows you to skip the simmer step altogether. Just add the dehydrated meal to boiling water and place the pot inside of the cozy. The passive heat energy trapped inside will be more than enough to fully rehydrate the meal.
Pros of Using an Insulated Cozy
- Using an insulated cozy allows for a boil & soak method of cooking (no more simmering!). Now even homemade dehydrated backpacking meals rehydrate just like storebought meals!
- This boil & soak method saves fuel and reduces active cooking time down to virtually zero–just add ingredients to boiling water and place the pot inside cozy.
- Since all you need to do is boil water, you can opt for a simpler and less expensive backpacking stove (something without fancy simmer control). All it needs to do is boil water efficiently.
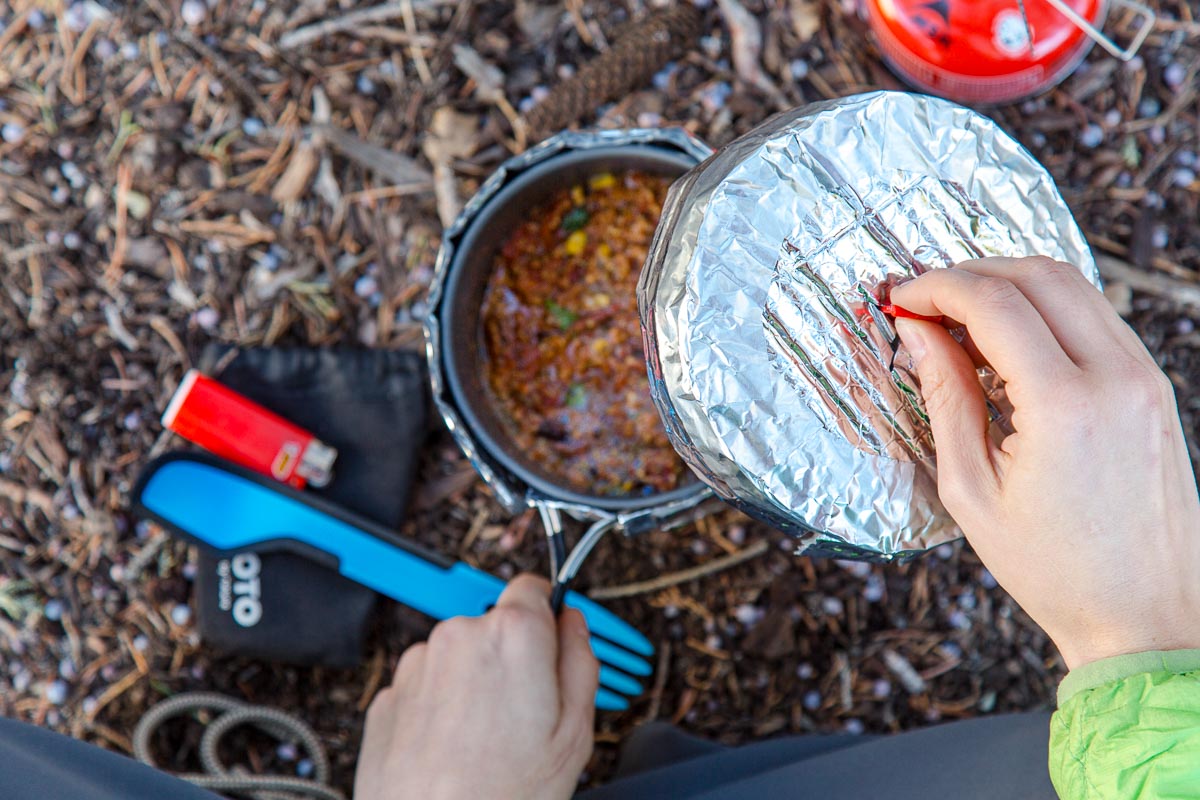
- When your food is ready, you can eat right out of the pot. The cozy makes even a very hot metal pot safe to handle with your bare hands.
- Your food will stay warmer for longer. So now you can actually sit back, relax and enjoy your meal. No need to scarf it down before it gets cold.
If you want to learn how to make your own cozy, we have all the information you need to get started below including a material list and step-by-step instructions to make a pot cozy or a pouch-style cozy.

Materials needed
We were able to pick up the following materials at Home Depot for less than $15, and that’s for the full rolls. Your cost-per-cozy will end up being much less as you can make a bunch of cozies with the materials listed.
Reflectix (Ayr foil in Canada): While there are lots of different insulative materials that can work, we’ve found Reflectix to be the best option for backpacking. It consists of two 96% reflective layers of film bonded to two internal layers of heavy gauge polyethylene bubbles.
…or a Car Sun Shade: If you’re looking to find small quantities of Reflectix, car sun shields are often made out of Reflectix and can be easily cut up.
Reflectix Foil Tape or Gorilla Tape: We’ve made a few cozies using both tapes and both Reflectix Foil Tape and Gorilla Tape we can say with confidence that both will work. However…
Reflectix Foil Tape is heat rated to 248 F and is less than half the weight of Gorilla tape. So if you’re cutting off the handle of your toothbrush to save grams, use the Reflectix tape. But, Gorilla Tape is heat rated to 200 F (which is sufficient) and has a lot more practical applications after you buy a roll of it.
Velcro: Use sticky-back velcro when making an insulated food pouch for bagged meals to secure the top flap.
Sharp Scissors: Reflectix is really easy to work with and cuts well with just normal crafting scissors.
Chip Clip: (not pictured above) We find that a chip clip, or a second set of hands, makes folding and taping the pouch cozy much easier.
Step by step: Pot Cozy
1. Find the height of your pot, measuring just below the lip. Wrap the Reflectix around the circumference of your pot to determine the length you’ll need. Better to be a little long, than a little short.
2. Using your measurements, cut out a piece of Refelctix. This is the sidewall of your pot cozy. Double-check the fit around the pot: the ends should meet together but not overlap. The cozy should be snug but not overly tight around the pot.
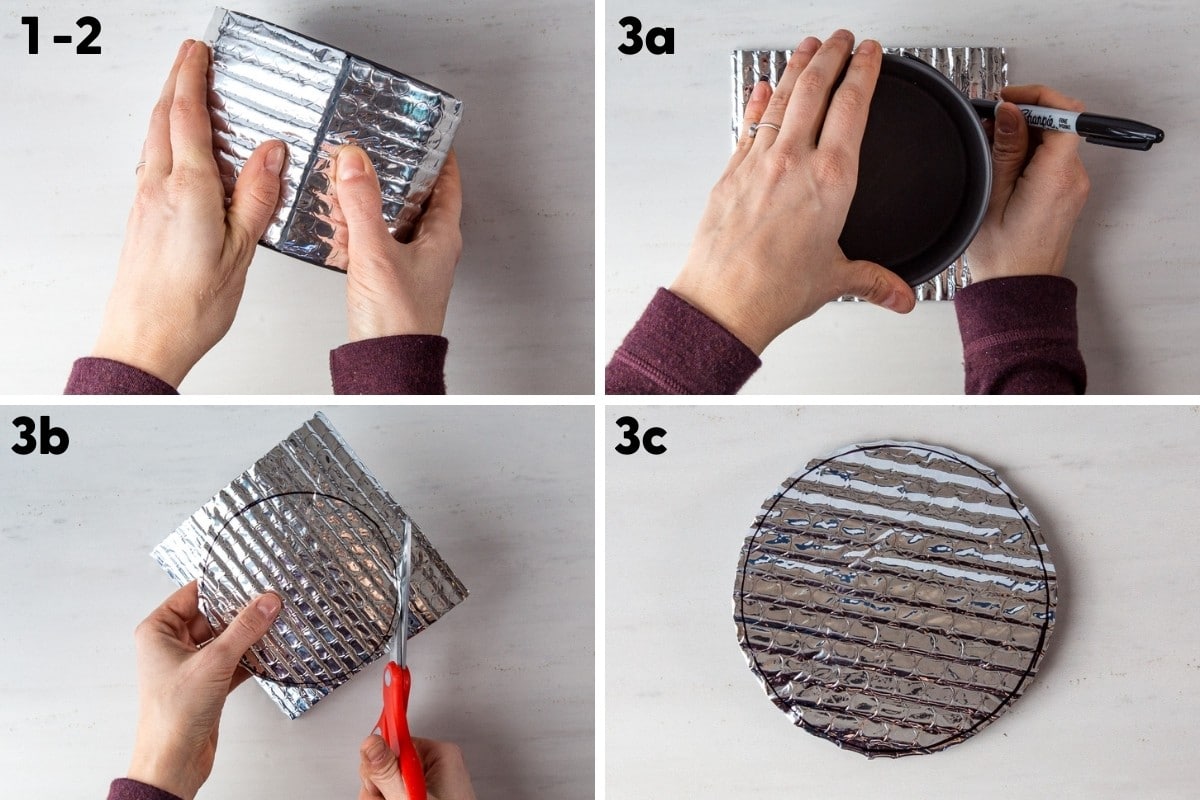
3. To find the measurement for the bottom of the cozy, place your pot on a piece of Reflectix and trace around the outside of the pot. Cut out this circle with at least a ⅛” allowance around the drawn line.
4. Cut a strip of tape that is the length of the sidewall piece plus an inch or so. Cut a second piece of tape that is the height of the sidewall piece.
5. Take the first piece of tape (cut to length) and lay it flat on your work surface with the foil side down. Remove the backer tape and set it aside. It’s best to remove the backer slowly, trying to keep it flat against the surface, which will help prevent the aluminum tape from curling.
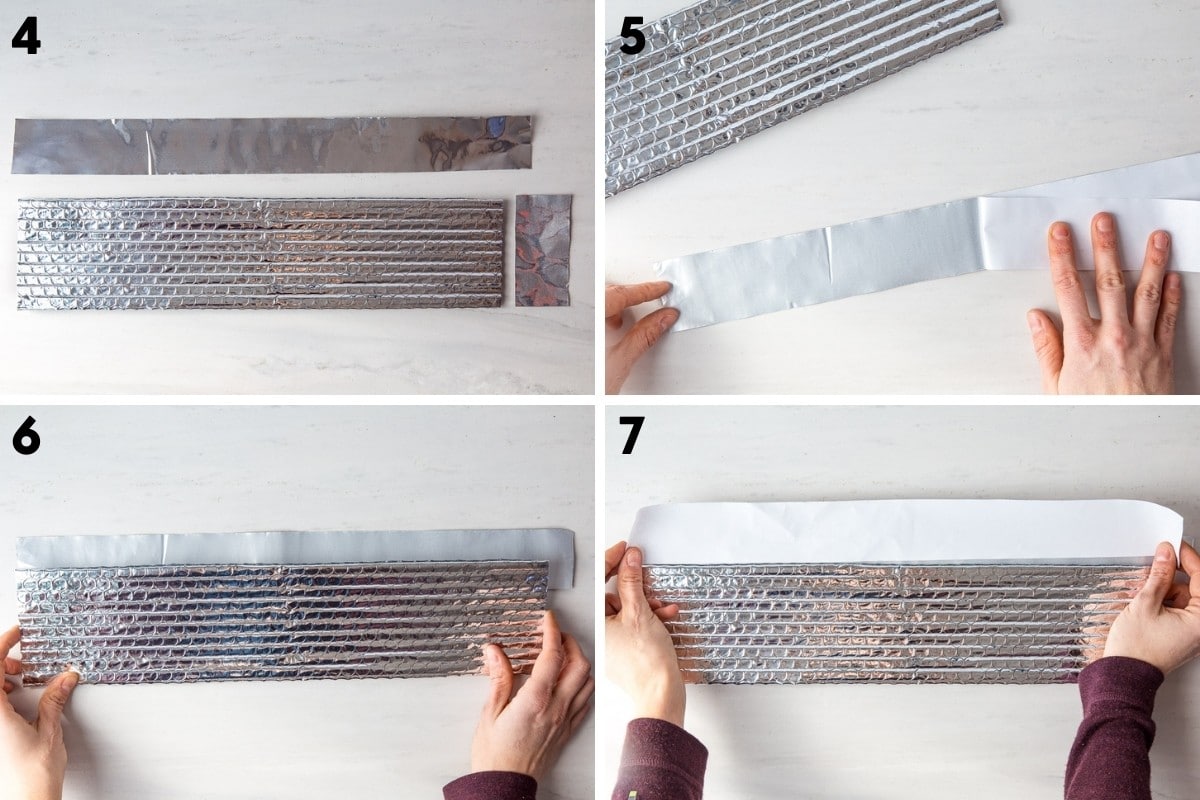
6. Lay the sidewall piece on half the width of the tape. Press to secure.
7. Re-attach the backer to the exposed length of tape (waxy side to the adhesive).
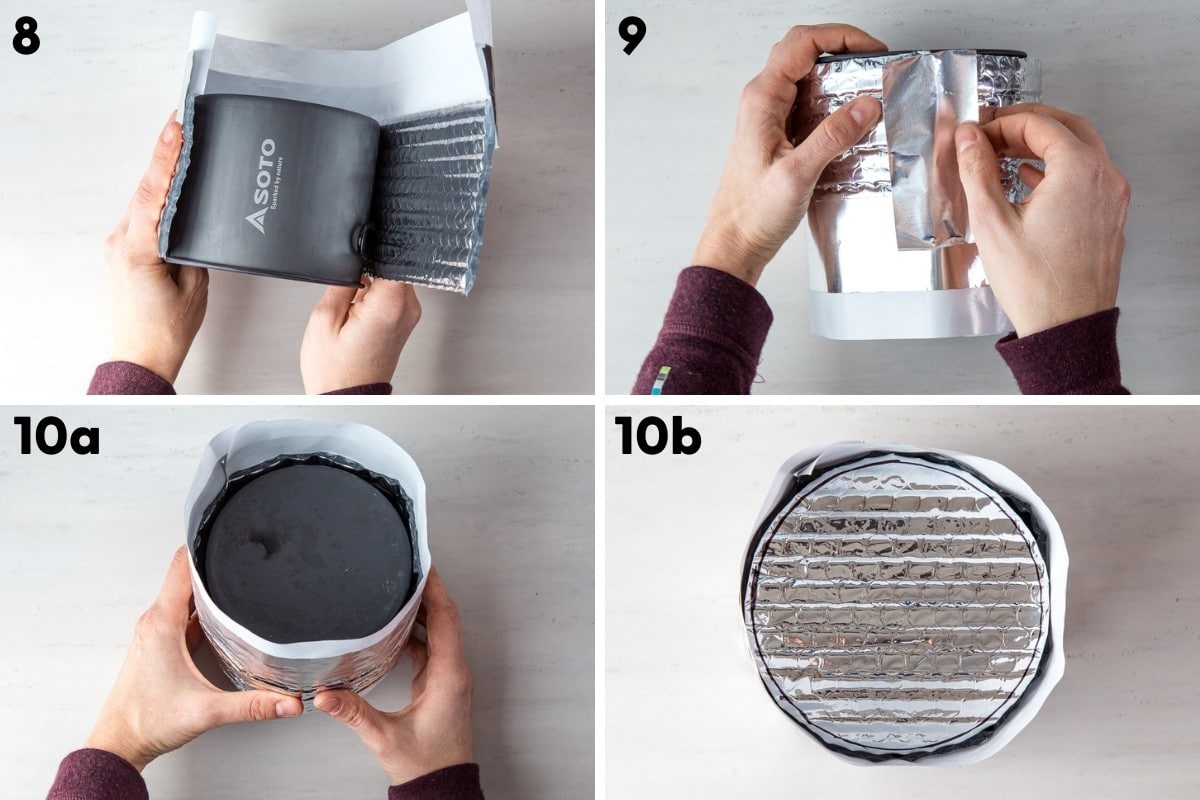
8. Wrap the sidewall around your pot, with the tape towards the bottom of the pot and the foil side of the tape facing out. Secure using the small bit of exposed tape.
9. Use the second piece of tape (cut to height) to tape the seam in the sidewall.
10. Turn the pot and cozy upside down so the tape is facing up. Place the bottom circle onto the bottom of the pot, double-checking the fit. It should overlap the Reflectix that makes up the sidewall, but not extend out past the wall.
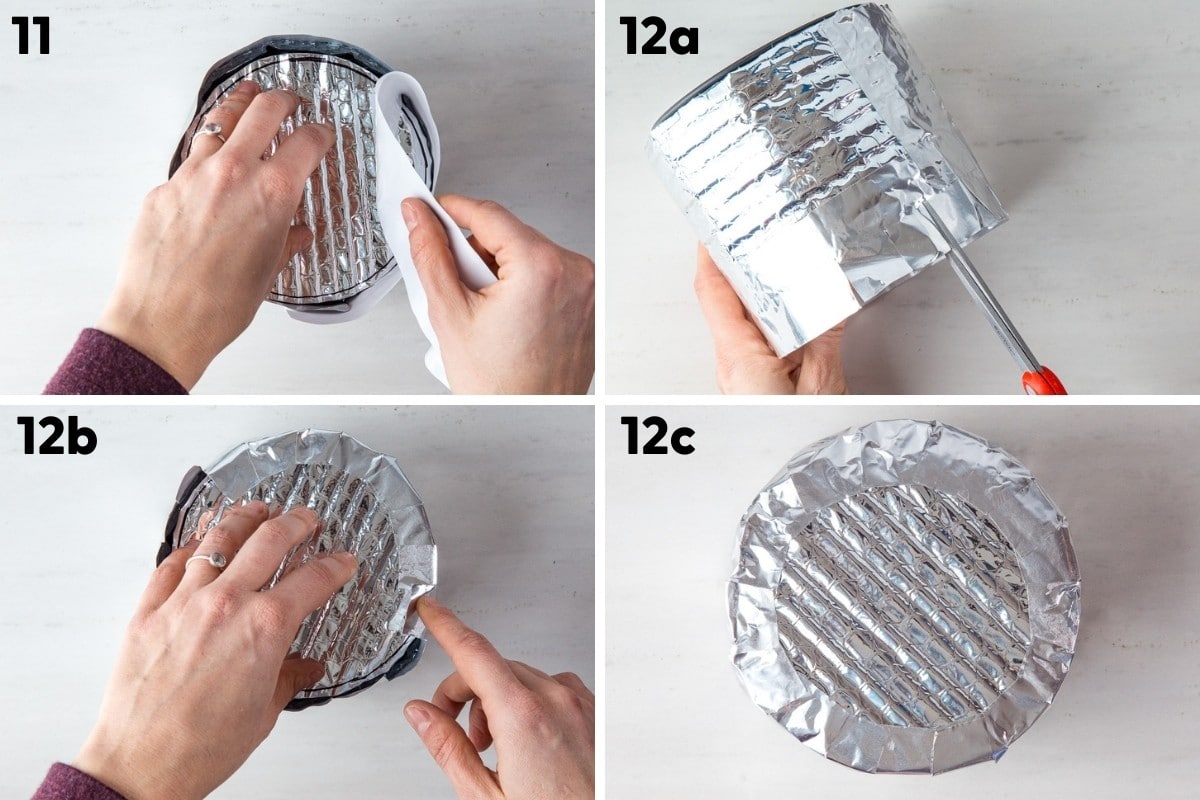
11. Carefully remove the backer tape, using one hand to hold the bottom circle piece in place.
12. Using your scissors, cut perpendicular slits into the tape at 1”-2” intervals. Then, secure each section one by one, ensuring that there is no gap between the bottom piece and the sidewall.
13. If needed, cut the sidewall to accommodate your handles. Here are two ways of doing this:
- Handle Design 1: For pots and mugs with collapsible handles that pop out and come together like Evernew, TOAKS, Vargo, and Snowpeak mugs/pots, cut two parallel lines that are inside the width of your handles. Only cut down as far as needed to accommodate the handles. Leave this flappy piece in place (reinforce it with additional tape if you like).
- Handle Design 2: For pots that use a pot grabber, or have longer handles close to the top rim of the pot (like the MSR Ceramic and Trail Lite pots), cut a notch in the top of the cozy just big enough for the handle. The lid will cover the missing piece to bridge the thermal gap.
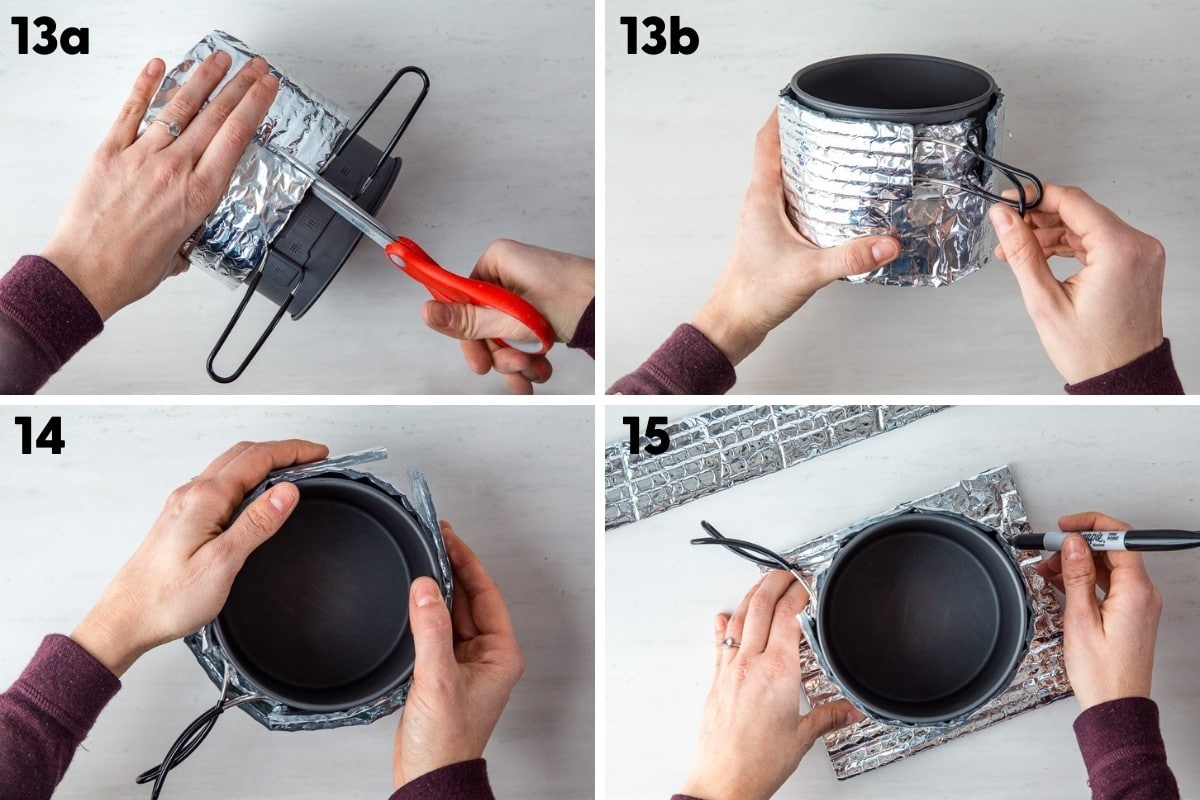
14. On to the lid! Cut a length of Reflectix that is 1”-2” wide and long enough to wrap around the base of your cozy with the pot inside. This is your lid sidewall.
15. To find the measurement for the top of the lid, place your pot in the cozy on a piece of Reflectix and trace around the outside of the cozy, OR if your lid extends past the outside of the cozy with the pot in it, use that to draw your circle.
16. Cut out this circle with at least a ⅛” allowance around the drawn line. If needed, cut a slit for the lid’s D-ring or handle to go through.
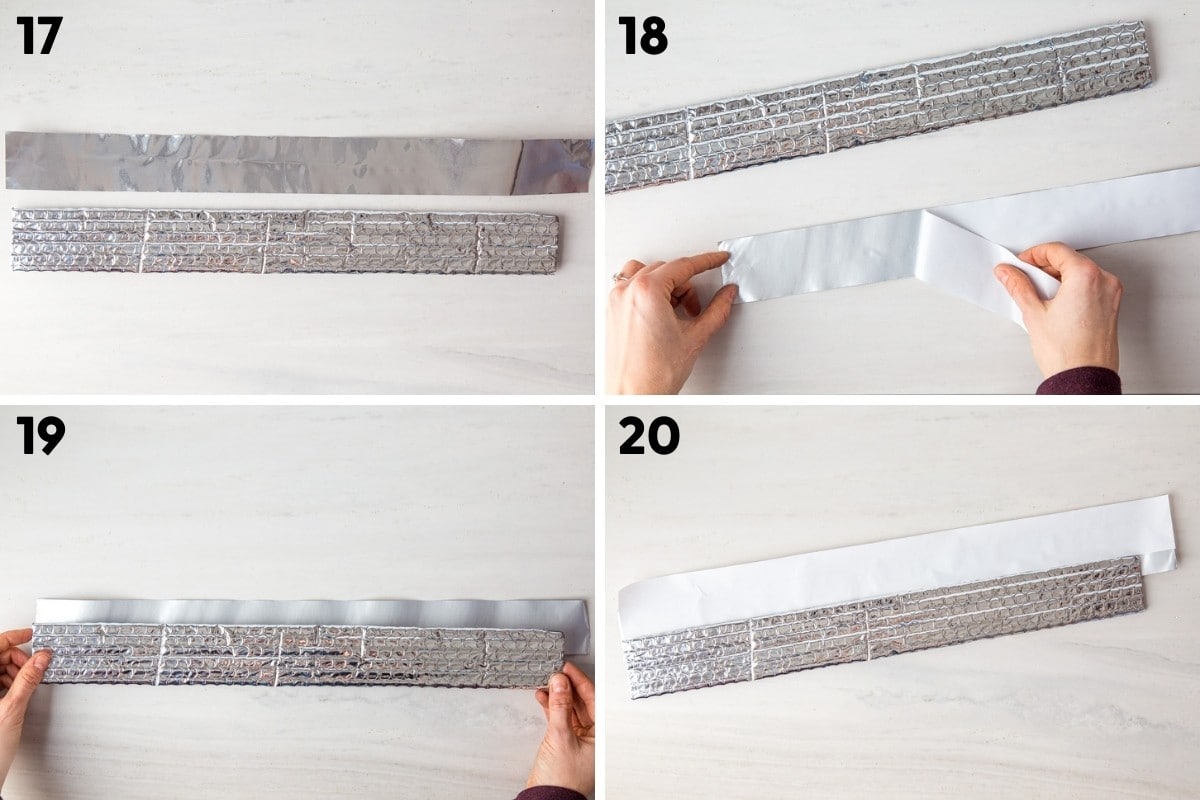
17. Cut a strip of tape that is the length of the sidewall piece plus an inch or so.
18. Take the first piece of tape (cut to length) and lay it flat on your work surface with the foil side down. Remove the backer tape and set it aside.
19. Take the lid sidewall and lay it on half the width of the tape. Press to secure.
20. Re-attach the backer to the exposed length of tape (waxy side to the adhesive).
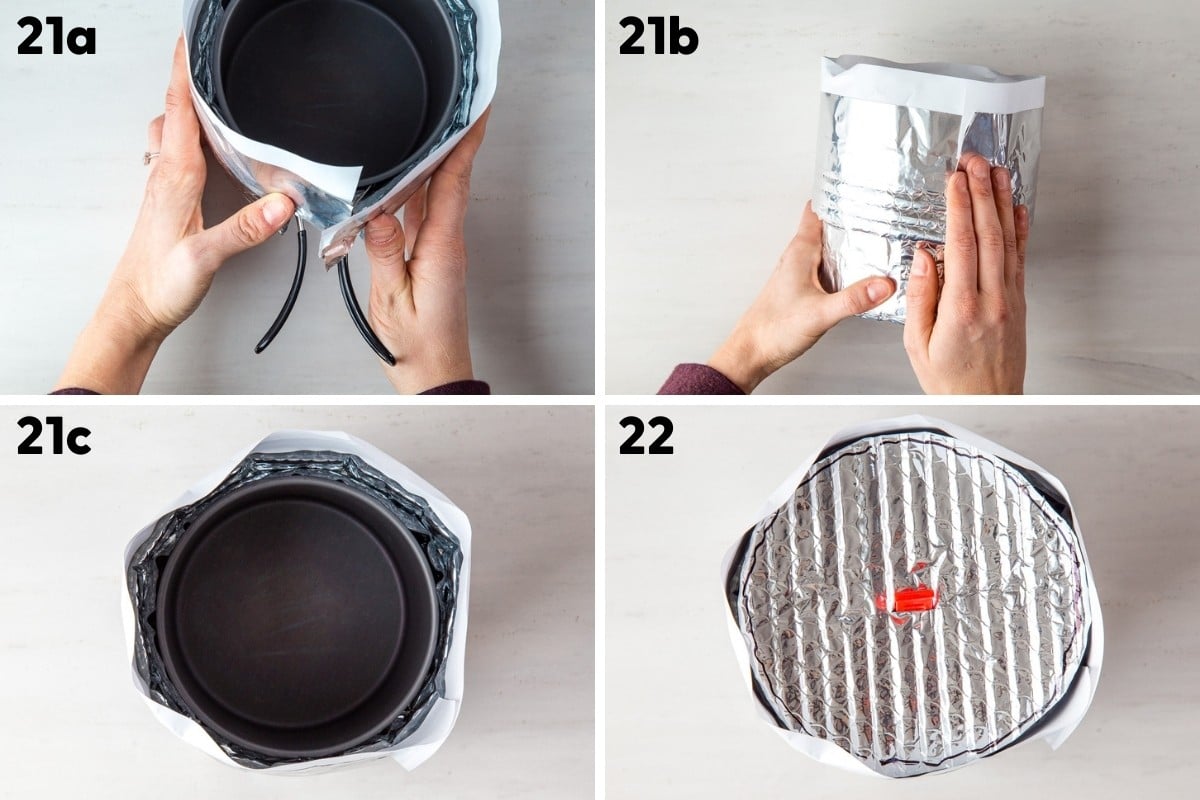
21. Wrap the lid sidewall around the cozy base (with your pot in it), with the tape towards the top of the pot and the foil side of the tape facing out. Secure using the small bit of exposed tape.
22. With the pot lid in place, set the top circle onto the lid, double-checking the fit. It should overlap the Reflectix that makes up the sidewall, but not extend out past the wall.

23. Carefully remove the backer tape, using one hand to hold the top circle piece in place.
24. Using your scissors, cut perpendicular slits into the tape at 1”-2” intervals. Then, secure each section one by one, ensuring that there is no gap between the lid piece and the sidewall.
25. If needed, notch the lid sidewall to accommodate your handles, making the gap as small as possible.
Step by step: Pouch Cozy
1. Determine the size of cozy you need. If you cook a variety of freeze-dried meals, we’ll make this easy for you! You’ll need a piece of Reflectix that is 9½”x24″ (if you bought a roll, it’s likely that the height is already 24″). This will create a pouch wide enough for Mountain House meals and tall enough for Backpacker’s Pantry meals.
Otherwise, find the largest size bag you use and measure the width and height. Add about 1 inch to the width, and double the height measurement and add 5 inches, and cut out a piece of Reflectix to size–so, (W+1)x(H+H+5).
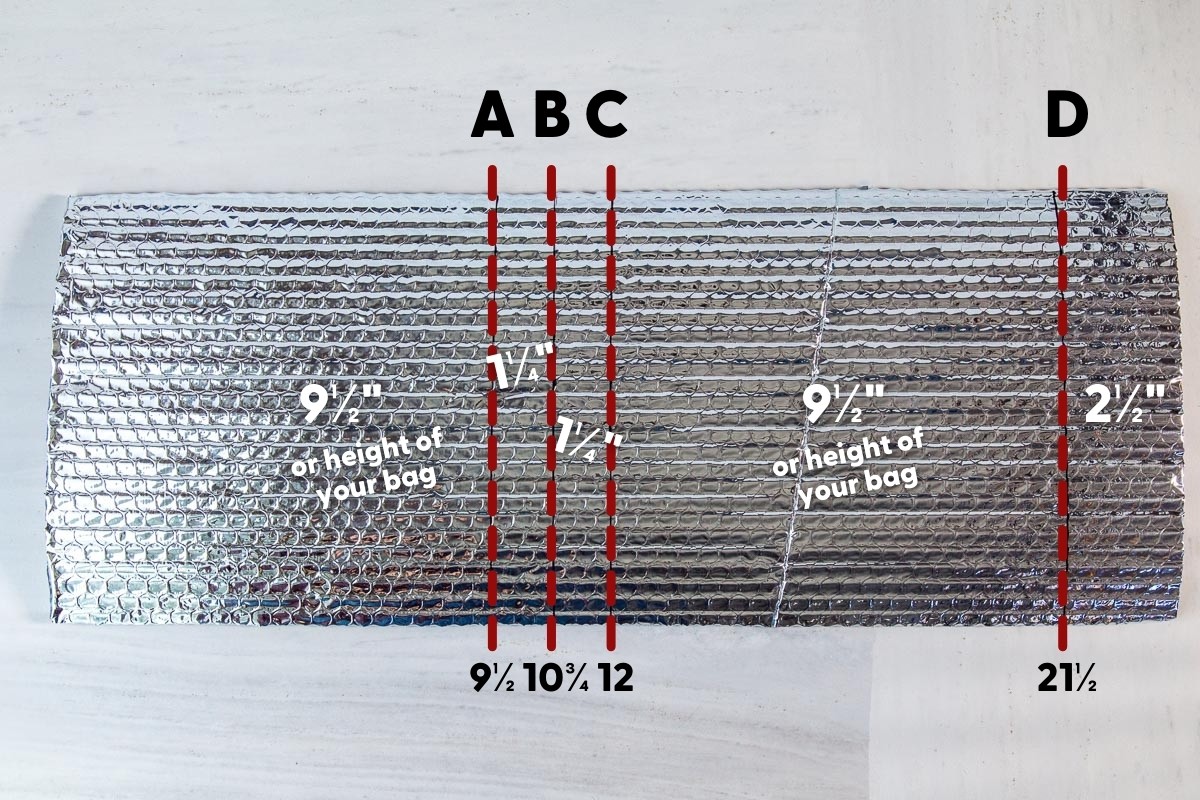
2. Measure and draw lines where you will be folding the Reflectix. For the piece in our example (9½”x24″), draw lines (measuring from the bottom edge) at 9½”(A), 10¾”(B), 12″(C), and 21½”(D). If you’re making a different size bag, you will need to adjust these lines based on your height measurement. The middle lines need to be 1¼” apart, and the top line will be about 2½” from the top edge to create the folding flap (take a look at the diagram, it should help guide you!).
3. Cut two pieces of Reflectix tape that are as long as your height measurement–in our example, 9½”.
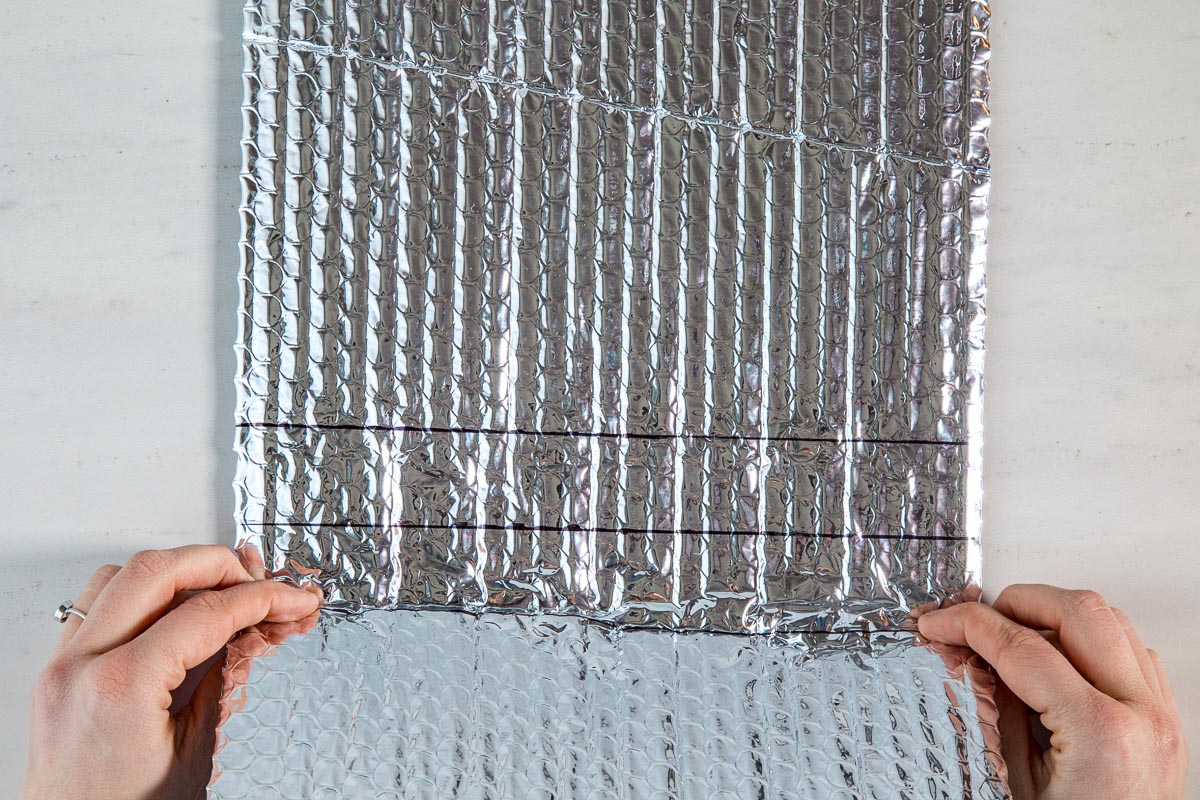
4. Fold and crease the Reflectix piece at the lines. You’re not going to get crisp, precise creases, but you want to have a little bit of bend already in the material for the next steps.
5. Bring the bottom edge up to line D. You’ll see that lines B and C create a flat base.
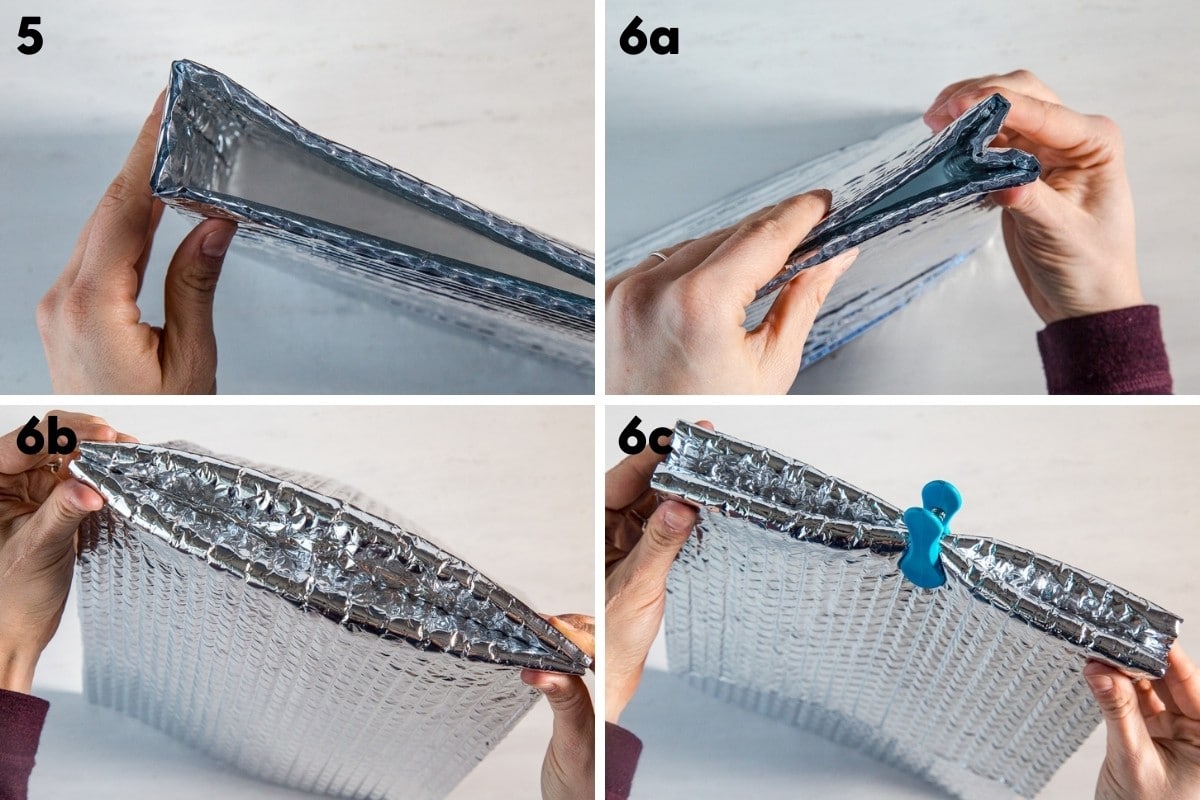
6. Pinch the edges of that “base” together so that the material folds upward into the pouch. At this point, I like to use a chip clip or enlist a friend to hold this shape as I tape.
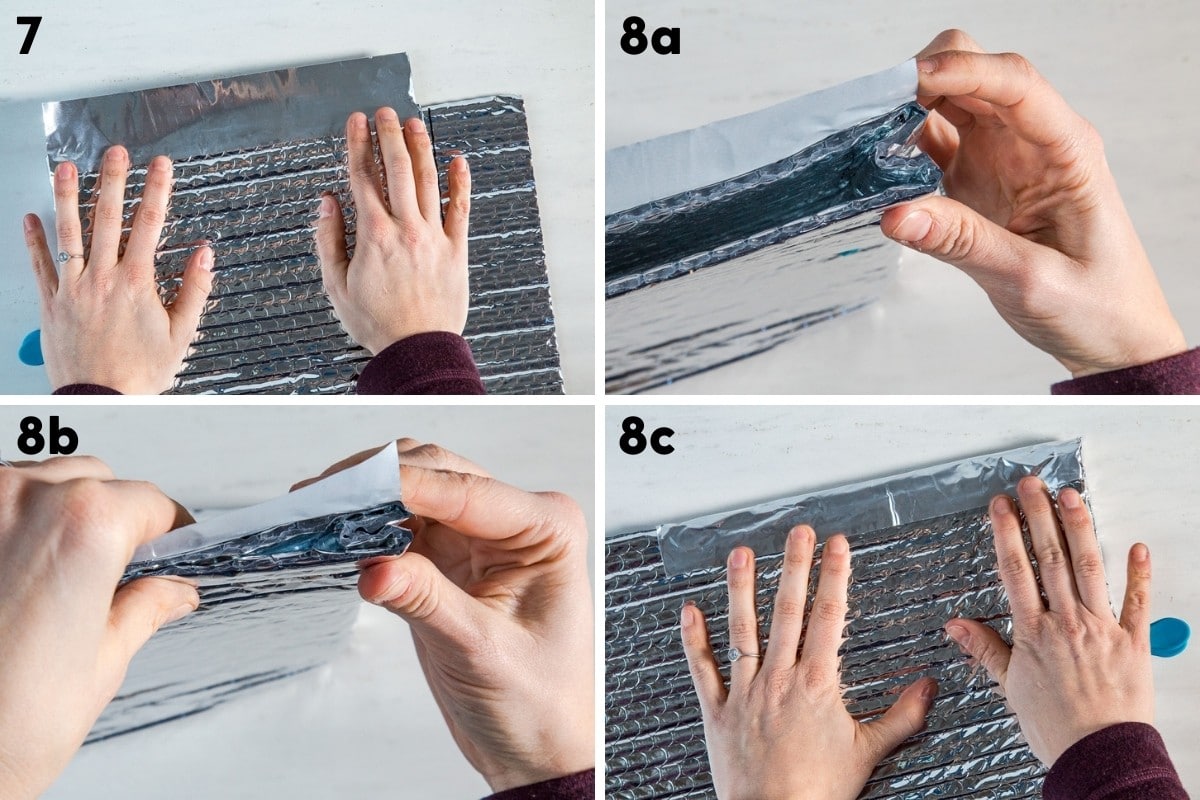
7. Remove the backing from one of the strips of tape. Secure half the width of the tape to a side of the pouch.
8. Making sure the edges of the base are really squeezed together, fold the tape over the seam and secure it to the back side of the pouch.
9. Repeat steps 7 & 8 with the other side.

10. Take two 1″ pieces of velcro and secure them to the pouch flap. We find this trick works best when the loop and hook sides are stuck to each other. Remove the adhesive backer and fold the flap into place, applying pressure so that the velcro sticks to the pouch. When you lift the flap, the one side of the velcro will be attached to the flap and the other side will remain attached to the body of the pouch.
Other FAQs
What do I do with all the extra Reflectix?
If you bought the 10 foot roll of Reflectix, then you can use the extra to make a cozy for your cooler. Even an advanced cooler like a Yeti can benefit from an additional layer of reflective protection on the outside.
How much weight will this add to my pack?
Not much at all! The cozy we made for our 1L pot weighs 28g, the cozy for our 1.3L pot is 30g, and the large pouch cozy is 39g.
We just did an experiment with our camp cups that don’t have lids. We created a lid from the reflectix & tape to fit over the reflectix sleeve as in the instructions. We then compared the temperature drop of a standard cup, one with just a simple round of reflectix as a lid & no reflectix sleeve, and one with a reflectix sleeve & fitted reflectix lid. Starting at 210F and measuring for 25 minutes: the standard camp cup cooled to 129F, the simple reflectix lid no sleeve to 160F, and the sleeve with lid insulated to 174F.
How do you store the pot cozy in your pack without destroying it? I guess you can leave it on the outside of the pot. But if your pot is in a nested kit, this might not be an option.
We leave our pot inside the cozy and use a rubber band to attached the cozy lid on top. This gives the cozy some rigidity and prevents it from getting smashed in our pack. We then put our fuel, stove, and dishwashing material inside the pot, so we’re using the available space inside the pot. If your pot is inside a nested kit that might make things difficult, but most of the kits we’ve seen have the pot on the outside (holding all the nesting items inside of it).
Question: Will the reflectix melt if I cook with the cozy lid on? Because of my lid handle it would be hard to slide it on post cooking so I’m wondering if anyone has tried this so I can just skip a whole step of transferring from cooking to sitting mode.
Great diagram, thanks for doin tha lahhhds work
What type of pot are you using? Is it possible to cut out a slit for the handle? We would be very hesitant about getting the Reflectix material anywhere near the open flame. While it can handle the heat of pot just fine, an actual flame will melt the material. For some perspective, the bottom of the pot might be between 212-300 F if you are boiling water. But the flame from you stove is around 1900 F.
Just had to leave a message to say thanks a million you guys – that is an excellently put together instruction manual, exactly what I was looking for!
can I heat the pot with a cozy on it using an alcohol stove?
No, unfortunately the Reflectix material used to make the cozy will melt if exposed to direct heat. Heat the water/food in your pot using the stove, then remove the pot from the stove and place it in the cozy.
is reflectrix strong enough that I can put it under my sleeping pad for extra padding and insulation?
You could probably use it as an “add-on” to your sleeping pad. Reflectix on its own only has an insulation rating of R-1 but paired with an already insulative sleeping pad it could help push the overall R rating of your system up. It would definitely be cheaper than having to buy a different sleeping pad for colder temps! In terms of padding, it’s fairly thin so I’m not sure how helpful it would be.
that’s a good observation. I guess for that thin, R1 isn’t bad. I was thinking of it’s value as an add on to a sleeping pad to make a wood floor shelter be a little more soft. Or do you think it would get crushed? And I also wanted to know if you thought your cozy could get damaged if on a pot being heated by a little alcohol stove. Thanks for those great instructions. By the way, I plan on using aluminon foil tape rather than duct tape