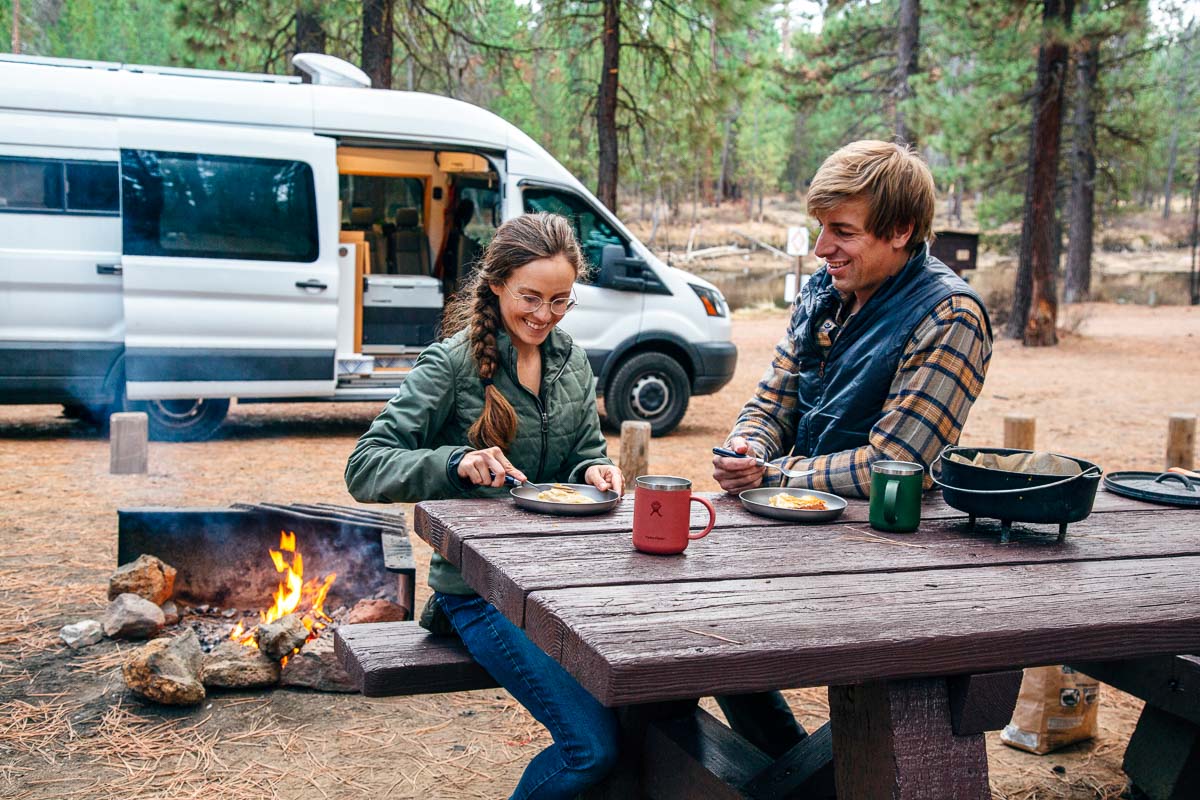
Dutch Oven Apple Pie
This post may contain affiliate links.

When it comes to camping desserts, this Dutch oven apple pie can’t be beat! With a flaky butter crust and soft tender apple filling, with this recipe, you can enjoy the taste of freshly baked homemade apple pie right at your campsite.

Making apple pie from scratch at a campsite in a Dutch oven is by far the most ambitious recipe we’ve ever developed for Fresh Off The Grid. It is also – without a doubt – one of the most epic camping desserts we’ve ever experienced. Pull this one off on your next camping trip and you’ll be lauded as a culinary genius for years to come.
Now we’ll be straight with you: There is nothing “quick and easy” about this recipe. To put it mildly, this recipe is, er, well, involved. If you just want to enjoy an apple pie without a lot of time and effort, there is no shame in buying a pie from the store and warming it in a Dutch oven.
But if you’re in it for the challenge, the glory, and the exhilaration of being able to tell people you baked an apple pie from scratch at a campsite, then we’re with you all the way. You’re our kind of crazy. And we developed this recipe to help you achieve camp cooking greatness.
Some specialty gear is required for this recipe, which we will cover below. A base-level understanding of how a Dutch oven works will definitely come in handy as well. Other than that, we’re ready to rock and roll. So let’s get into it!
Dutch Oven Apple Pie Ingredients
While this recipe might be a bit involved, the ingredients are not! In fact, this apple pie only uses a handful of ingredients:
Apples: For all of our tests we used Pink Lady apples. They have a great balance of sweet, crisp, and tart that holds up well when baked. You can also try Honeycrisp, Granny Smith, Braeburn, Jazz, or Jonagold. Just stay clear of overly sweet apples (Red Delicious, Fuji, Envy, Sweet Tango), which will basically turn into apple sauce when cooked.
Butter: We used unsalted butter in this recipe. If using salted butter, omit the salt in the crust dough.
Flour: Nothing fancy here, we developed this recipe using white AP flour.
Sugar: Granulated cane sugar.
Cinnamon: Goes a long way to deliver that classic apple pie flavor.
Corn starch: Corn starch helps combine the juices from the apples into a nice, syrupy filling.
Egg: A beaten egg brushed over the top of the crust will produce a beautiful golden brown pie once baked.
Essential Tools
Cooler: A cooler is essential for this recipe to work. The dough needs to be cold before you roll it out. Not cool. Not kind of cold. Really cold. We have an electric cooler in our campervan, which is what we used. We also own a RTIC cooler. If using an ice cooler, seal it in a waterproof container so the dough stays dry!
10” Dutch oven: The ingredient ratios for this recipe were developed for a 10-inch Dutch oven. We recommend a “camping dutch oven” that has little feet on the bottom which raises the oven above the coals, and a flat lid with a flange for holding coals on top. Don’t use your enamel-coated Dutch oven from home on a campfire – the intense heat can damage the coating.
Lid lifter: A lid lifter lets you safely remove the lid to check on your pie’s progress. If you don’t have one, heat-proof gloves will also work.
Parchment paper: One secret to easier Dutch oven baking is to use liners where possible. These pre-cut circles of parchment paper are super convenient!
Chimney starter: This recipe calls for lots of coals, and a chimney starter will help them get going quicker. We love this one, which folds down flat for easy storage in our gear bin.
Flat metal skewers: Laying metal kebab skewers on top of the Dutch oven for the lid to rest on will create a vent to allow steam to release, so your pie will turn out golden brown (not soggy!)
“Rolling Pin”: We don’t camp with a rolling pin but find that a wine bottle or smooth-sided water bottle works just fine!
Silicone Brush: This is the perfect instrument for brushing on the egg wash. It’s also great for marinades, so it’s worth picking one up.
How to Make Dutch Oven Apple Pie
At Home
While this recipe can be made entirely at a campsite, preparing the dough at home will save you time and reduce cleanup.
At home, mix the dry ingredients together in a medium mixing bowl until thoroughly combined.
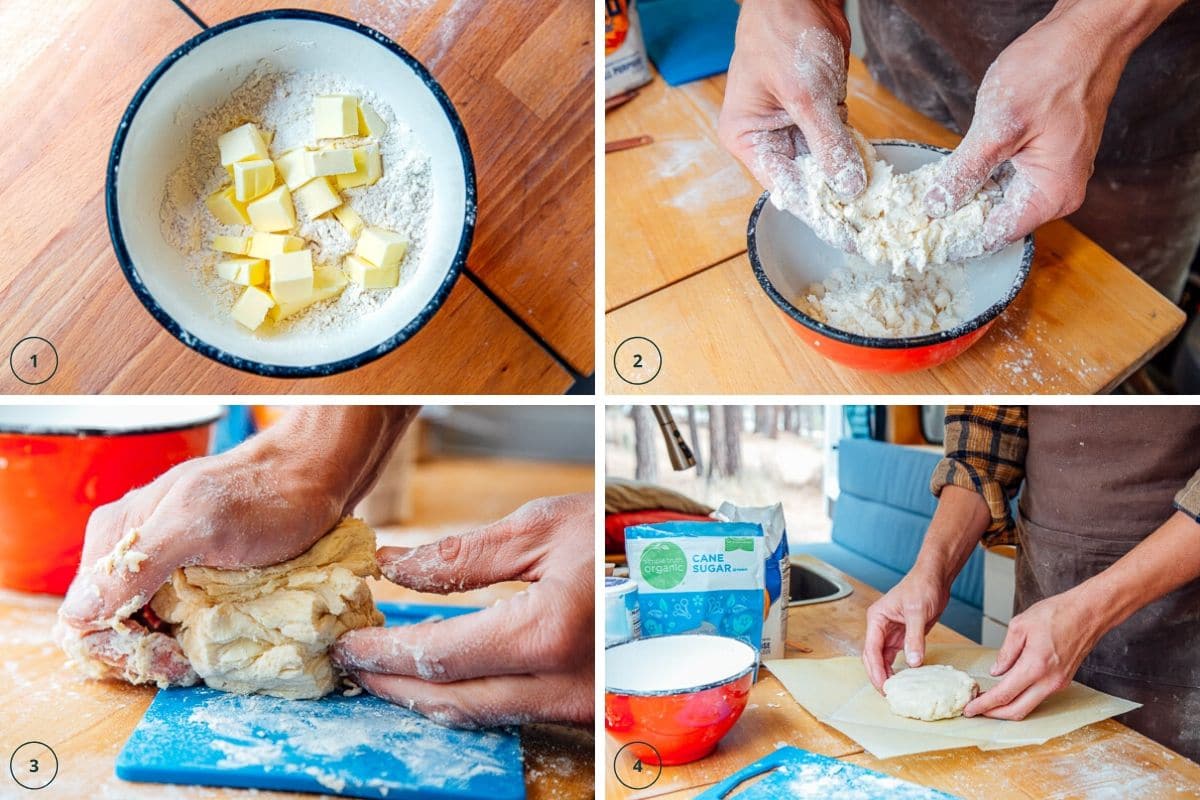
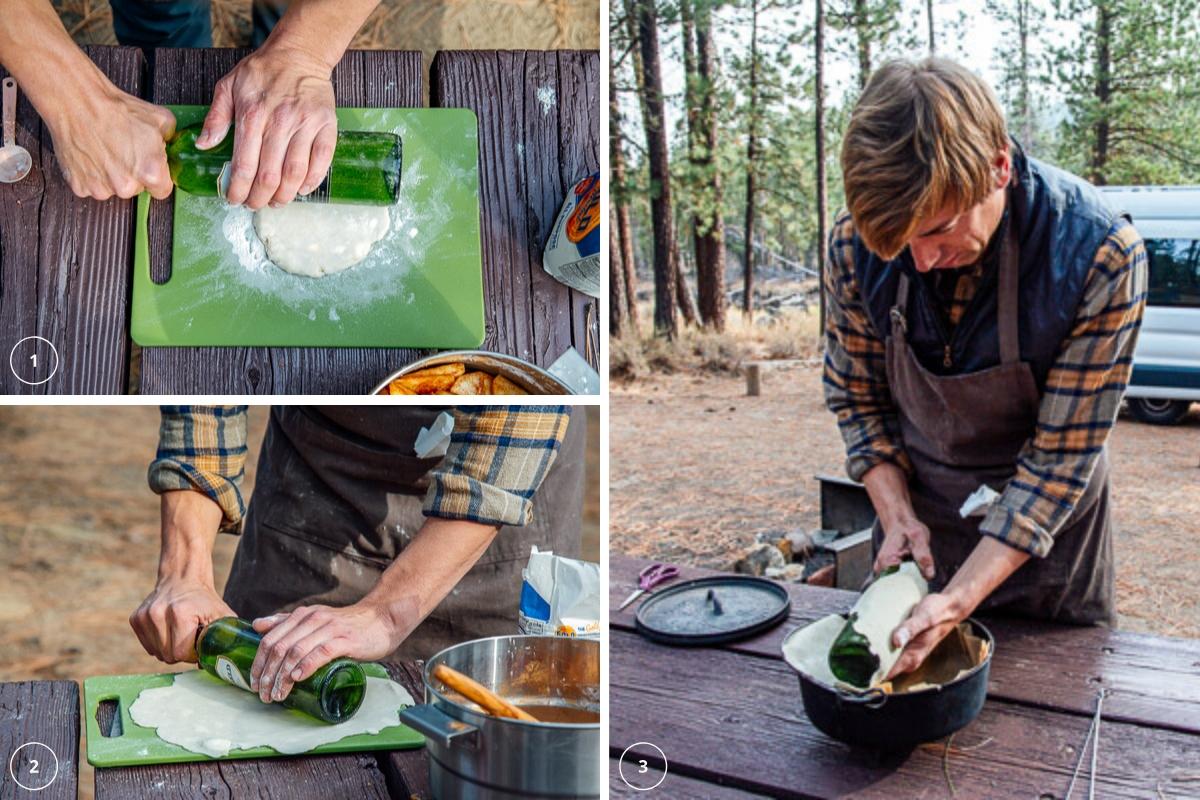
Take a cold stick of butter out of the refrigerator and using a chef’s knife cut into ½ inch cubes (fig 1). Add the cubes of butter to the dry ingredients and smear it into the flour using your thumb and forefinger. You’re looking to turn your cubes of butter into thin smears and distinct shards that mix into the flour. Once the butter has been worked in and the flour appears crumbly, it’s time to add the water (fig 2).
Start by adding 5 tablespoons of ice water one tablespoon at a time. In between each tablespoon work the flour a little bit with your hand to see how it absorbs the liquid. One hand for the dough, one hand for the water. After 5 tablespoons the dough should start to come together into a moist-but-not-sticky ball.
If it seems dry and there’s a lot of loose flour still floating around, then continue to add one tablespoon of ice water at a time until the dough reaches the correct texture.
On a lightly floured cutting board, flatten the dough into a disc, roughly 6” in diameter. With a chef’s knife, cut the disc into four pieces. Stack the pieces on top of each other and then press down to combine them back into a single ball again (fig 3). Repeat this process 2-3 times. This stacking process creates layers of butter in the dough that result in a light and flaky crust.
Form the dough into a flat disc, wrap in Bee’s Wrap, or place it inside an airtight resealable container, and immediately put it into the refrigerator (fig 4). When packing for your camping trip, this dough goes directly from your refrigerator into any ready-cold portable refrigerator or into an already-cold cooler.
At Camp
Our biggest advice for making an apple pie at a campsite is to start early! Including prep time, cook time, and cool down, the whole process can take well over two hours. Not all of it is active, but still, it takes time. Pies need time to cool anyway, so there is no downside to starting sooner rather than later.
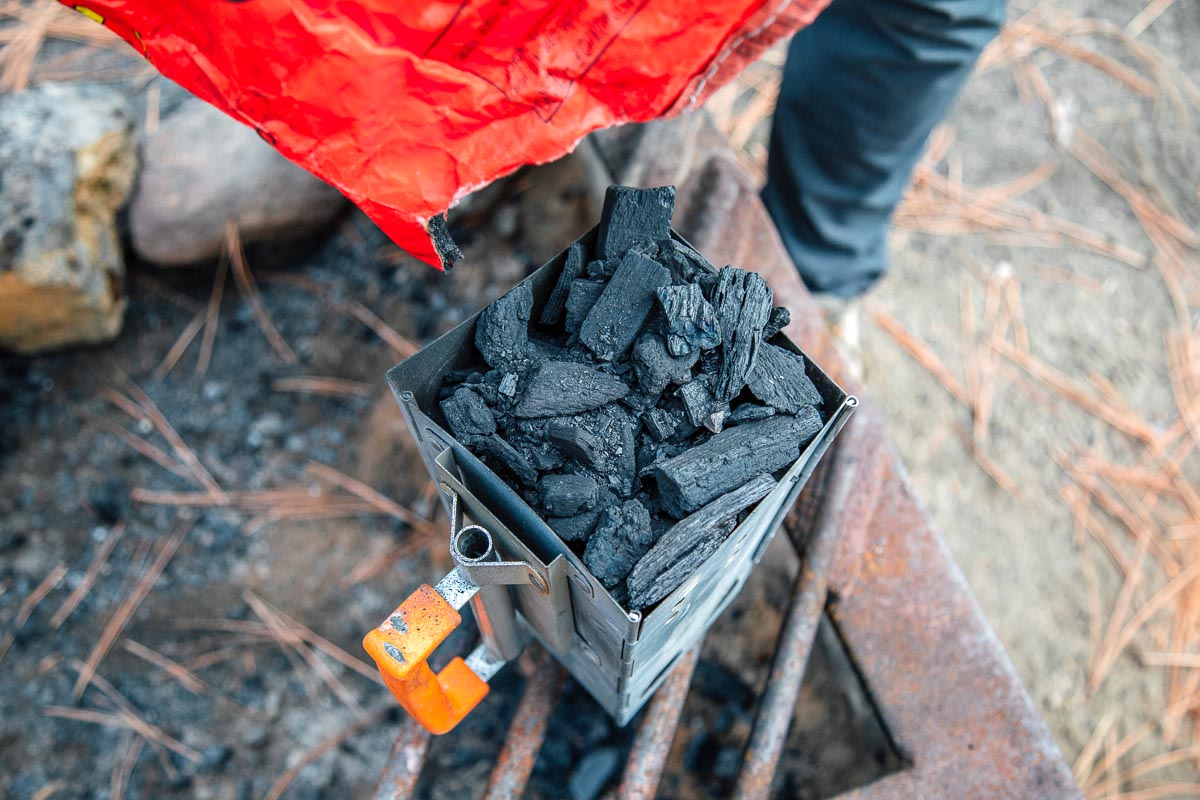
As with most Dutch Oven recipes, the first step is to start the charcoal. There is a lot to do, and standing around waiting for the coals to get ready is not one of them.
For this recipe, we used hardwood lump charcoal that we lit in a foldable chimney. The jury is still out with us on whether we prefer lump or briquettes, but we definitely opt for all-natural charcoal (aka not drenched in lighter fluid). This recipe will require multiple batches of charcoals to complete, so be sure you have enough on hand.
Make the Filling
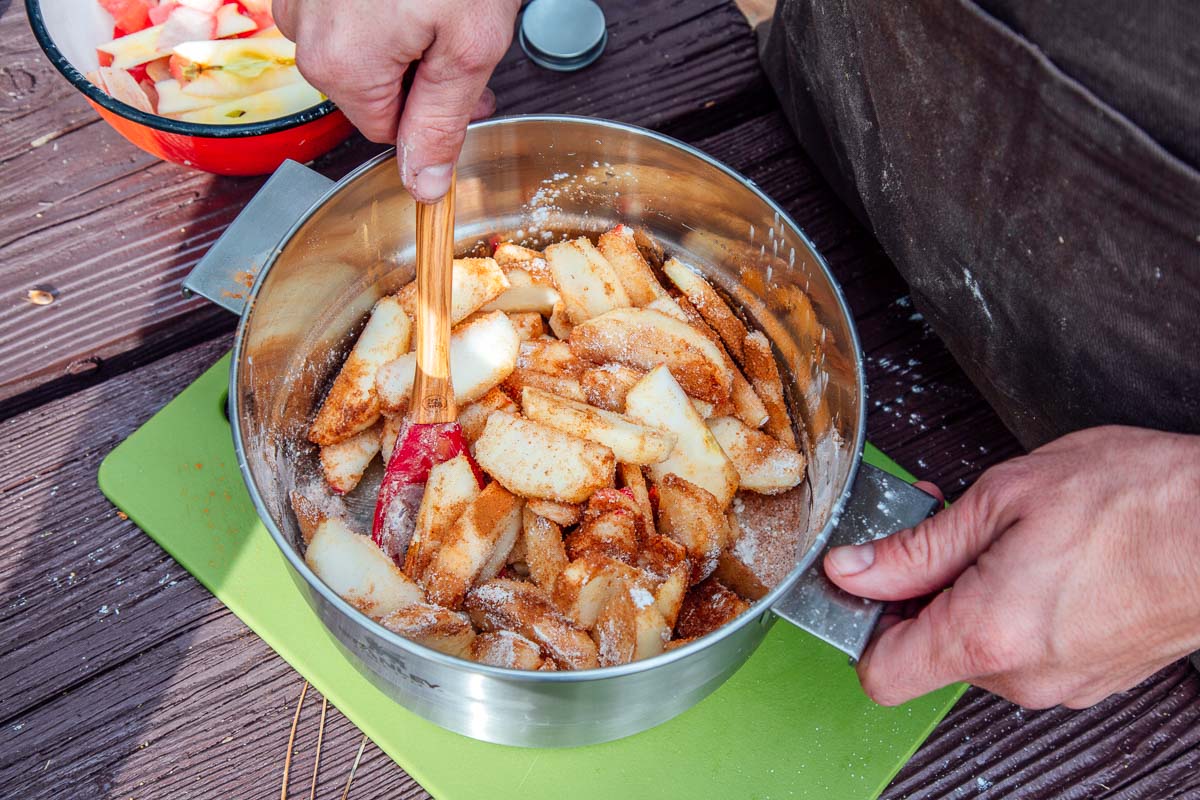
While the coals warm up, you can begin peeling, coring, and slicing your apples. You are looking for apple slices somewhere between ⅛” and ¼” of an inch thick. Place the slices into a large mixing bowl or pot. Add in the sugar, cinnamon, and cornstarch and mix thoroughly. We found the best approach is to just get a hand in there and make sure everything is evenly coated.
Prep the Dutch Oven
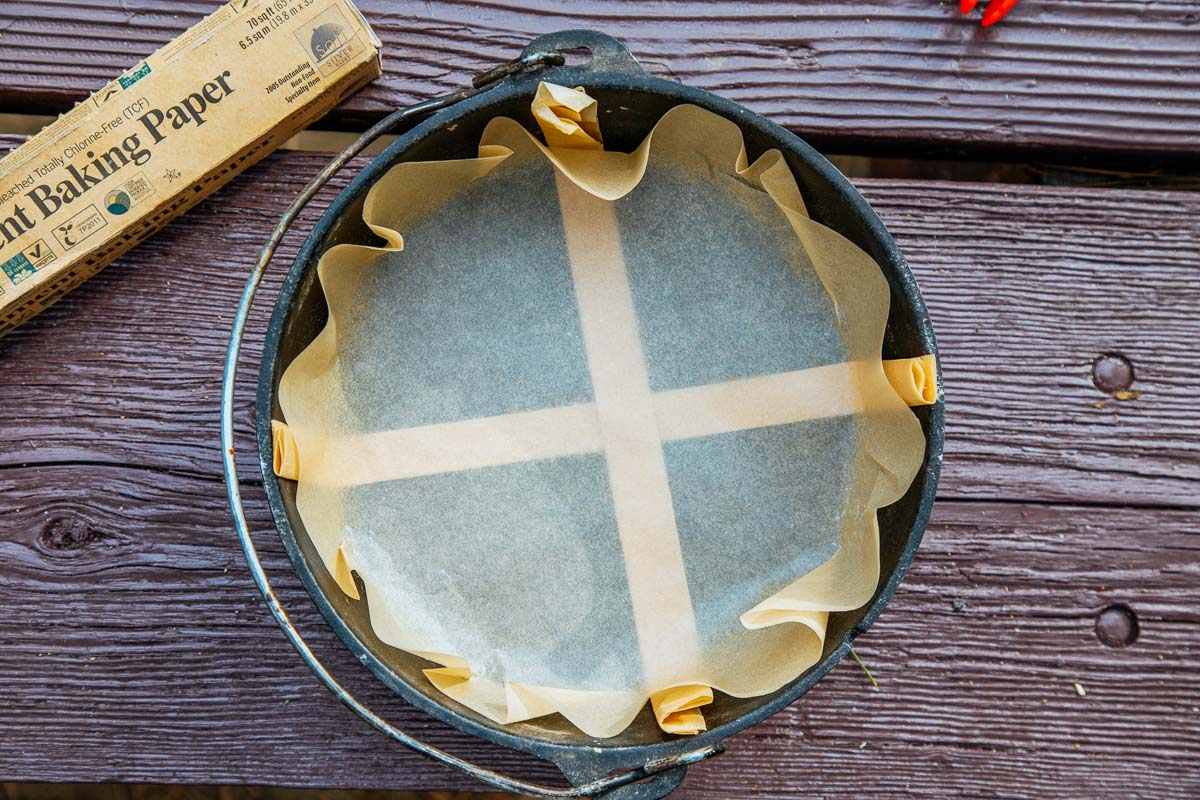
The coals probably aren’t ready yet, which is fine, because there’s more work to be done. Take the lid of your Dutch Oven and place it on top of a sheet of parchment paper to form a template. With a pair of scissors, cut out a circle that is about 2” bigger than your lid.
Then cut a long piece of parchment paper and fold it widthwise a few times to make a thin strap. Create two of these straps and place them in a cross along the bottom of your Dutch Oven. They should extend up the side of your Dutch Oven and reach almost to the top. Place the circular piece of parchment paper on top of the straps.
The parchment paper will keep the pie from sticking to the cast iron while the straps will help you (and a partner) lift the pie up and out of the Dutch oven once it is done. You could do this whole parchment paper arts & craft project at home ahead of time as well.
Make the Crust
At this point, it’s time to start rolling out your dough. Lightly flour a large cutting board and retrieve the dough from the cooler/refrigerator. Cut ⅔ of the disc and return the extra ⅓ to the refrigerator. You’ll be using the ⅔ portion for the bottom and the ⅓ portion for the top. Form the dough into a disc in your hands, allowing it to warm up ever so slightly.
Place the disc on the cutting board and, using a rolling pin, hydroflask, or wine bottle, whack the disc a few times, rotate a quarter turn, and whack a few times again. (fig 1) Do a full rotation like this until the disc is compressed, circular, and expanded slightly. Then start rolling the dough.
Don’t try to apply too much pressure in a single roll. Apply the most pressure in the center and let up as you roll towards the edges. After each roll, rotate the dough a little bit, so you’re evenly spreading it. (fig 2)
If the dough sticks to your pin, scrap it off the pin, sprinkle a little flour on the dough and rub flour on the pin. The same goes for the cutting board. If it sticks, pull it away, scrap up any dough stuck to the board, and sprinkle some more flour.
Once the dough is about 2” larger than the bottom of your dutch oven (or roughly the size of parchment paper you cut out), it’s ready. If the dough appears particularly oblong in some areas, use a knife to cut it into a more perfect circle. Place your rolling pin at one end, hold the edge to the pin, and slowly roll up your dough (so it is wrapped around the pin). Then unroll it over your Dutch oven. (fig 3)
The dough will need some adjusting to get it centered on the parchment paper. Additionally, because a Dutch oven has straight walls, the edges will flop down into the middle. That’s fine. We’ll deal with that in a moment.
Assemble the Pie
At this point, your apple slices should have released some juices. You can use a slotted spoon or just grab them by the tong-full. The point is to transport as little of the liquid into your pie.
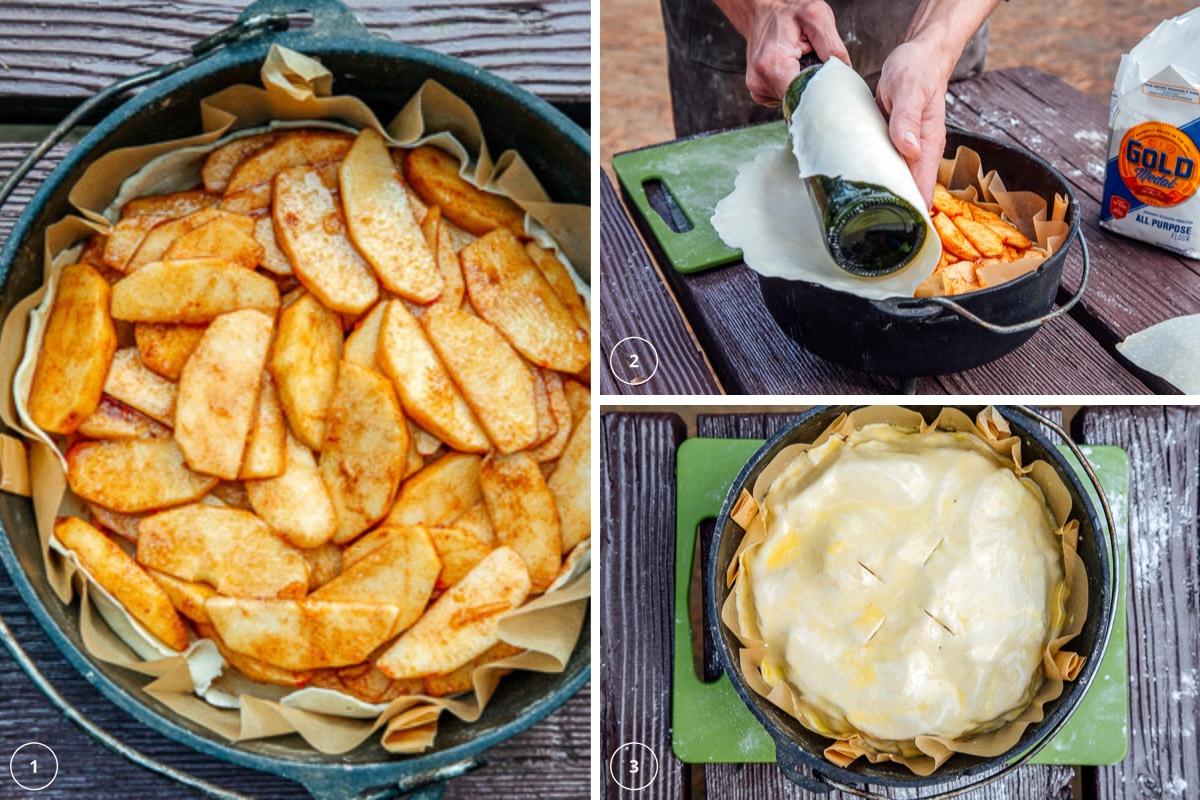
When loading your apple pie, start by making a ring around the outside edge. Use the apples to help stand up the flopping edges of the dough. Once the dough is being supported all the way around, fill the middle.
You want the apple slices to laying relatively flat. No strange humps on one side or apple points sticking up. You’re looking for a nice, mostly flat, layer on top. (fig 1)
Now, retrieve the remaining ⅓ portion of dough from the refrigerator/cooler. Roll it out the same as before, but only to the actual size of the Dutch oven. This will be the top of the crust. You can use the lid as a reference.
Once you’re ready, roll this dough up on the rolling pin and unroll it onto the top of the pie. (fig 2) Again, some slight adjusting may be required once you get it in there for it to center up.
You can now pinch the top dough and bottom dough together to form a seal. You can wet your hands a little if the dough isn’t sticking. You want a good seal all the way around so to avoid a blowout and achieve a flaky crust.
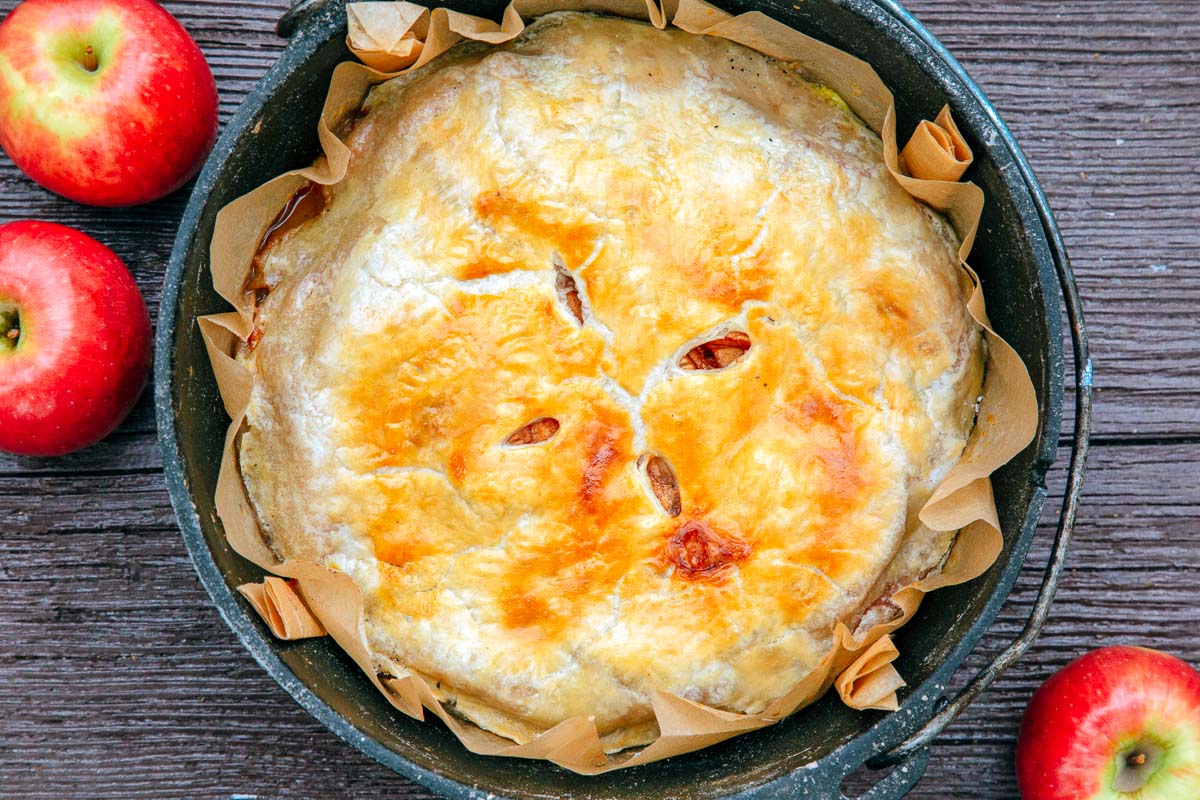
In a small bowl, beat an egg until completely mixed. Brush the egg over the top of the pie. This egg wash will produce a light and golden crust. Use a knife to cut 4 slices into your dough to allow steam to escape. (fig 3)
Cook the Pie
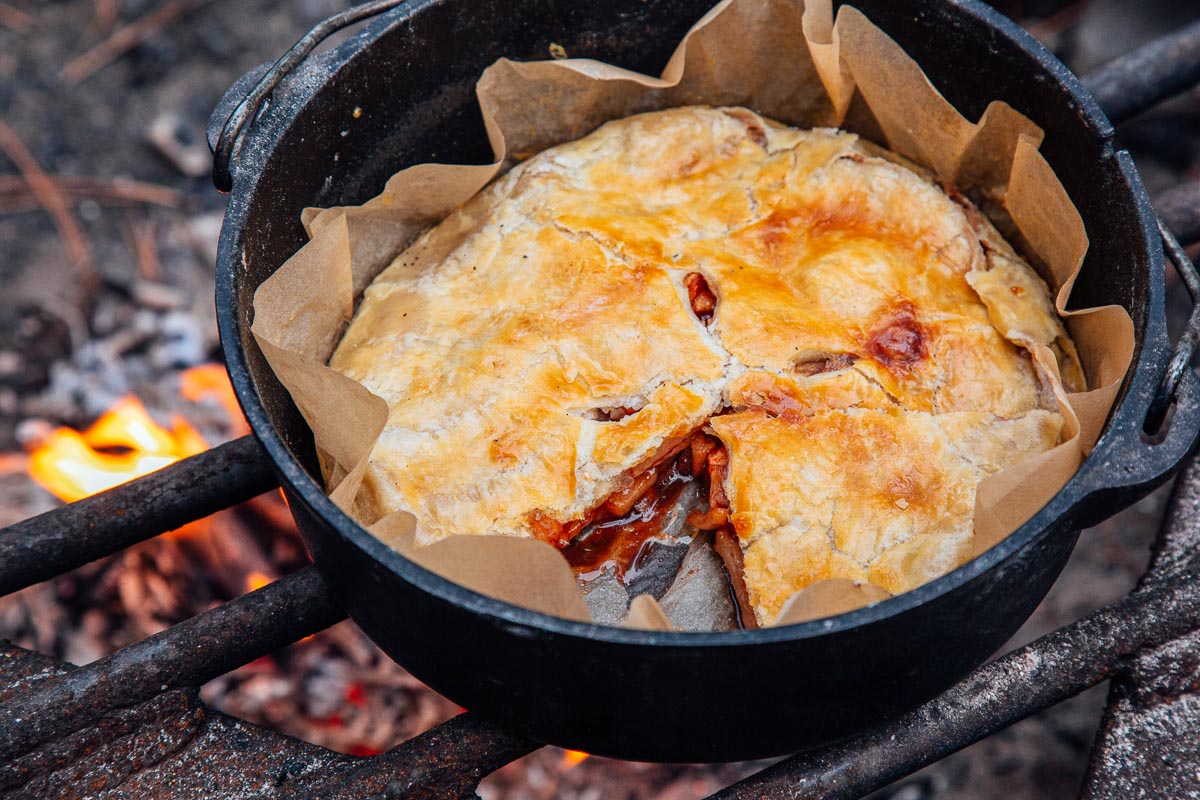
At this point, your coals should be ready to go. Dump out a layer on the ground and place your Dutch Oven on top.
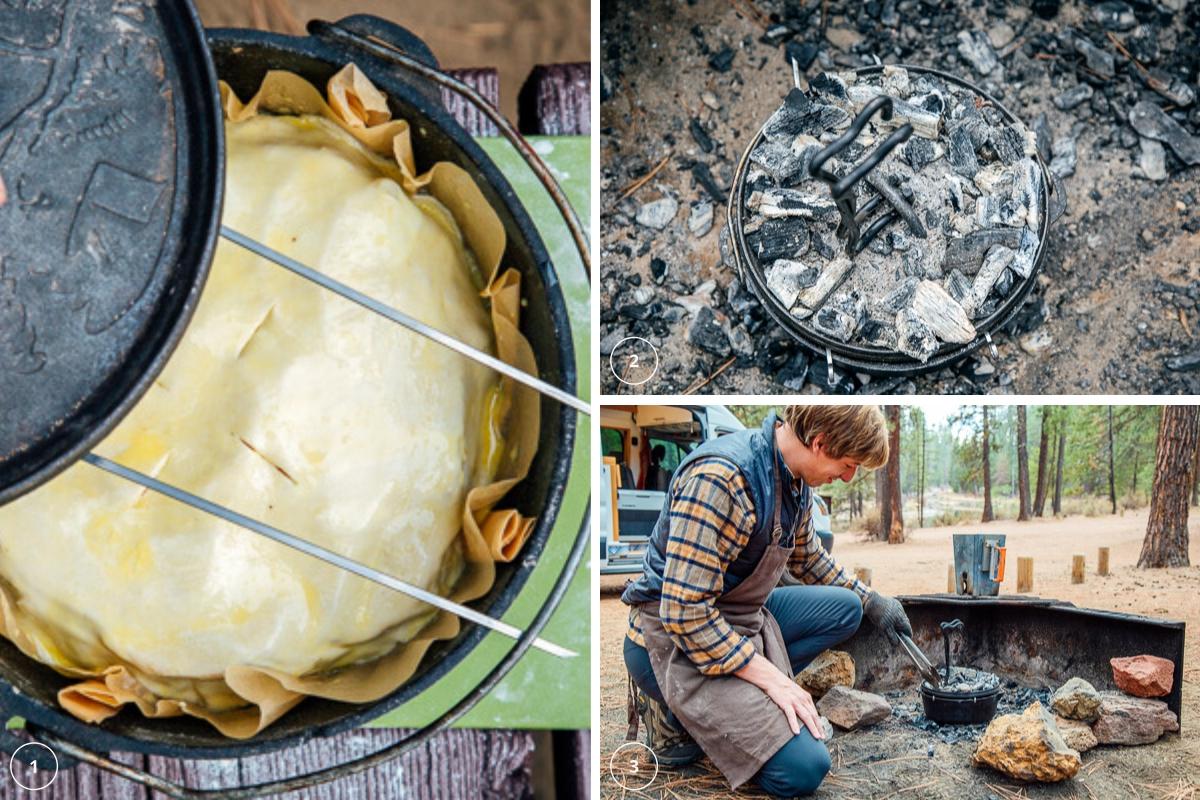
Place two flat metal skewers across the top of the Dutch Oven and then place your Dutch Oven lid on top. These metal skewers create a gap all the way around under the lid, which will allow steam to escape out the side. You want the heat inside the Dutch Oven to be as dry as possible, so the pie will get crispy. (fig 1)
Place the remaining coals on the Dutch Oven lid, favoring the outside rim over the center. The center tends to brown the quickest, so you want to concentrate the heat toward the edges to even it out. (fig 2)
Immediately start a new batch of coals. We reserved a few coals from the first batch to use as starters for our second batch.
Monitor the coal temperature periodically by hovering your hand over them. If you want to be able to hold your hand there for 2-3 seconds but not more. Rotate the oven over the bottom coals and rotate the lid that contains the top coals to even out any unintentional hot spots.
If you feel the heat start to drop on either the top or bottom, replenish with new coals. (fig 3)
This whole process should take roughly an hour. You should be able to see inside through the metal skewer air gap and monitor your progress without taking off the lid (and releasing precious heat). Once the top looks golden brown, remove the Dutch Oven from the heat.
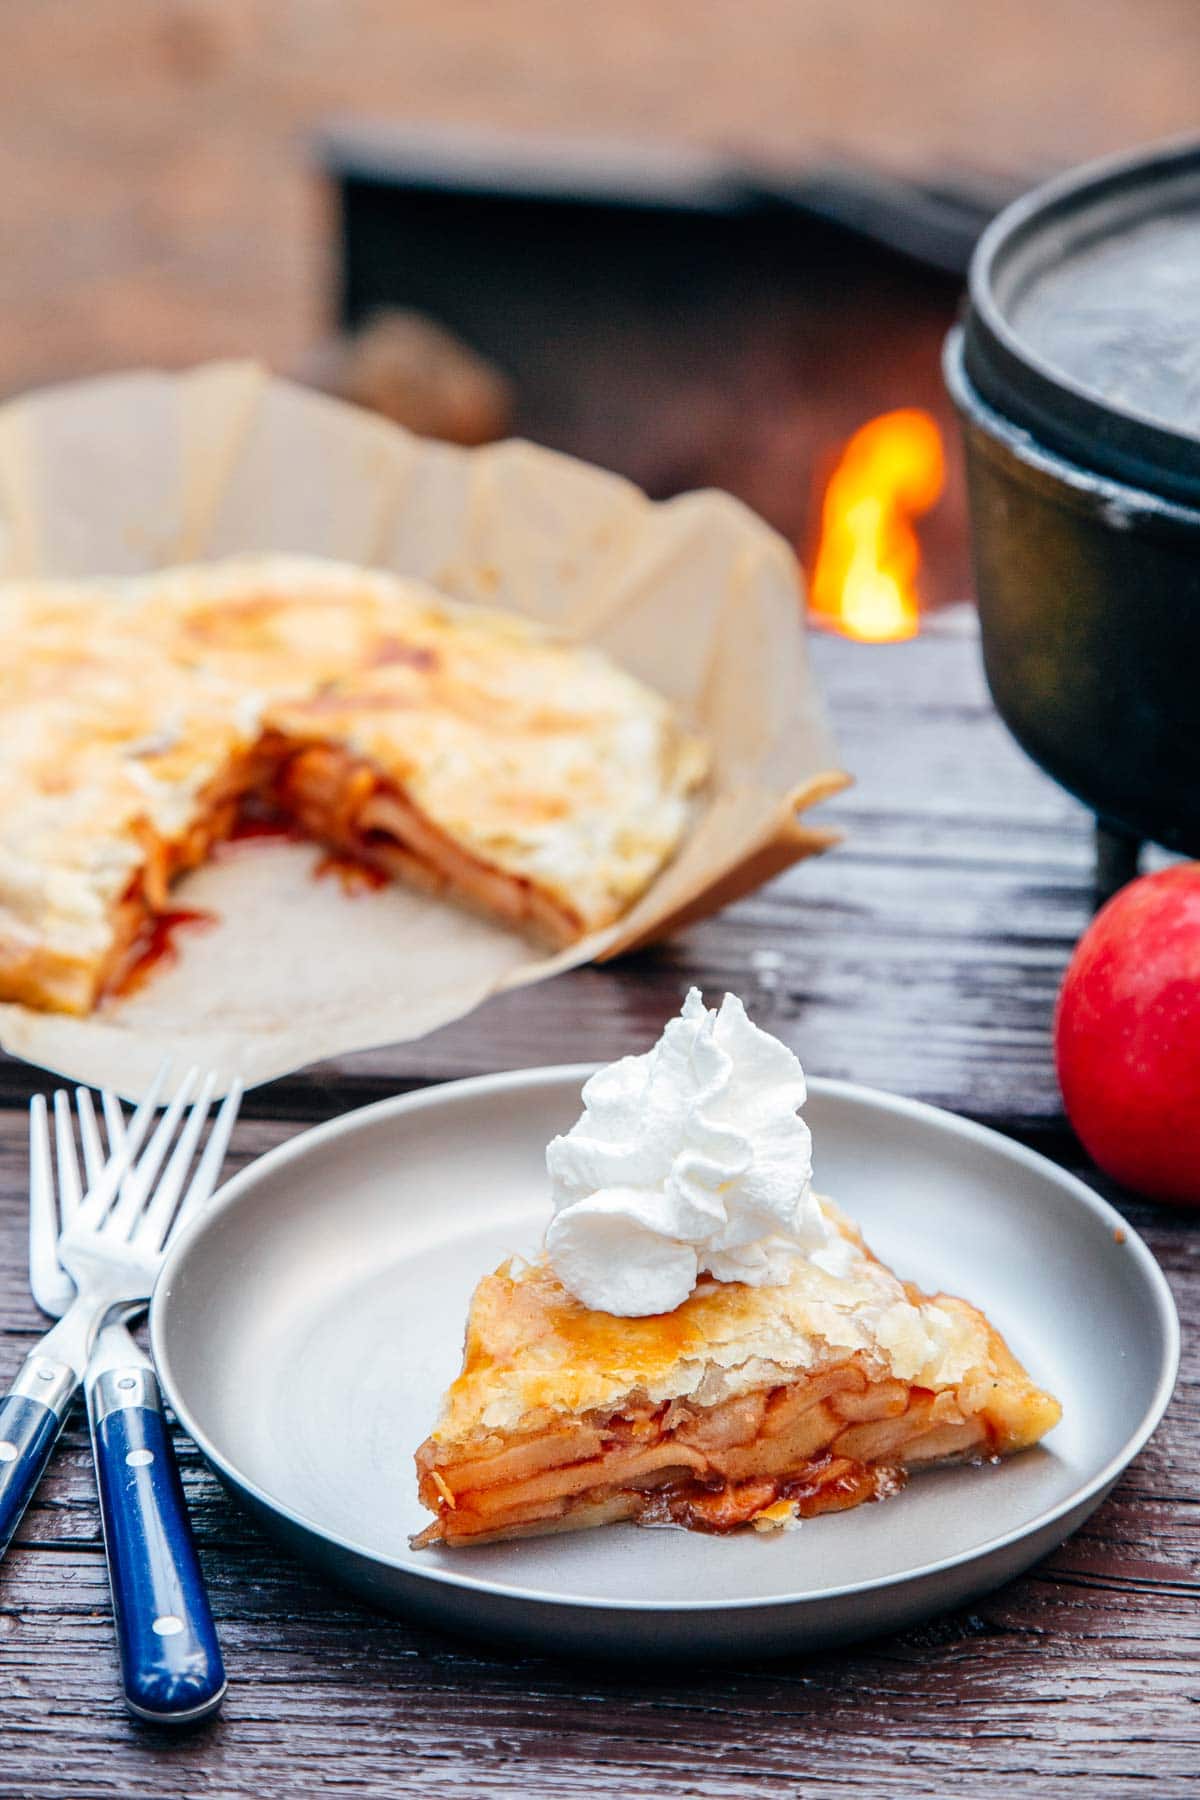
Serve & Enjoy!
If you have lots of extra time, you can let the pie cool inside the Dutch oven with the lid off. If you want to speed up the cooldown time, then remove the pie from the Dutch Oven and cool on a plate or cutting board.
Lifting the pie out of the Dutch Oven is a two-person operation. Each person grabs two of the parchment straps and you lift up together.
You might be tempted to dig in right away, but the apple pie needs to rest. Ideally down to ambient room temperature. This cooling process firms up the filling, so it doesn’t just spill out all over your plate. We know, it’s a hard long wait, but it must be done!
Finally, once the pie has properly cooled down, it’s time to pour yourself a drink, pat yourself on the back, and serve yourself a slice. If you made it to this point, you absolutely earned this pie. Congratulations!
Tips & Tricks
- The dough can be made ahead of time at home (up to 4 days before your trip), then tightly wrapped and stored in your refrigerator/cooler in a spot where it will stay dry.
- This recipe can be made using a store-bought crust, which will really make your life easier. No judgment here; sometimes, you want to enjoy your campfire without worrying about making dough from scratch! Put down the rolling pin, let Pillsbury do the work, and grab yourself a nice cocktail instead.
- The key to a tender, flaky crust is smearing cold bits of butter into the dry ingredients by hand.
- What apples are good for apple pie? The best apples for apple pie are ones that are a bit tart, sweet, and will hold their shape when cooked. We love Pink Lady apples, but Honeycrisp, Granny Smith, Braeburn, Jazz, and Jonagold are all solid choices. Use your favorite or mix a few varieties.
- Allow the pie to cool before serving so that the filling has a chance to set, otherwise you’ll end up with soupy pie on your plate. Ideally, you would take the pie off the campfire before you sit down to eat dinner and by the time you’re done, the pie will be ready.
- Serve this apple pie on its own, or with a dollop of whipped cream. If you happen to camp with an electric fridge/freezer or at a site near a town, a scoop of ice cream on the side would be a real treat.
More Camping Dessert Recipes You’ll Love
↠ Dutch Oven Apple Cobbler
↠ Easy Campfire Apple Crisp
↠ Grilled Peaches with Yogurt
↠ Plum Skillet Tart
↠ Campfire Banana Boats
Dutch Oven Apple Pie
Ingredients
Crust
- 1 cup AP flour
- 1 tablespoon granulated sugar
- ½ teaspoon salt
- 1 stick cold butter (1/2 cup)
- 5 tablespoons ice cold water
Filling
- 4 apples
- ½ cup granulated sugar
- 1 teaspoon ground cinnamon
- 2 tablespoons cornstarch
- 1 egg
Equipment
Instructions
At Home: Make the Crust
- Mix the flour, sugar, and salt together in a medium bowl. Cut the cold butter into cubes and add to the dry ingredients. Using your fingers or a pastry cutter, smear the butter into the dry ingredients until a crumbly dough forms. Incorporate the ice water into the dough, 1 tablespoon at a time, mixing with your hand, until it comes together into a moist-but-not-sticky ball.
- Transfer the dough to a floured work surface and flatten the dough into a 6” disc. Cut the disc into four pieces. Stack the pieces on top of each other and then press down to combine them back into a single ball again. Repeat this process 2-3 times.
- Form into a final disc, then tightly wrap or place it into an airtight container and place in the fridge. When packing for your camping trip, this dough should go directly from your refrigerator into your pre-chilled cooler.
At Camp: Assemble the Pie
- Start your charcoals in a chimney starter.
- Make the filling: peel, core, and slice apples into ⅛” - ¼” slices. Place the slices into a large mixing bowl or pot. Add in the sugar, cinnamon, and cornstarch and mix so the apples are evenly coated. Set aside.
- Prep the Dutch oven: Using parchment paper, create two “straps” and set them in the bottom of a 10" (4qt) Dutch oven in an “X”. Line the oven with a circle of parchment paper set over the straps.
- Roll Out the Crust: Lightly flour a large cutting board and retrieve the dough from the cooler/refrigerator. Cut ⅔ of the disc and return the extra ⅓ to the refrigerator. Form the dough into a disc in your hands, allowing it to warm up ever so slightly.
- Place the disc on the cutting board and using a rolling pin, hydroflask, or wine bottle whack the disc a few times, rotate a quarter turn and whack a few times again. Do a full rotation like this until the disc is compressed, circular, and expanded slightly. Then start rolling the dough, applying the most pressure in the center and let up as your roll towards the edges. After each roll rotate the dough a little bit, so you’re evenly spreading it.
- Once the dough is about 2” larger than the bottom of your dutch oven (or roughly the size of parchment paper you cut out), place your rolling pin at one end, hold the edge to the pin, and slowly roll up your dough (so it is wrapped around the pin). Then unroll it into the Dutch oven.
- Assemble the Pie: Using a slotted spoon or pair of tongs, transfer the apple slices into the Dutch oven, making sure they are in as even of a layer as possible.
- Retrieve the remaining ⅓ portion of dough from the refrigerator/cooler. Roll it out the same as before into a ~10” circle. This will be the top of the crust. You can use the Dutch oven lid as reference. Then, roll this dough up on the rolling pin and unroll it onto the top of the pie.
- Pinch the top dough and bottom dough together to form a seal. You can wet your hands a little if the dough isn’t sticking. You want a good seal all the way around so to avoid a blow out and achieve a flaky crust.
- In a small bowl, bear an egg until completely mixed. Brush the egg over the top of the pie. Use a knife to cut 4 slices in to your dough to allow steam to escape.
- Cook the Pie: Dump a layer of coals on the ground and place your Dutch Oven on top of it. Place two flat metal skewers across the top of the Dutch Oven and then place your Dutch Oven lid on top. Place the remaining coals on the Dutch Oven lid, favoring the outside rim over the center.
- Immediately start a new batch of coals. Monitor the coal temperature periodically by hovering your hand over them. If you want to be able to hold your hand there for a 2-3 seconds but not more. Rotate the oven over the bottom coals and rotate the lid that contain the top coals to even out any unintentional hot spots. If you feel the heat start to drop on either the top or bottom, replenish with new coals.
- Cook for about an hour, until the top of the pie looks golden brown, then remove the Dutch Oven from the heat.
- Allow the pie to cool to “room” temperature before serving. Using the parchment straps, lift the pie out of the oven. Once cooled, cut into 6-8 slices and serve.
Is this recipe possible on a stove? I only have an enamel Dutch oven, so I won’t be able to have it sitting/covered in coals
Unfortunately in order for the pie to actually “bake” it will need heat from the bottom and top. A camping-style cast iron Dutch oven is really the only way to make this work. Sorry about that.
If you had a cast iron dutch oven would you be able to make this in the oven? If so what would you preheat it too?