Backpacking Quinoa Burrito Bowl
This post may contain affiliate links.

A backpacker’s dream come true, this dehydrated quinoa burrito bowl features a diverse range of ingredients, flavors, and textures. Shake up your backpacking menu with this bright and flavorful recipe!
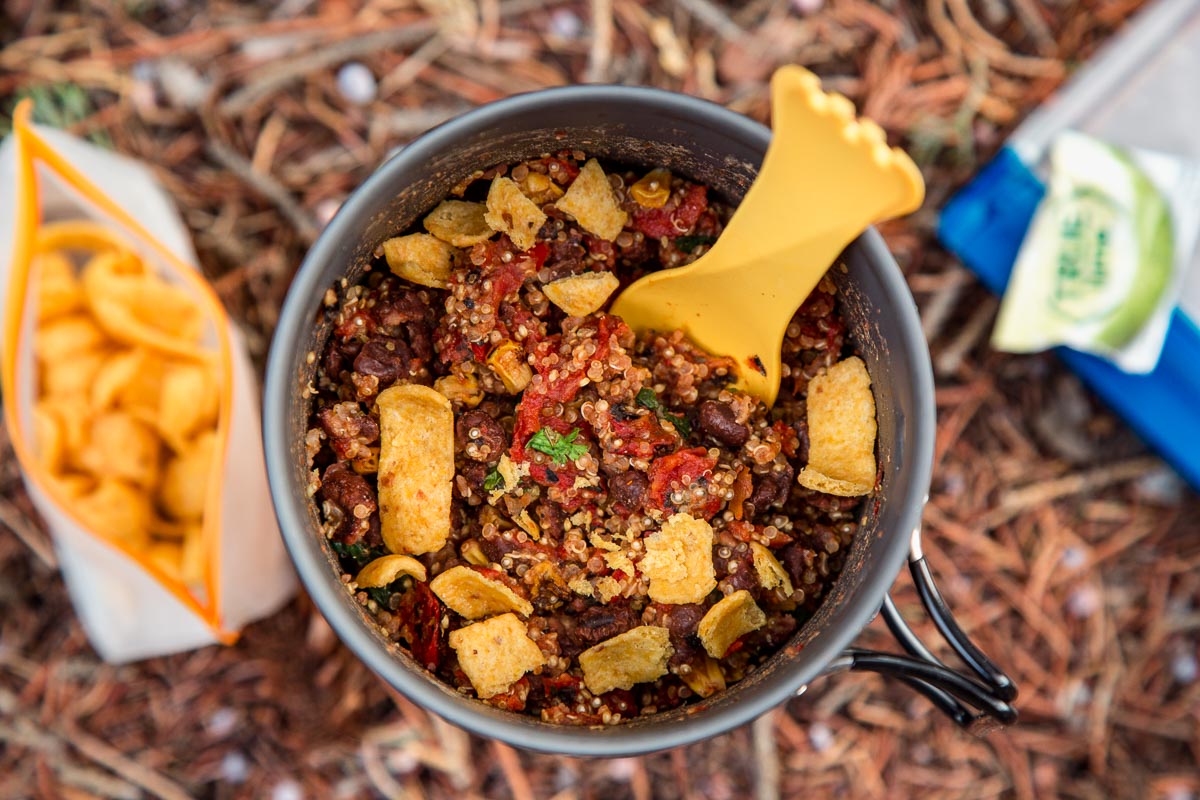
Who doesn’t love a good burrito bowl? Beans, rice, and fun toppings like roasted corn, bell pepper, cilantro, and tortilla chips. When compared to the mono-texture and mono-flavor of many store-bought backpacking meals, this meal feels like a real party!
Not only is it fun, but this quinoa burrito bowl also has some serious sticking power. With around 660 calories per serving and loads of plant-based protein, this meal will help you refuel after the day’s adventures.
Now, if you were trying to make a burrito bowl from scratch out in the backcountry, it would be hopeless. There are just too many different ingredients for it to be even remotely practical.
But, when you use a dehydrator, the impossible becomes possible! Using a dehydrator means all the prep work can be done ahead of time at home and creates a super lightweight meal that packs easily in your bear canister. All you have to do on the trail is add the dehydrated mix to boiling water.
So if you’re looking to liven up your backpacking menu, give this quinoa burrito bowl a try!
What We Love About This Meal:
- Diverse ingredients, flavors, and textures
- All the prep work is done at home
- Totally customizable! Pick the toppings you love.
- A vegan backpacking meal with some real sticking power

Equipment Needed
Dehydrator: Any dehydrator that has an adjustable temperature setting will work. We own the Nesco Snackmaster (budget-friendly) and a Cosori (more features, quieter, and dries faster) and recommend both.
Reusable bags: In our bid to reduce our disposable ziplock bag consumption, we’ve started packing our dehydrated meals in reusable baggies. ReZip is a great option, balancing durability with weight. Most of their bags weigh between ½ – 1 oz.
Backpacking stove and pot: We have a post all about backpacking stoves here. We use a Soto Windmaster or a JetBoil MiniMo for most of our on-trail cooking.
Pot cozy (optional): A pot cozy helps your pot retain heat so that you don’t have to use as much fuel when rehydrating your meal. It’s super light (ours is about 1 oz), easy to DIY (learn how here), and dramatically improves your fuel efficiency.

Ingredient Notes
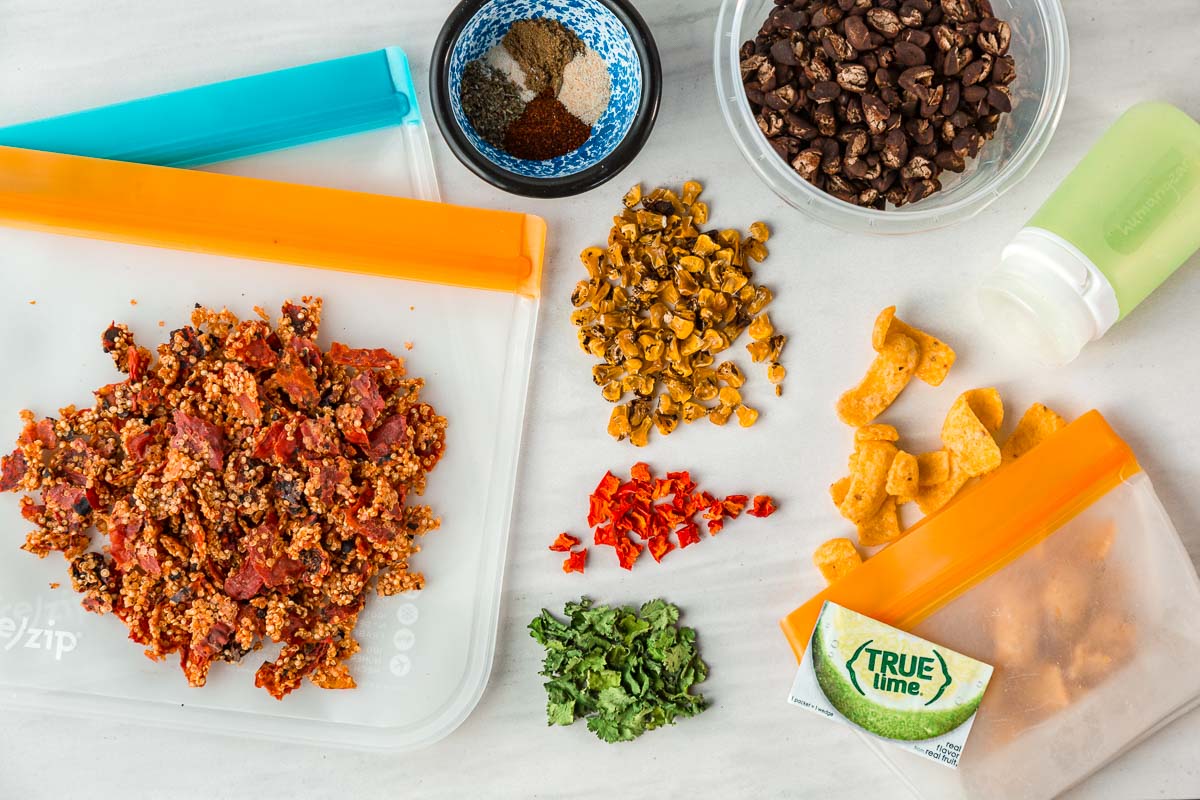
Quinoa: Quinoa is a great plant-based protein and rehydrates well on the trail. Use any type you like (white or red), making sure to rinse it thoroughly before cooking it (place it in a fine-mesh sieve and rinse under cold water until the water runs clear). Quinoa naturally has a coating of saponin which causes it to be bitter if it’s not rinsed off.
Black beans: This recipe calls for one can of black beans, but you can substitute with 1 ½ cup of home-cooked beans if you prefer. Drain and rinse canned black beans.
True Lime: These handy packets help bring all the flavors to life—don’t skip it! (If you must, add fresh lime juice to the quinoa before dehydrating.)
Olive oil: To up the calories, pack along some olive oil. You can either bring a small container of oil (we like this one), or pack single-serve packets.
Chips: Highly recommend a snack sized bag of Fritos for this meal! Tortilla chips packed in a small bag will work as well. These add a nice crunch to the meal. Don’t worry too much about the chips getting crushed in your food bag, as long as they don’t turn to dust they will be great!
How To Dehydrate Quinoa Burrito Bowls
At home: Start with clean, sanitized equipment, hands, and work area. This is super important for food safety when dehydrating, so wash up with soap and hot water!
Dice the bell pepper into small, uniform pieces, ideally about ¼” large. Drain and rinse the black beans.
Place quinoa in a fine-mesh strainer and rinse thoroughly with cold water (don’t skip this or it will result in bitter quinoa). Place in a medium saucepan along with the fire roasted tomatoes and their juices, water, and sea salt. Bring to a simmer, then partially cover and simmer for about 20 minutes, or until the quinoa is tender. Remove from the heat.

Line dehydrator trays with parchment paper. Spread the quinoa into a thin, even layer on two or three trays. Arrange drained black beans, diced bell peppers, corn, and cilantro onto additional trays, making sure that there is room around individual pieces to allow for air circulation.
Dehydrate at 125F for 8-10 hours, or until completely dry. Some ingredients may take longer than others.
If you’re new to dehydrating, read our complete guide to dehydrating food for backpacking to learn all the ins and outs!
To pack for the trail: Place the dehydrated ingredients into a sealable bag (or divide between two bags for individual portions) and add the remaining seasonings. Pack olive oil in a small squeeze bottle, and pack along the True Lime and corn chips separately.
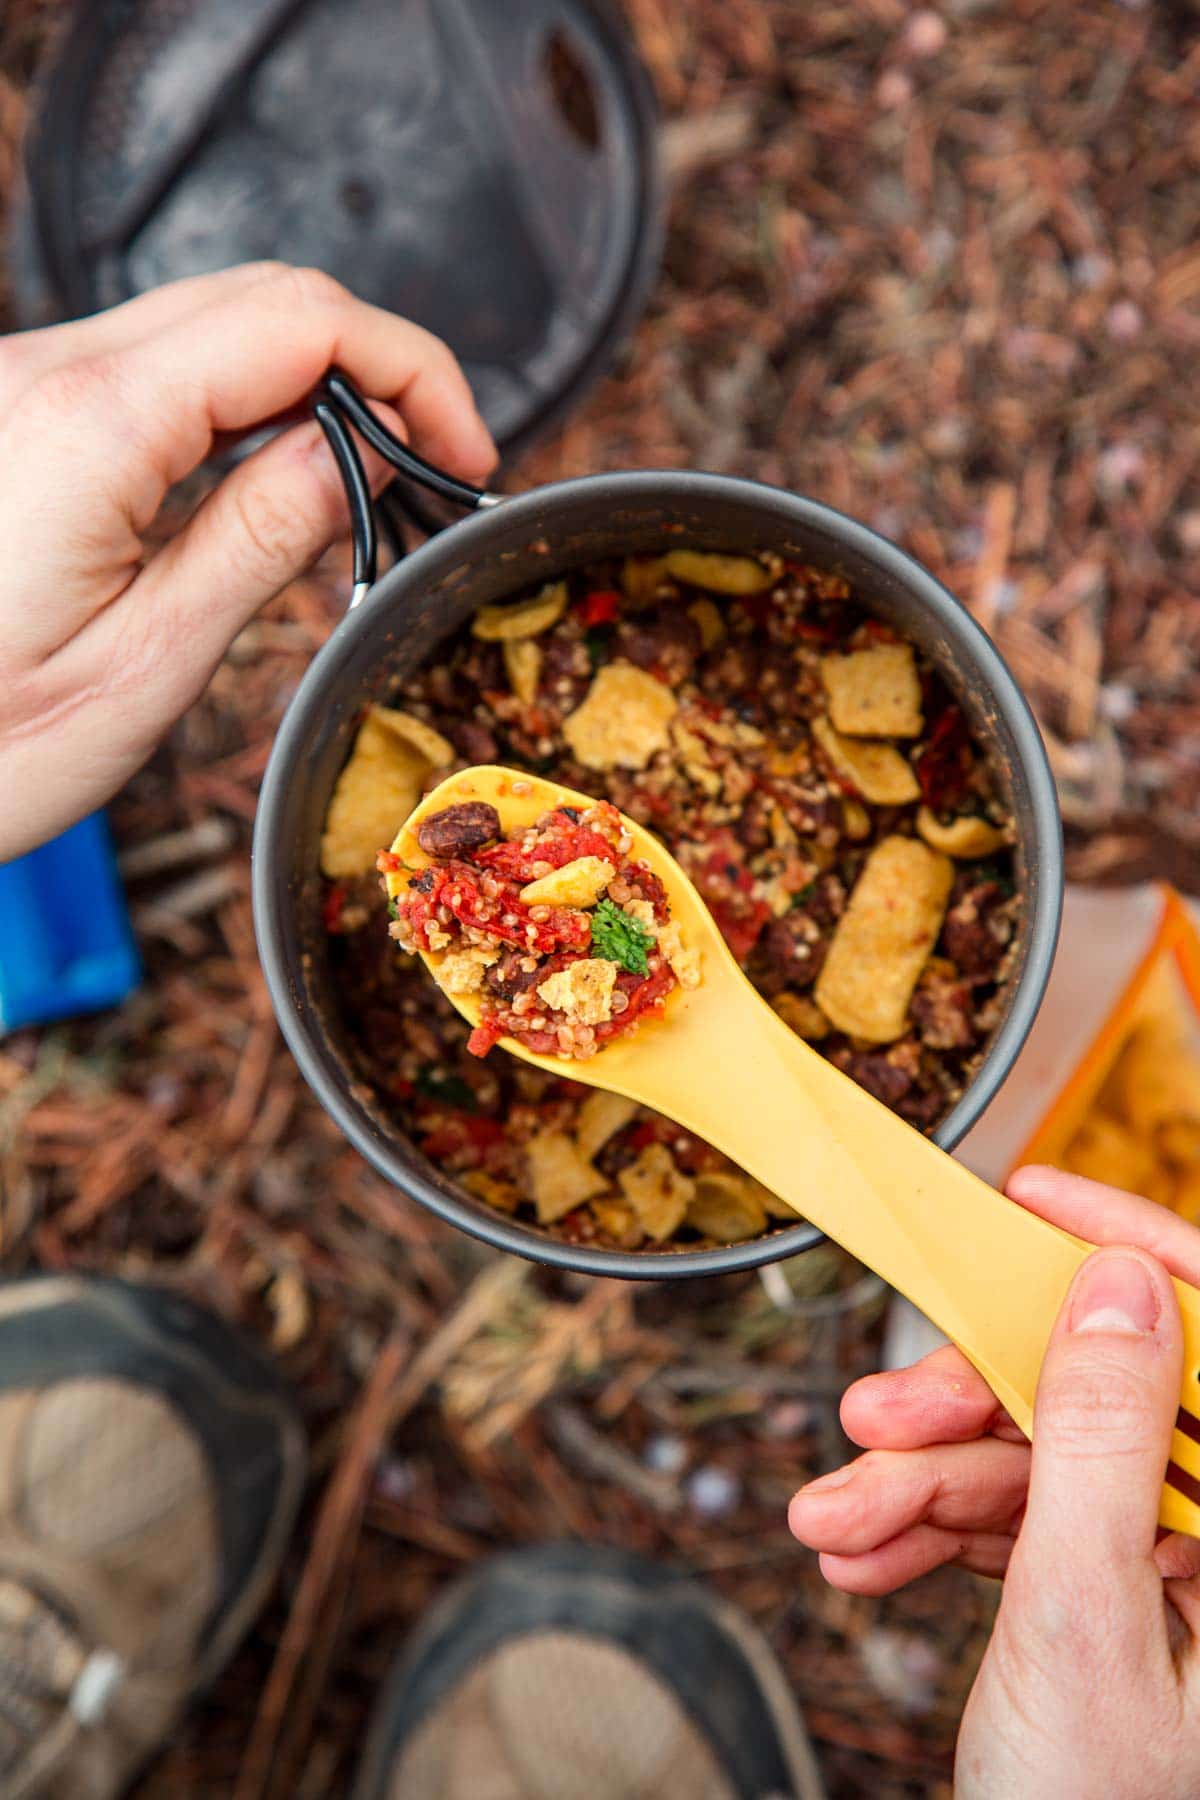
On trail: Place the contents of the bag into your cook pot with 150mL water for one serving or 300mL water for two servings. Soak for 5-10 minutes. Light your stove and bring to a boil for one minute. Remove from heat and place the pot in a pot cozy to rehydrate for 10 minutes. If you’re not using a pot cozy, simmer the meal until completely rehydrated, stirring occasionally (especially towards the end to prevent scorching)—you may need to add more water for this method.
Stir in the olive oil and serve with True Lime to taste and top with corn chips.
Storage Tips
The length of time that dehydrated meals can be stored for can vary depending on the storage method and conditions. Here are some tips for best results:
- Store your dehydrated food in a cool, dry, and dark place. Moisture can ruin your food and make it unsafe to eat, while heat and light will cause the nutrients and flavors to degrade over time.
- Dehydrated food should be stored in airtight containers, especially if you’re going to store them for more than a week or two. If we’re packing a meal for this weekend’s trip, we might just put it in a reZip and then straight into our food bag. But if you’re prepping for a trip that is further out, package your food in a sealed mason jar, a Mylar bag with an oxygen absorber, or vacuum seal it into individual servings.
- Since this meal is dairy and meat-free as written, you don’t need to store this in the fridge if everything is dehydrated and packaged properly.
- For best results, we recommend consuming this meal within six months, but it can store for longer if vacuum sealed.
Of course, some report that their dehydrated food lasts much longer, and some foods may not last as long due to dehydrating and storage conditions. When in doubt, discard any questionable food!
Trail Weight & Nutrition
This recipe makes two ~126g servings (dry weight), clocking in at ~147 cal/oz once you add the olive oil (assuming 1 olive oil packet per serving). Each serving provides:
663 calories
21g fat
95g carbohydrates
23g protein
Feel free to package the quinoa burrito bowl in larger or smaller portions depending on your appetite! For more information about how much food to eat while backpacking, check out our backpacking meals post.
(Disclaimer: Nutrition was calculated based on the ingredients we used, so yours may vary slightly.)
Quinoa Burrito Bowl
Ingredients
- ½ cup quinoa
- 15 oz. can fire roasted tomatoes
- ¼ cup water
- ¼ teaspoon sea salt
- 15 oz. can black beans
- ½ red bell pepper diced
- ½ cup frozen or canned corn
- ¼ cup fresh cilantro stems removed
- ¼ teaspoon garlic powder
- ¼ teaspoon onion powder
- 1 teaspoon chili powder or to taste
- ½ teaspoon cumin
- ½ teaspoon oregano
- 2 tablespoons olive oil
- 1 packet True Lime
- 1 oz bag tortilla or corn chips
Instructions
At Home
- Place quinoa in a fine-mesh strainer and rinse thoroughly with cold water (don’t skip this or it will result in bitter quinoa). Place in a medium saucepan along with the fire roasted tomatoes and their juices, water, and sea salt. Bring to a simmer, then partially cover and simmer for about 20 minutes, or until the quinoa is tender. Remove from the heat.
- Line dehydrator trays with parchment paper. Spread the quinoa into a thin, even layer on two or three trays. Arrange drained black beans, diced bell peppers, corn, and cilantro onto additional trays, making sure that there is room around individual pieces to allow for air circulation.
- Dehydrate at 125F for 8-10 hours, or until completely dry. Some ingredients may take longer than others.
- Place the dehydrated ingredients into a sealable bag (or divide between two bags for individual portions) and add the remaining seasonings. Pack olive oil in a small squeeze bottle, and pack along the True Lime and corn chips separately.
In Camp
- Place the contents of the bag into your cook pot with 150mL water for one serving or 300mL water for two servings. Soak for 5-10 minutes. Light stove and bring to a boil for one minute. Remove from heat and place the pot in a pot cozy to rehydrate for 10 minutes.
- Stir in the olive oil and serve with True Lime to taste and top with corn chips.
This recipe has become a favorite for backpacking. So easy and full of nutrients and flavor!