10 Favorite Ways to Make Coffee While Camping
This post may contain affiliate links.

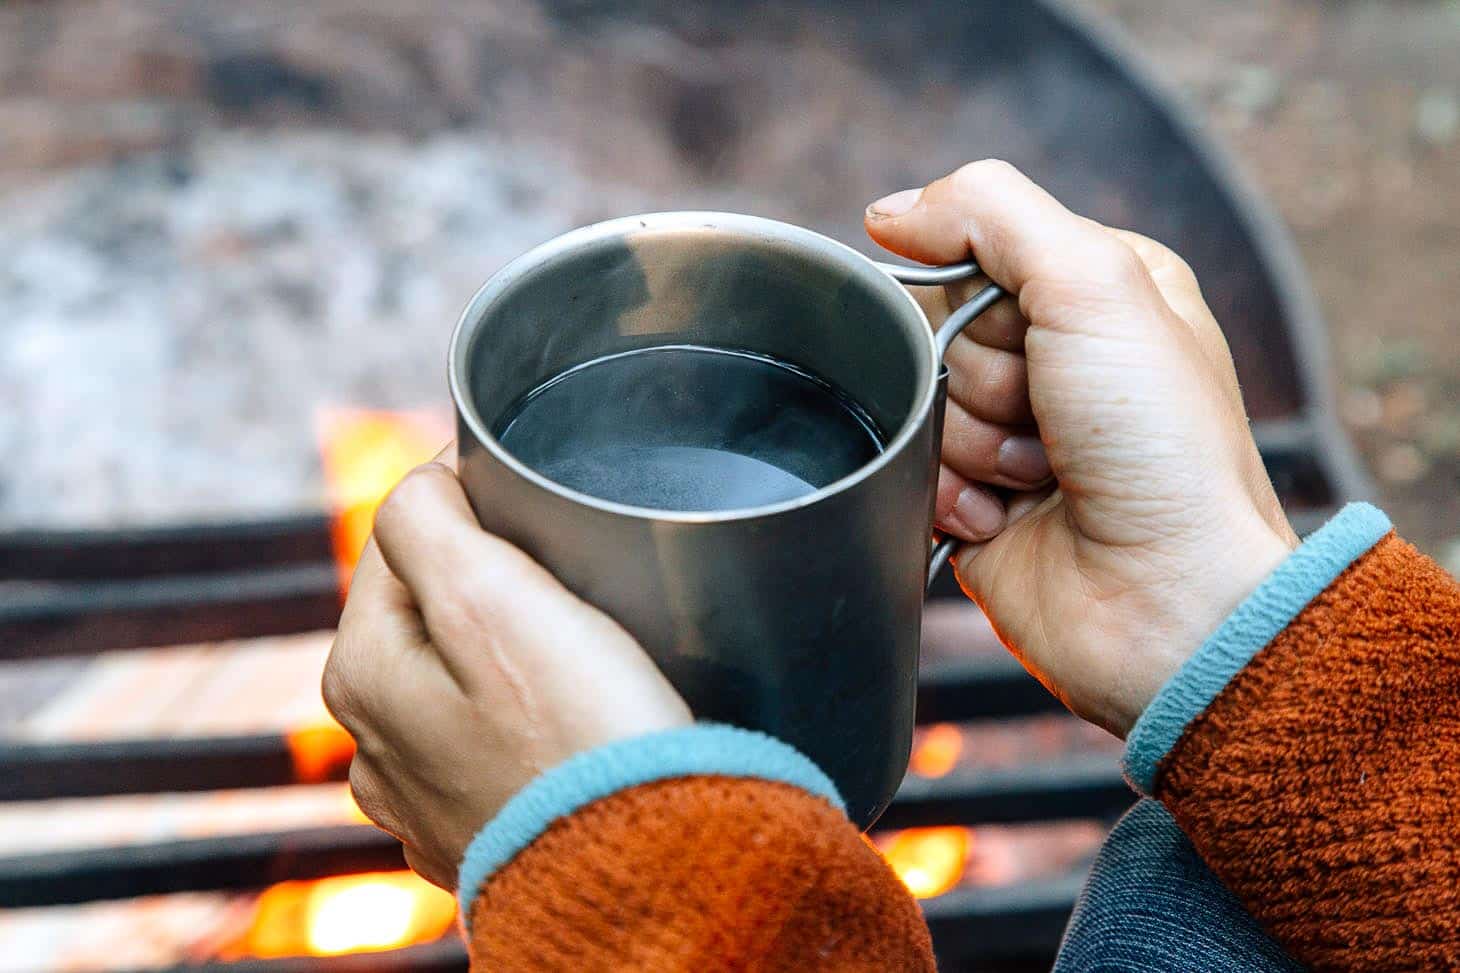
There’s something almost magical about sipping a hot cup of coffee while surrounded by the great outdoors. The fresh air, the sunrise peeking over the trees, and that first sip—it just hits different when you’re camping. For those of us who believe a good cup of coffee is a non-negotiable part of any camping trip, you’re in good company here!
Whether you’re a pour-over purist or prefer a quick instant brew, we’ve got you covered. There’s more than one way to make coffee while camping, and we’re here to help you find your perfect match. From simple methods to gear that would impress any coffee lover, we’ll guide you through all the ways to make a great cup of camp coffee.
So grab your favorite camping mug, and let’s dive into all the tips, tricks, and tools that make brewing coffee for camping easy and delicious. By the time you’re done reading this post, you’ll be all set to make the best cup of camping coffee on your next adventure!
The Best Camp Coffee Makers & Methods
We’ve organized this list from the lightest, simplest ways to make camp coffee to the bulkier, more elaborate methods—so no matter your style, there’s an option that’ll fit your adventure. Every method has its perks, so it’s all about finding the one that works best for you. Before diving in, here are a few key things to consider:
With these factors in mind, let’s get into the best camping coffee makers and methods that’ll help you start your day right, no matter where you’re waking up!
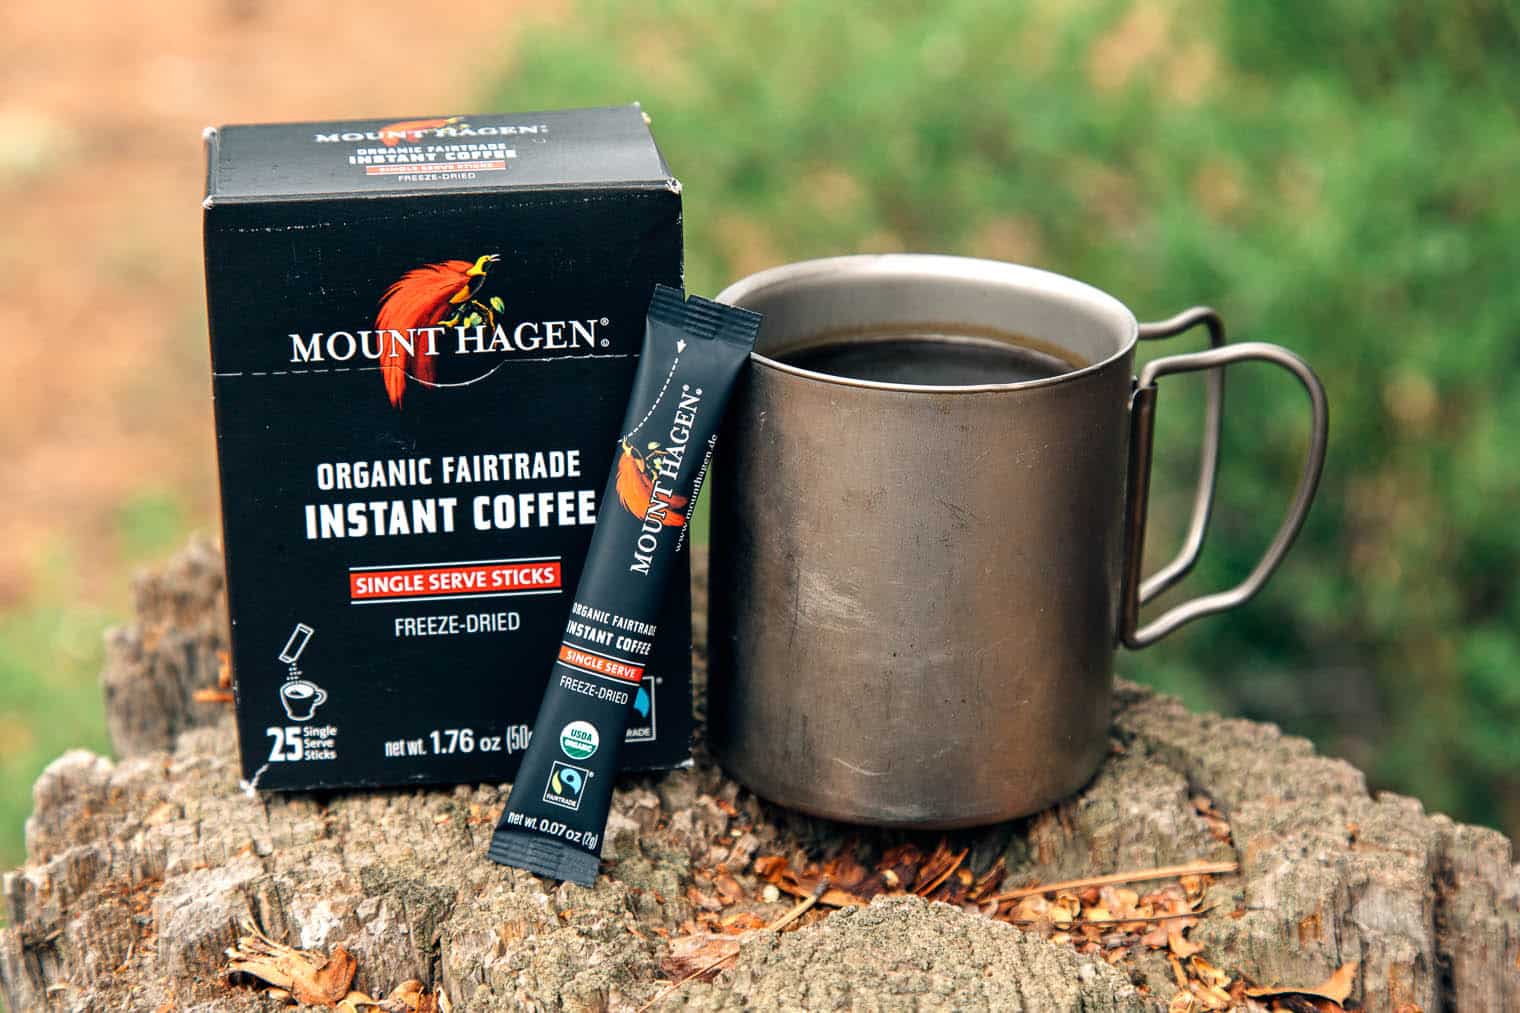
Instant Coffee
Instant coffee has come a long way, making it a fantastic option for camping and backpacking. It’s lightweight, compact, and requires minimal effort to prepare, with virtually no cleanup—perfect for those mornings when you need caffeine without the fuss.
If past experiences with instant coffee have left you unimpressed, it’s time to reconsider. Recent innovations have led to a surge of incredible tasting instant coffees!
Best for: Campers and backpackers looking to save space and weight, or anyone looking for a fast, hassle-free, impossible-to-screw-up coffee-making experience in the morning.
Method: Preparation is straightforward. Typically, you’ll add the instant coffee to your cup, pour in a specified amount of hot water, stir until dissolved, and enjoy. We can’t imagine a simpler brewing method!
Here are a few of our favorite instant coffees:
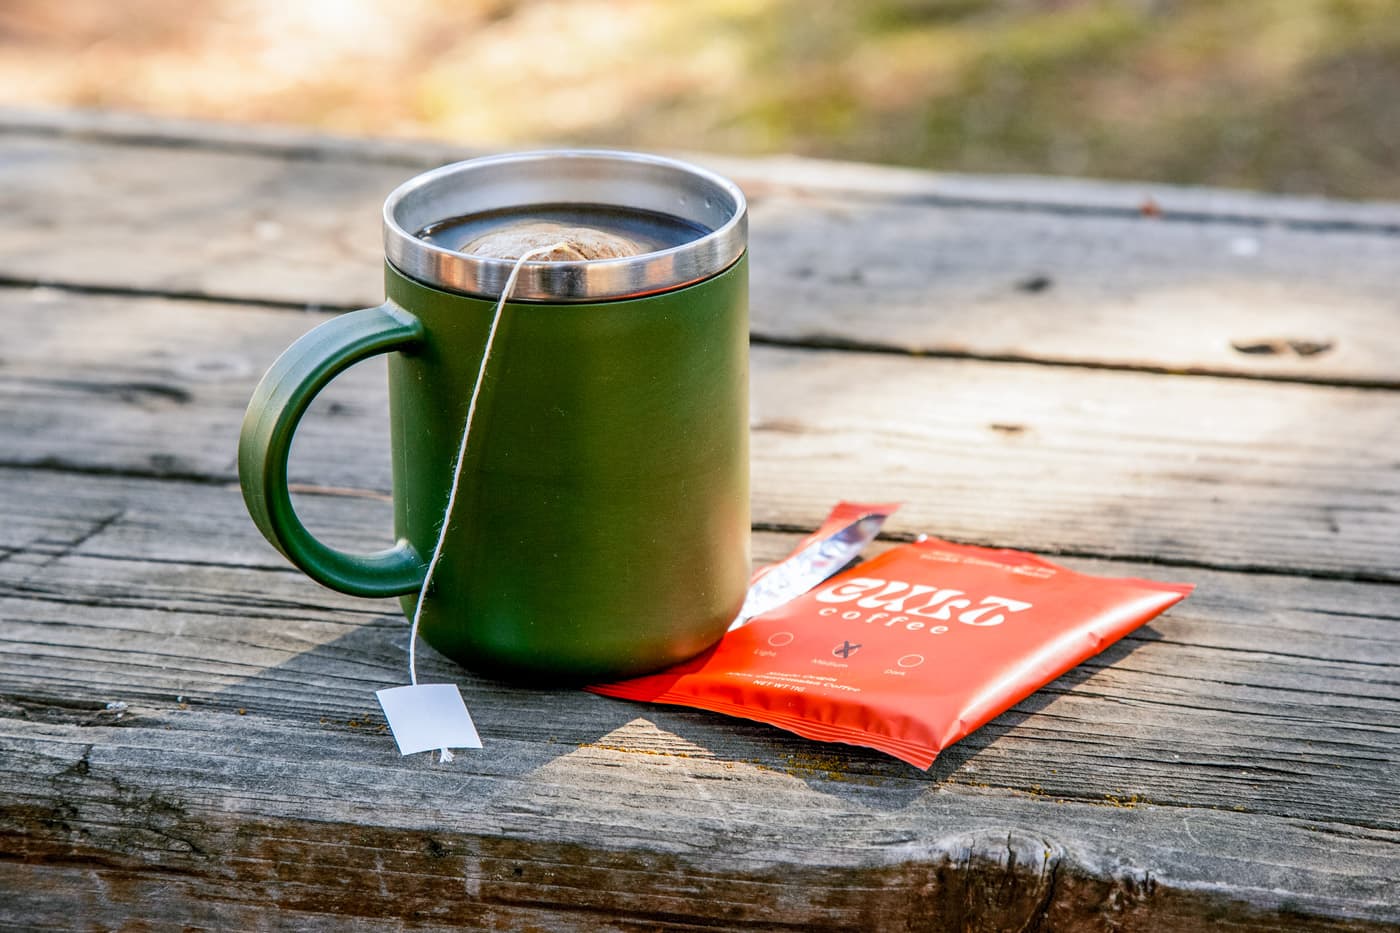
Coffee in a Bag
There is a beautiful simplicity to steeping a teabag. So why not do the same for coffee? While Folgers singles used to be the only option, now there’s a wave of new brands bringing us better-tasting coffee in a bag—perfect for camping mornings without the extra gear. Two of our favorites have been Steeped (they use compostable materials!) and Chamberlain Coffee.
Best for: Those who want a real coffee experience but don’t feel like packing a full brewing setup. This method sits nicely between instant coffee and a full-blown coffee maker, making it a great choice for minimalist campers.
Method: Pop the coffee bag into your cup, pour over hot water, and let it steep. Adjust the strength by steeping it longer, then remove the bag. If you’re familiar with steeping tea, you’ve got this down! The used bag can be squeezed out, dried, and packed out with no fuss.
Our Thoughts: Since the coffee grounds don’t dissolve into the water like instant coffee, you get a flavor that’s closer to a traditional brew. It’s a great option for a satisfying cup without the hassle, and there’s something nice about taking that extra steeping time to relax and soak in the morning views.
Make your own!
It’s also easy to make your own coffee “teabag.” Simply place ground coffee in the center of a regular coffee filter. Gather up the sides of the filter together and tie it with an 8-10″ long thread or string, leaving a tailing end.
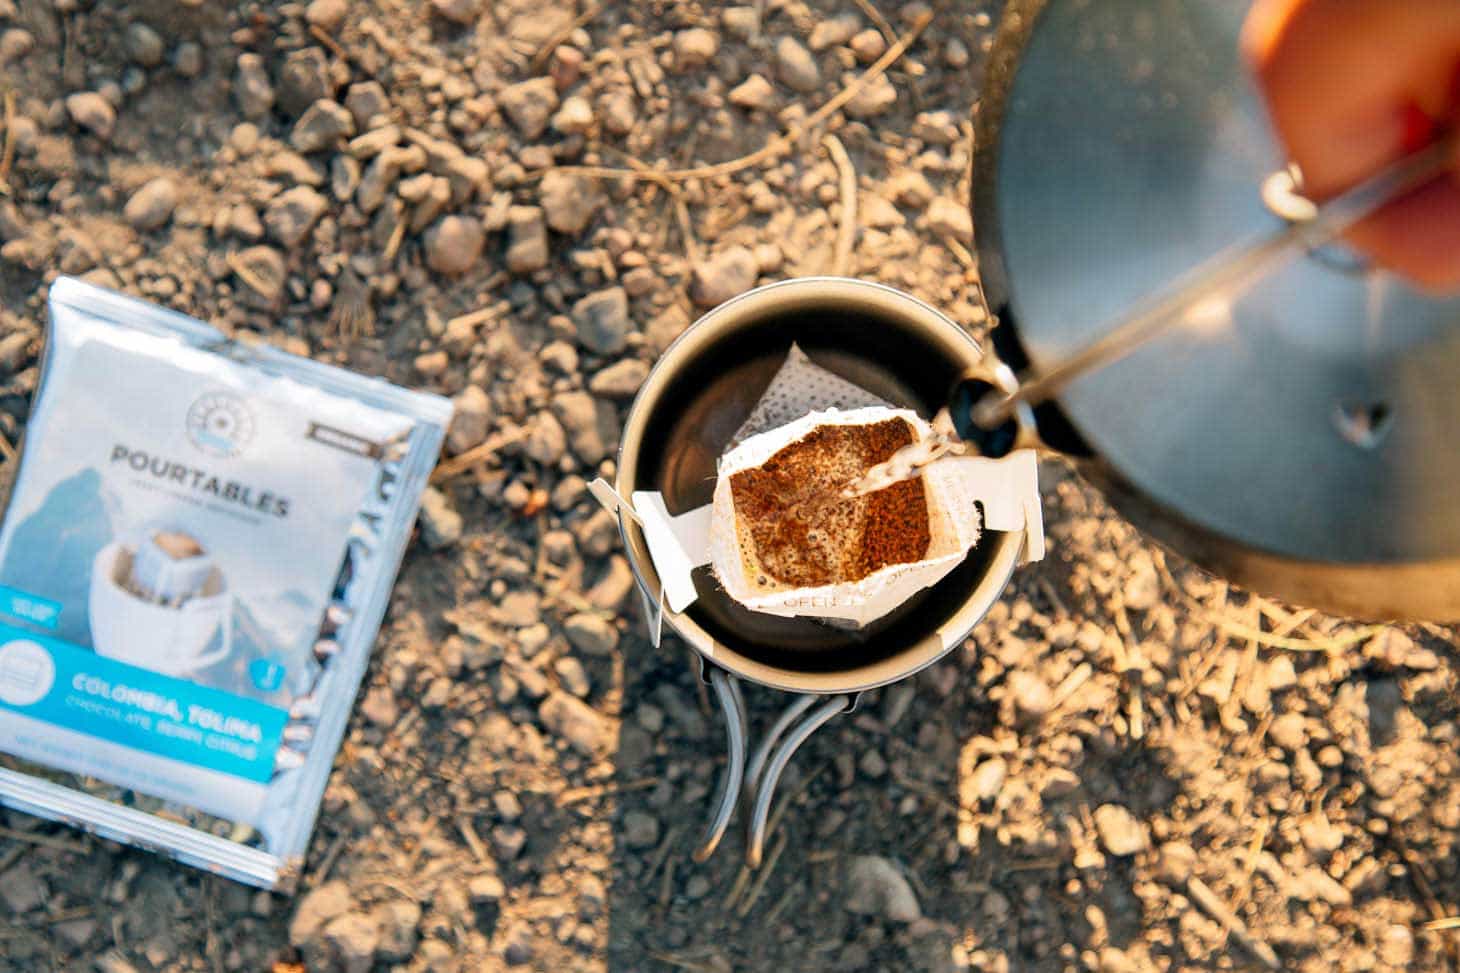
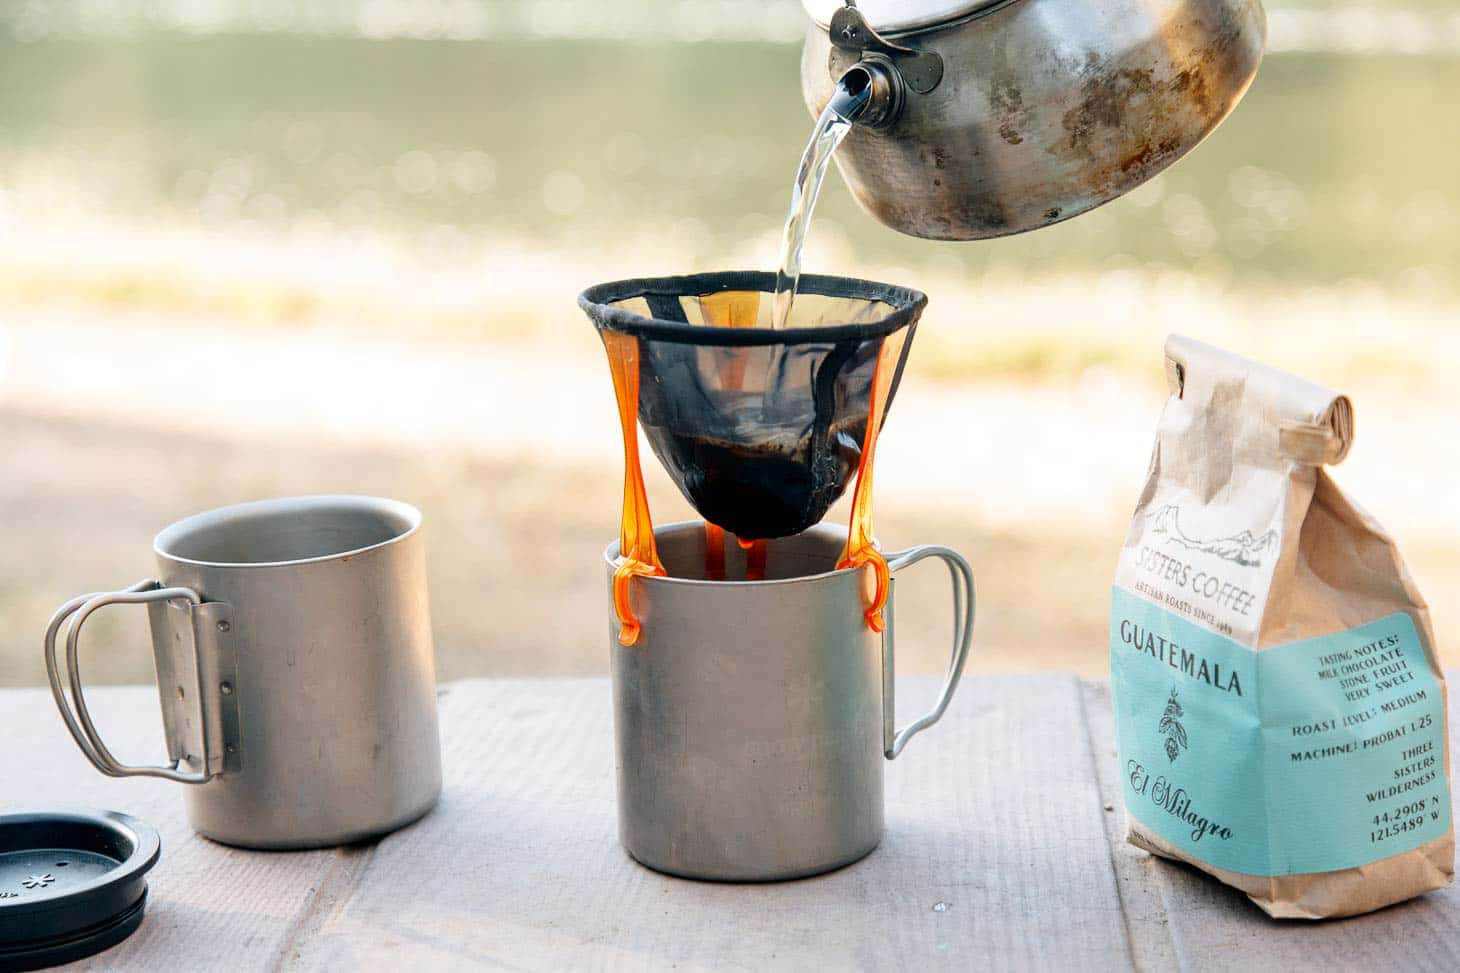
Single Serving Pour-Overs
If you’re looking to step up your camp coffee game beyond instant coffee or coffee-in-a-bag, single-serving pour-overs are a fantastic choice. These handy little packets combine pre-ground coffee with a foldable paper pour-over stand, giving you a cup of coffee that tastes a lot closer to a typical pour-over but in a lightweight, compact package.
One of our favorites is Kuju Coffee. They have fantastic-tasting coffee, and they donate 1% of sales to the National Park Foundation.
Best for: Campers and backpackers who crave that rich, pour-over taste but still want to keep their load light. It’s especially appealing if you don’t mind packing out the wet grounds.
Method: These pour-overs come with a small paper frame filled with ground coffee. Just open it up, set it over your cup, and slowly pour hot water through the coffee pouch. Remove the pouch when you’re done, and enjoy your freshly brewed coffee.
Make Your Own!
You can find single-use pour-over filters on Amazon (here’s a link for a biodegradable option!). Fill them with your favorite ground coffee ahead of time and seal in zip-top bags, pressing out the air to keep them fresh and the grounds in place. This way, you get all the convenience and the exact coffee you love, ready for the campsite.
Pour Over
If quality and flavor are more important to you than quick convenience, a proper pour-over stand might be your perfect camping coffee setup. While the ceramic stands you see in coffee shops aren’t exactly trail-friendly, there are plenty of lightweight and durable options designed for outdoor adventures. This method may take a few extra minutes, but the reward is a perfectly brewed cup of coffee that’s hard to beat.
Best for: Serious coffee lovers, especially those who plan on grinding their own beans at the campsite. This method delivers exceptional flavor and aroma but requires a bit more time, making it best suited for couples or solo campers.
Method: Place a paper or cloth filter in the pour-over stand, fill it with your coffee grounds, and position it over your mug. Heat your water to nearly boiling, then pour in a slow, circular motion over the grounds. A steady, smooth pour without splashing is key here, so a kettle with a controlled spout (like our favorite GSI kettle) makes a big difference.
Here are some pour-over camp coffee makers we recommend:
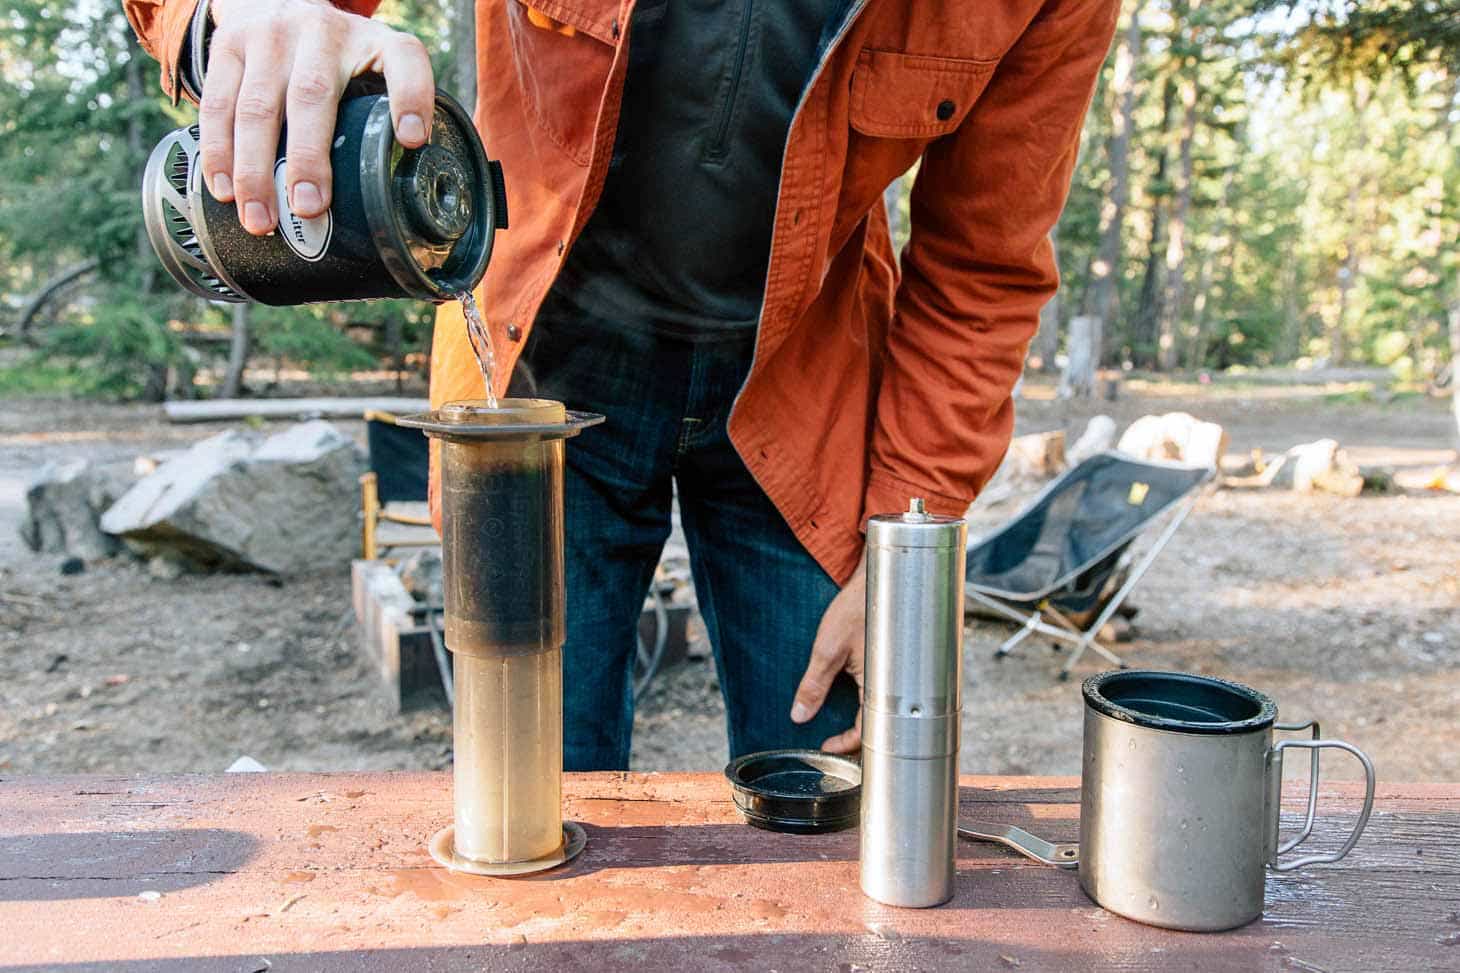
AeroPress Coffee Maker
This is our personal favorite way to make coffee while camping (and at home!). A combination between a pour-over, French press, and a pneumatic press, the Aeropress delivers incredibly rich and smooth coffee. With a quick brew time, nearly effortless cleanup, and a compact design, the AeroPress has been our go-to camp coffee maker for nearly a decade!
Best for: This method is great for car campers, vanlife and RVers, or backpackers really dedicated to their coffee. While it brews one or two cups at a time, it can work for small groups if everyone has a bit of patience.
Official Top-Down Brew Method: To see the traditional top-down method in action, it’s best to just watch the official video.

Inverted Method: This fan-favorite approach is popular with baristas and dedicated AeroPress enthusiasts. Place the plunger on a flat surface, facing up, and position the base on top, inserting the plunger slightly. Add coffee grounds to the base, drizzle hot water to degas, then fill the rest with water and let it steep. Attach the filter cap, place an upside-down cup over the filter, and flip the entire setup before pressing down.
Want to dive deeper? Check out our full guide with videos on how to brew with an AeroPress and make the most of this trusty little coffee maker on your next camping trip!
Here are the options:
- Aeropress Go Travel Coffee Maker: Designed to be more compact and travel-friendly, the Aeropress Go is ⅓ smaller than the original. It comes with a collapsible stirrer, scoop, and filter holder that can all be nested inside a coffee cup.
- XL Coffee Press: This new XL version can brew two cups of American-style coffee or six shots of espresso at a time, so it’s a great option for groups.
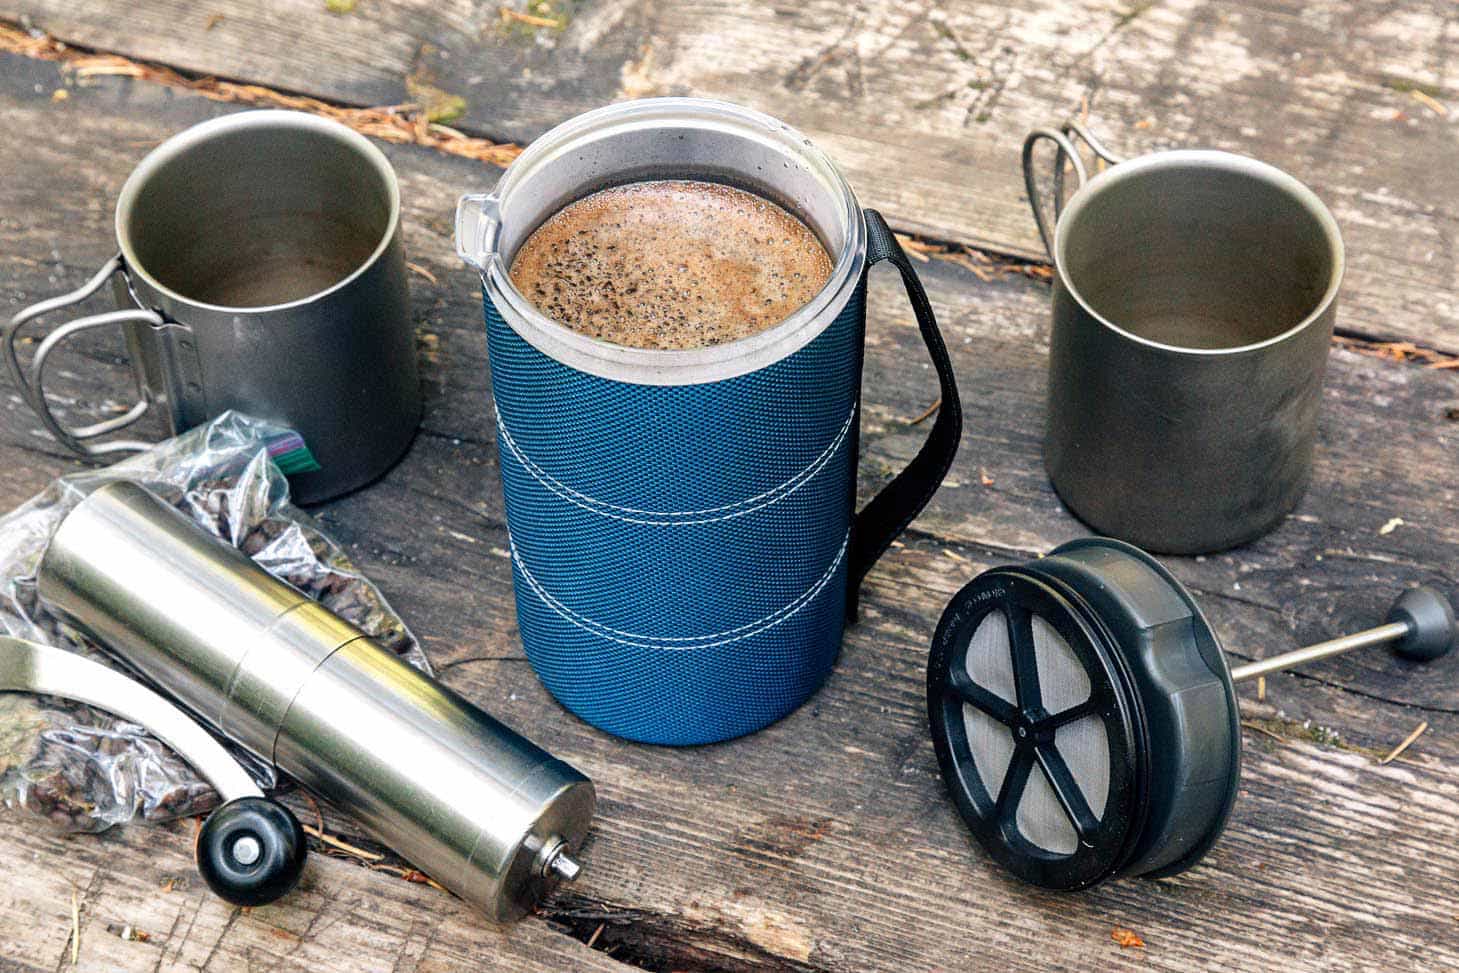
Camping French Press
For those who love the simplicity of a French press but want something designed for the rough and tumble life of camping, a camping-style French press is a solid choice. It’s ideal for making larger batches of coffee without much effort, though it does require a bit more coffee grounds (coarse grind is best) and requires bit more cleanup than some of the other ways of making coffee while camping.
Ideal Use: Campers looking for a straightforward brew method that yields a classic, robust cup of coffee, perfect for sharing among small groups of 2-4 people.
Method: Add coarse coffee grounds to the bottom of the press, drizzle a bit of hot water to allow the grounds to “de-gas,” then fill the rest with hot water and stir. Let it steep for 8-10 minutes, then press down the plunger to separate the grounds.
Good options to consider:
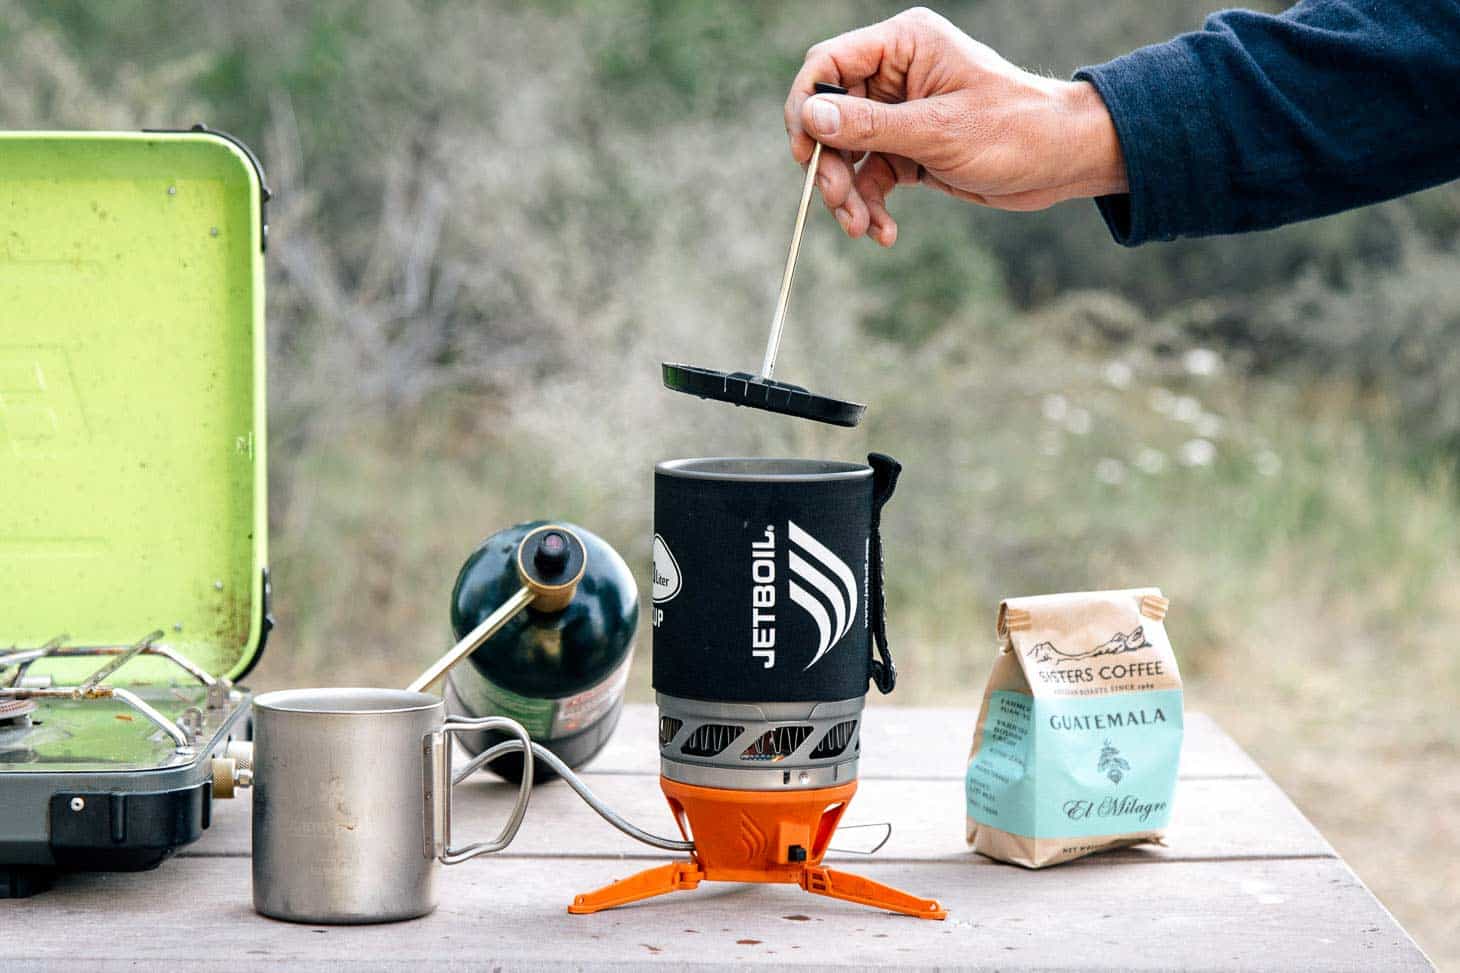
Cook Systems with French Press Attachments
Many integrated cook systems like Jetboil and MSR offer French press plungers. These plungers are designed to work with these rapid hot water makers, reducing the amount of gear you need to carry.
This approach is ideal if you already use your integrated cook system in the front country to rapidly make hot water. Or you really, really like French press-style coffee on your backpacking trips and you don’t mind packing the wet grounds out*.
*Yes, pack them out. It’s not OK to bury them or toss them on the ground.
Integrated Cook Systems With French Press Attachments
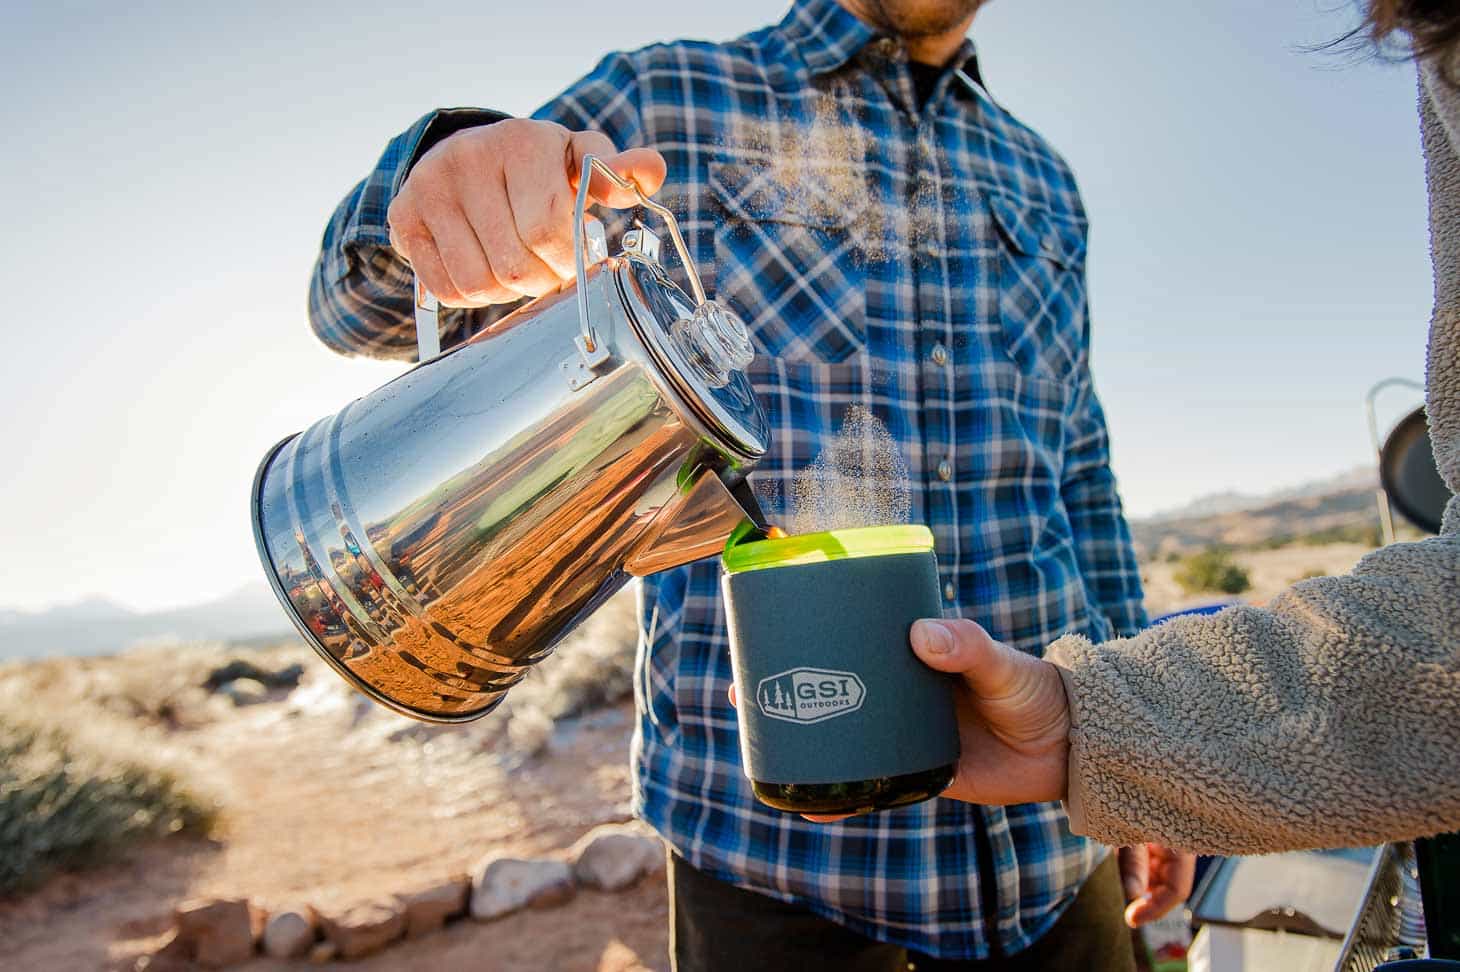
Stove-Top Percolator
The good old-fashioned percolator has been a go-to for camp coffee drinkers for generations. This nostalgic method uses a metal tube and basket system where boiling water percolates up into the coffee grounds, giving you a batch of piping hot, flavorful coffee. It’s especially great for making larger amounts, perfect for sharing.
Ideal Use: Ideal for car campers, vanlifers, and RVers, and it works well for groups of all sizes depending on the percolator’s capacity.
Method: Start by filling the kettle with water and adding a paper filter in the basket (or just use the metal filter basket). Add coffee grounds to the basket, place the percolator on your campfire or propane camp stove, and bring it to a boil. Many percolators have a viewing bubble on top, allowing you to check the color and strength of your brew.
A percolator may require a bit of monitoring and time, but the payoff is a strong, satisfying cup of coffee that’s hard to beat, especially when shared around a morning campfire.
Here are a few recommendations:
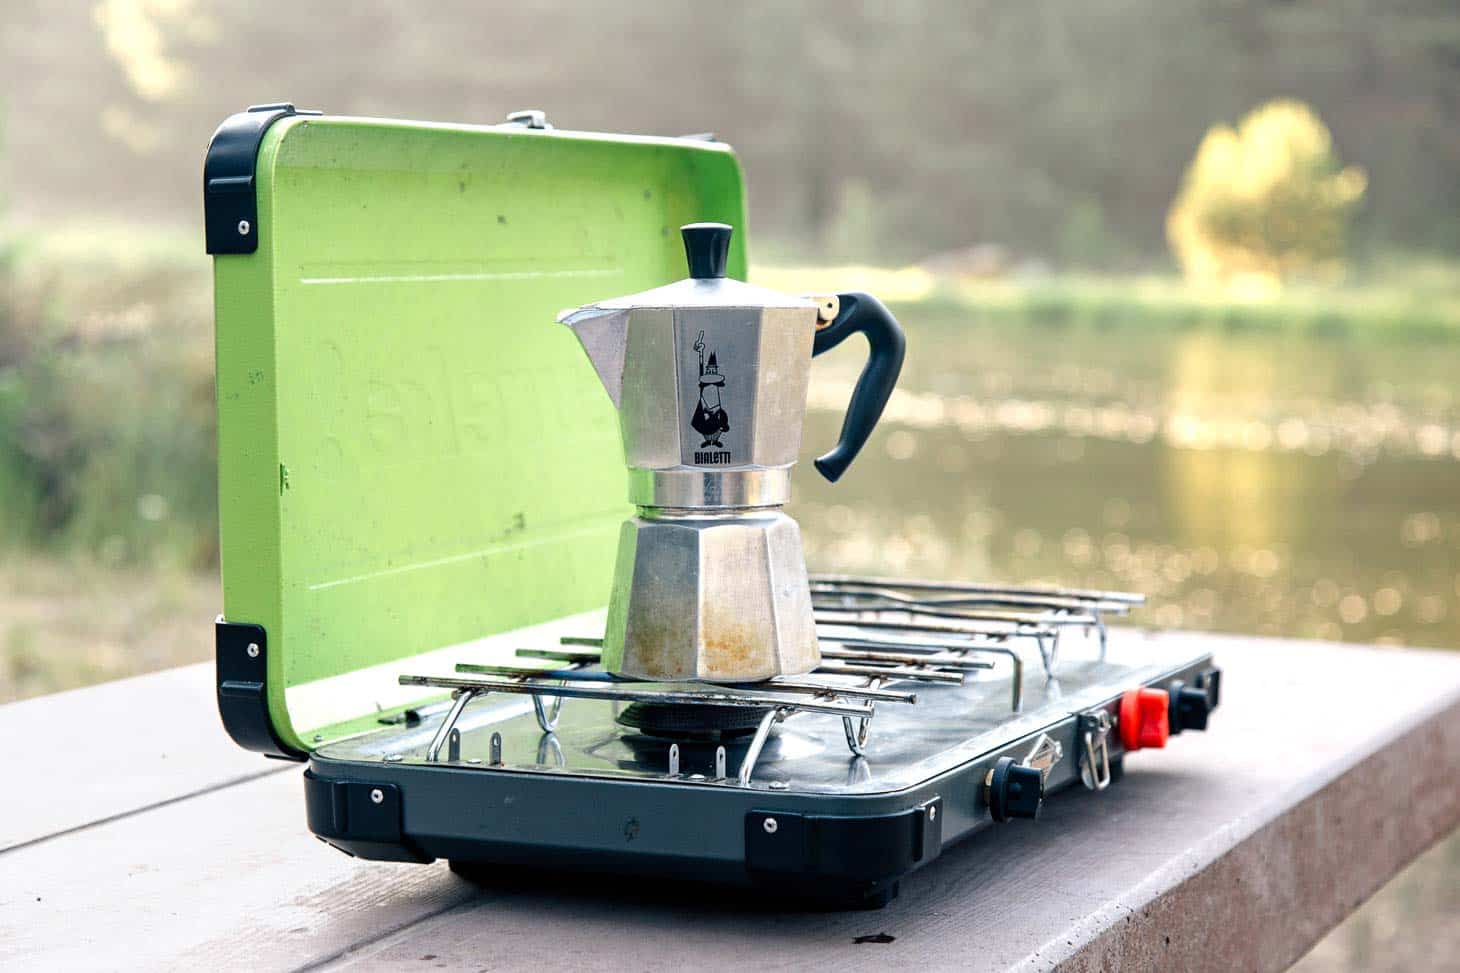
Moka Pot & Portable Espresso Makers
If you like strong, Italian-style coffee, then the Moka Pot might be for you! This stovetop espresso maker brews extra-bold coffee that can be enjoyed straight or diluted with hot water for a smooth Americano. The Moka pot’s built-in metal filter means you’ll never have to worry about disposable filters, making it both convenient and eco-friendly.
Best for: Anyone who wants to experience the peppy bravado that only a shot of genuine Italian espresso can deliver.
Method: The Moka pot has three parts: a bottom reservoir for water, a middle filter for the coffee grounds, and a top carafe for the brewed coffee. Fill the bottom chamber with water, pack the middle filter with grounds, and screw the top on securely. Place the pot over a stove, and as the water heats, it’ll create steam pressure that pushes the water up through the coffee grounds and into the top chamber.
This method is straightforward and satisfying, delivering a robust coffee experience for those mornings when you need a little extra pep in your step!
Here are our recommendations:

Cold Brew Coffee
If you’re camping in hot weather or prefer a smooth, low-acid coffee, cold brew is an excellent choice. It’s easy to prepare in advance, doesn’t require a heat source, and can be enjoyed straight from the cooler! Cold brew is brewed as a concentrate, so it’s strong, refreshing, and perfect for those relaxed mornings (or afternoons!) at camp.
Best for: Campers looking for a cold coffee option or those who want a no-fuss, make-ahead coffee that can last for days without the need for boiling water.
Method: To make your own cold brew concentrate, add coarsely ground coffee to a large jar or bottle and fill it with cold water at a ratio of roughly 1:4 (one part coffee to four parts water) for a strong concentrate. Let it steep in the fridge or cooler for at least 12-24 hours. When ready, strain out the grounds (a coffee sock or fine mesh strainer works well), then pour the concentrate over ice and add water or milk to dilute to your taste.
Cold brew concentrate will keep well in a cooler for up to a few days, making it an ideal option for camping trips where you’ll be craving something refreshing and easy. Just pour, sip, and enjoy!
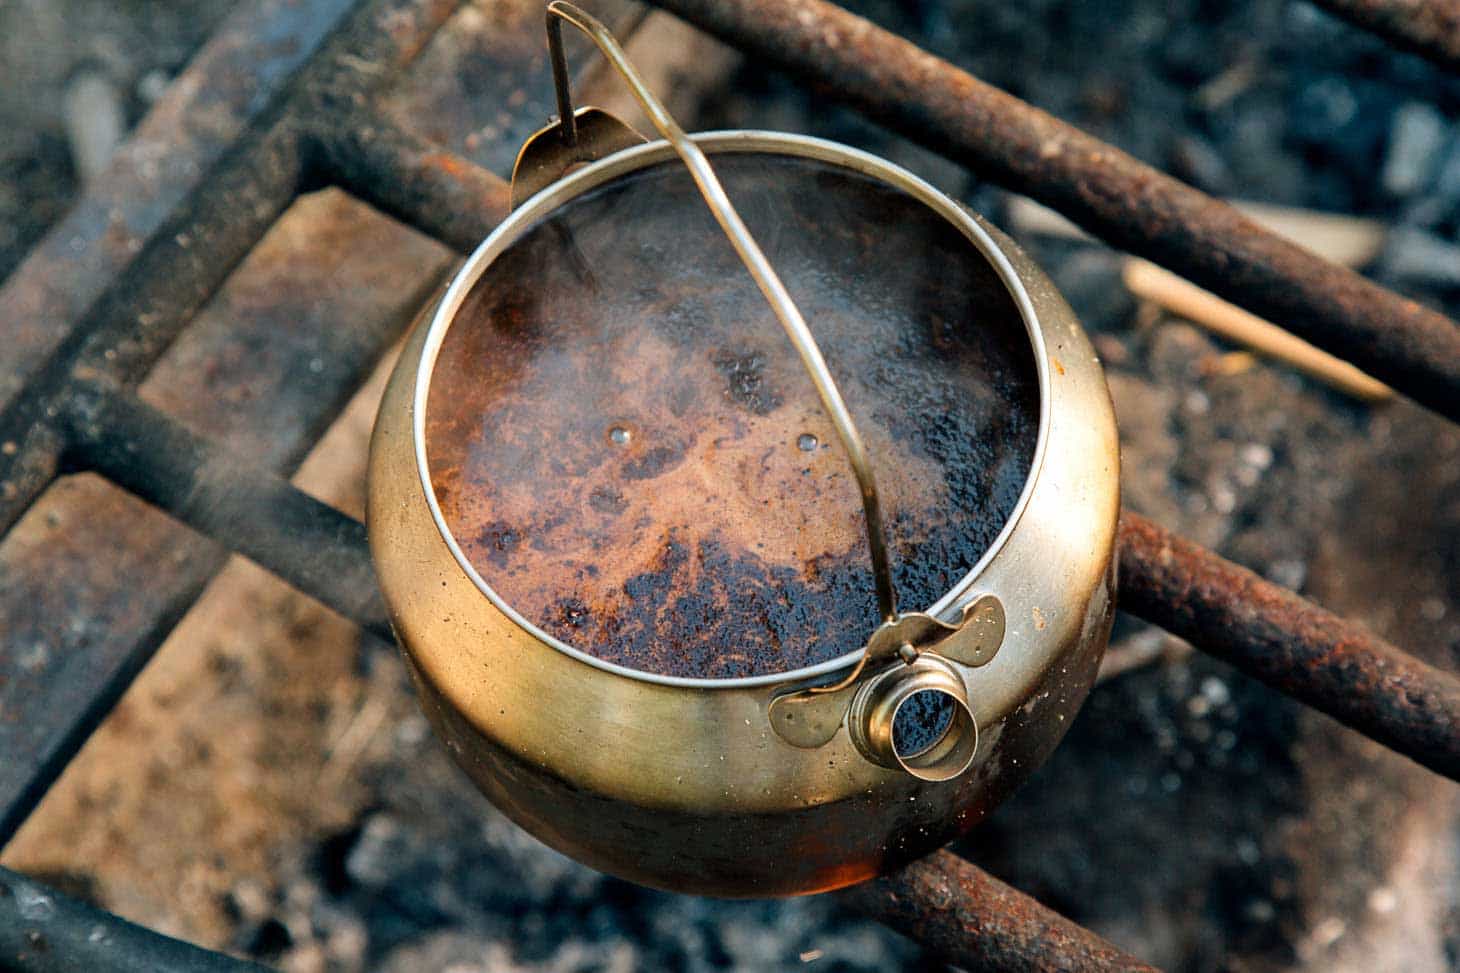
Cowboy Coffee
Have you ever arrived at the campground only to realize you forgot your coffee maker at home? What should you do? Panic? Cancel the trip?!
Nope—cowboy coffee to the rescue!
Assuming you didn’t also forget the coffee at home too (in which case you seriously need to download our car camping checklist), all you need is a kettle or pot of water, some coffee grounds, and a little know-how. Cowboy coffee is rustic, resourceful, and packs a surprisingly satisfying punch.
Best for: Campers who enjoy the simplicity of “no-gear” coffee or those who may have forgotten their regular coffee setup.
Method 1: Sink Down Method
- Heat a kettle or pot of water until it’s boiling.
- Remove from heat, add coffee grounds, and return to low heat for a gentle simmer.
- After a few minutes, some of the grounds should start to sink. Drizzling a bit of cold water on top can help encourage this process.
- Pour the coffee gently into cups, trying to avoid disturbing the grounds that have settled at the bottom.
Method 2: Scoop Top Method
- Boil water in a kettle or pot, then remove from heat and add coffee grounds.
- Return to low heat and let the coffee simmer.
- Use a spoon to skim the coffee grounds off the surface, leaving a smoother brew below.
With either method, cowboy coffee offers a quick and rugged solution for those coffee emergencies (or just a taste of the simple life!). It’s not fancy, but it’s warm, satisfying, and gets the job done—camping style.
Insulated Coffee Mugs
One of the simplest ways to upgrade your camping coffee experience is to invest in a proper mug. For years, we used the classic blue-speckled enamel camp mugs—only to find that they’d get scalding hot in seconds and then go cold just as quickly, leaving us with just a few minutes of perfect temperature.
That changed when we made the switch to insulated coffee mugs. With double-wall insulation, these mugs keep your coffee warm much longer, letting you enjoy every sip without rushing. Now, we can enjoy a piping hot cup throughout the morning, whether we’re watching the sunrise or getting ready for a day of adventure.
Our favorites:
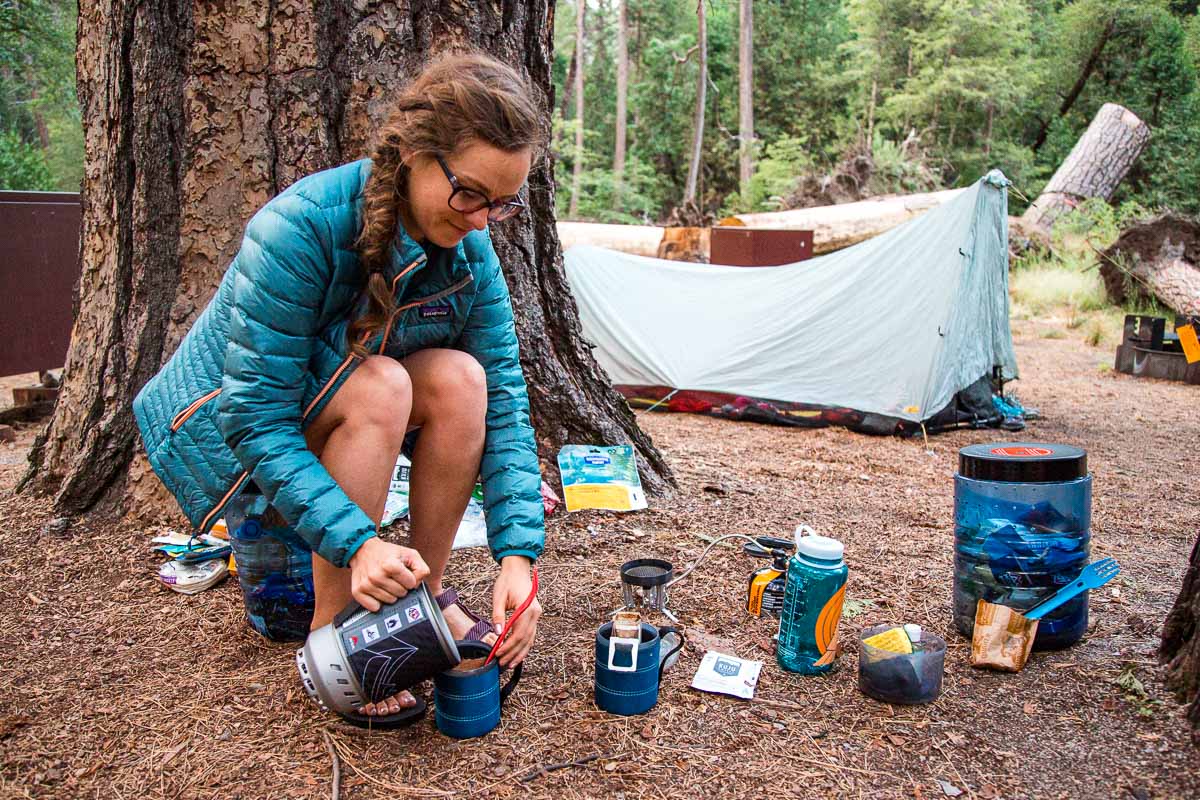
Portable Coffee Grinders
No doubt, bringing pre-ground coffee is the easiest way of making coffee while camping. But there’s something to be said for grinding fresh beans at camp. Freshly ground coffee offers a noticeable flavor boost—even for those of us who wouldn’t call ourselves coffee snobs. If you’re brewing a specialty or high-end coffee, grinding your beans on the spot makes all the difference.
Another perk? Adjusting the grind size to fit your brew method. Most pre-ground coffee is medium-coarse, ideal for drip machines, but some methods (like the AeroPress) call for a finer grind, while others (like a French press) need it coarser. With a portable coffee grinder, you can dial in the perfect grind.
Here are a few compact and durable hand grinders:
This post was first published in 10/2018 and refreshed 11/2024.
Why in the world would you want to trek your used coffee grounds out of the wild? Coffee grounds are not trash or anything foreign to the wilderness, forest or grassy fields. Coffee is a natural mix for soil. In the home front many use to airate and fertilize their special plants. This is one item that does not need to return to the source unless you are dumping the grounds on top of a picnic table or a parking lot. Just about any ground will surfice for mixing with your grounds.
Milo, we totally get it that coffee grounds are compostable and can easily be re-integrated into the soil. If we were making coffee in our backyard, the grounds would go in the hedges. But there are a few reasons why we’d suggest packing out while backpacking. 1.) In a lot of the designated wilderness areas in the western US, it’s required you pack out all waste. 2.) Not all environments are equally suited for soil compositing: fragile alpine meadows, arid deserts, rocky summits. 3.) The strong smell of coffee can attract animals, which trains them to check backpackers sites for food. So while soil composting might works in some circumstances, we tend to err on the side of caution.
I know this is a year old article but…..
I live in Colorado and camp 10 to 12 times yearly.
2 things:
1st. Pack it out or dont pack it in. If you would rather not carry used grounds out with you, that is OK. Just take instant instead. And I do pack my tea bags out.
2. What do you all think the preferred method for making coffee for 30 person camping would be? Need economical but still decent flavor. (full disclosure: I don’t drink coffee at all. I am a tea guy.) I will be hosting large monthly camping trips 4-5 times a year for the foreseeable future.
Texsport, GSI, and a few others make mega-sized percolators (I think 24 cups). We’ve come across a few guided rafting camps (with like 30 people in them) and that was what they were using.
I know this is really, really, really,*really* old, and everyone involved will have long since moved on with their lives, but just for the sake of future readers yet to come, I’d just like to tag in behind Nate and also say that it’s not all about the soil; caffeine is not safe – or necessarily *wise* – for all animals to consume. And if it smells interesting – which coffee grounds do – they *will* lick it.
Even if your leftover grounds, dumped out in the wild, don’t outright poison any poor fuzzy li’l critter, have a heart for the other camper who might have to deal with a caffeinated bull moose (or mountain lion, or bear, or coyote…komodo dragon…cassowary…hey, I don’t know where you are).
Half-joking? Sure. But only half.
Haha this is great! I loved the little bripe! We mostly use a French press in our Skoolie. But in the woods I think instant is the way to go. If you live out there long enough it starts to taste like real coffee.
We hear that! Instant coffee is getting better and better.
Good article, so far I’ve just used the coffee press with my JetBoil Zip and a No4 coffee from Aldi and it was very easy to make and tasted good
We posted a lot of options but if you find something that works, stick with it!
Where is the original travel espresso maker Handpresso?
We had one of their models a couple of years back, and we weren’t super crazy about it. Perhaps they’ve made some improvements since. We’ll have to try them again.
You can cold brew your own if you think to start it the day before. So good and smooth!
We need to start practicing our DIY cold brew game.
Starbucks instant packets work just fine for this simple family! Sipping while looking at the lake! Camping is an escape for us.
Ain’t nothing wrong with that!
We use a Dripolator. Best coffee we ever had