Dutch Oven Blondies
This post may contain affiliate links.
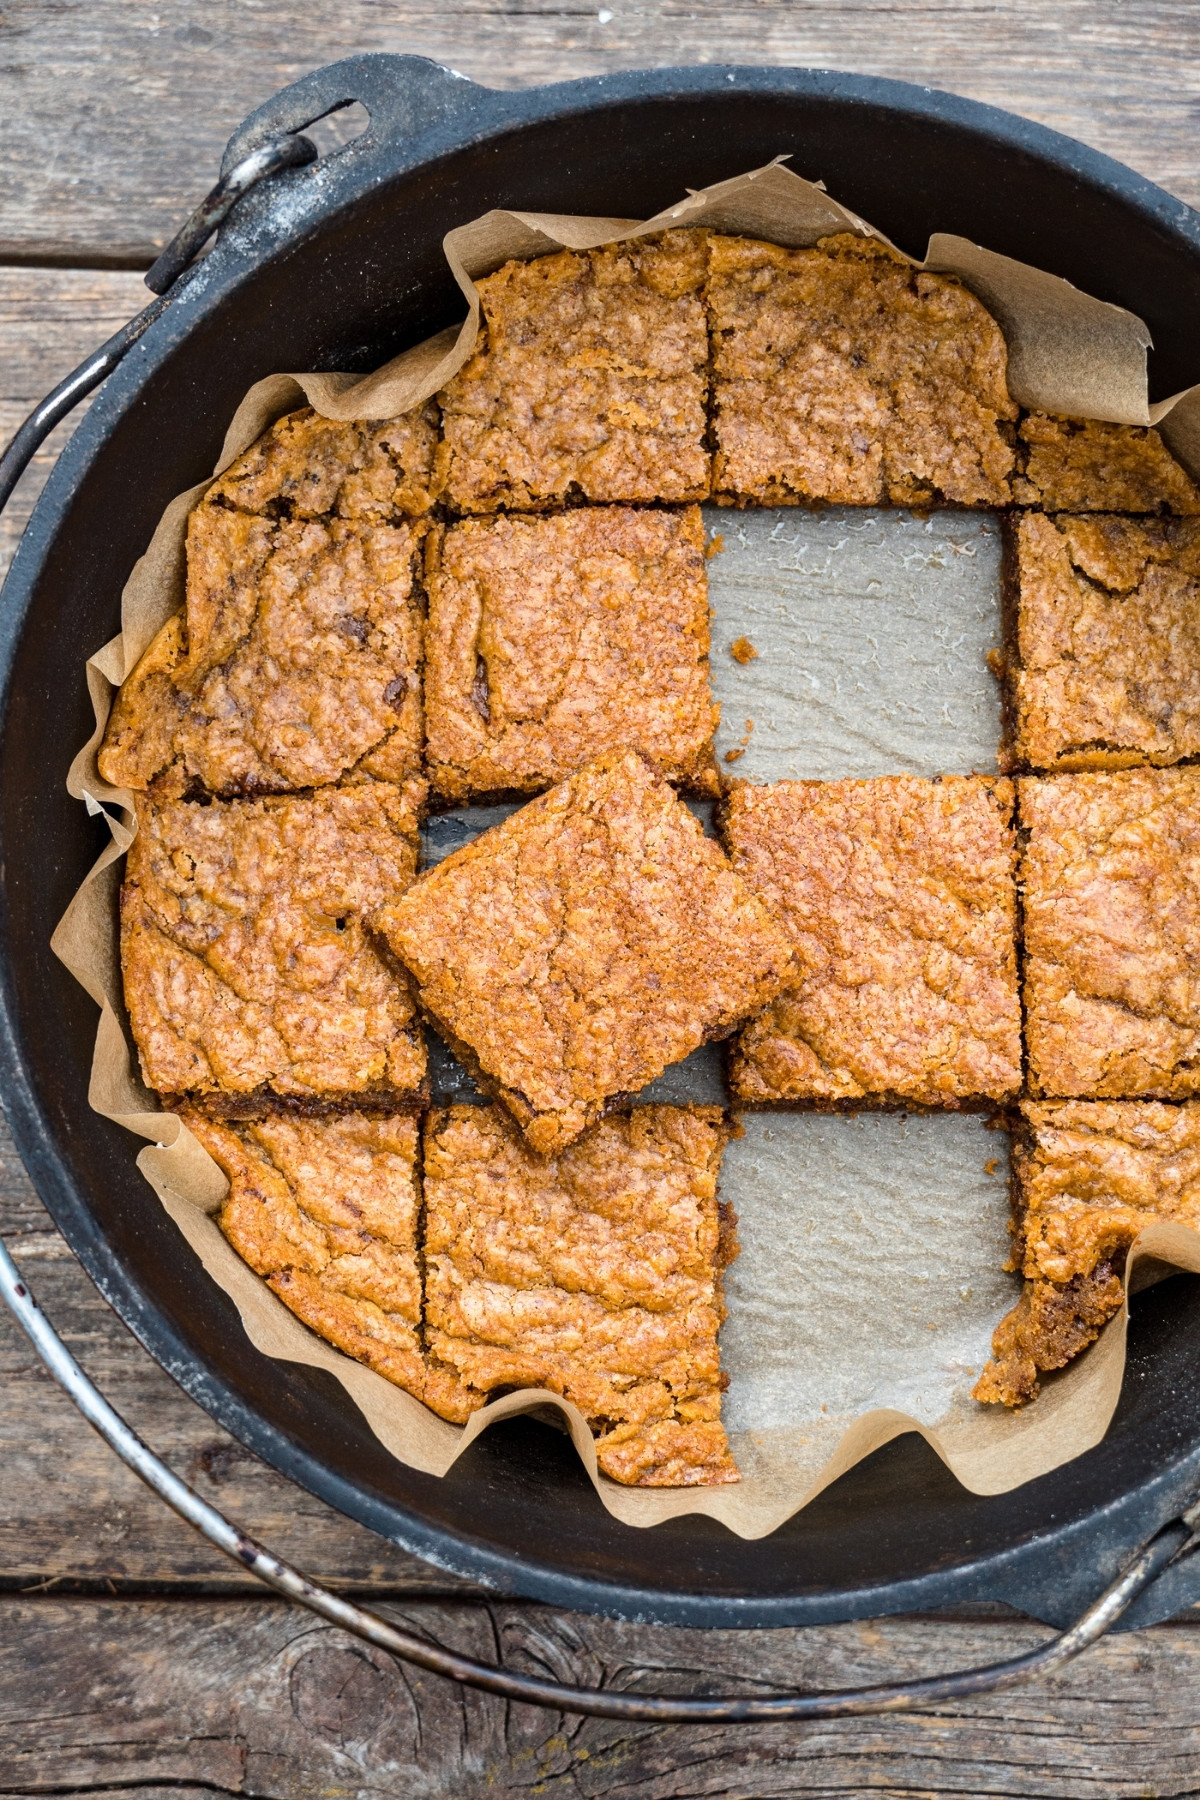
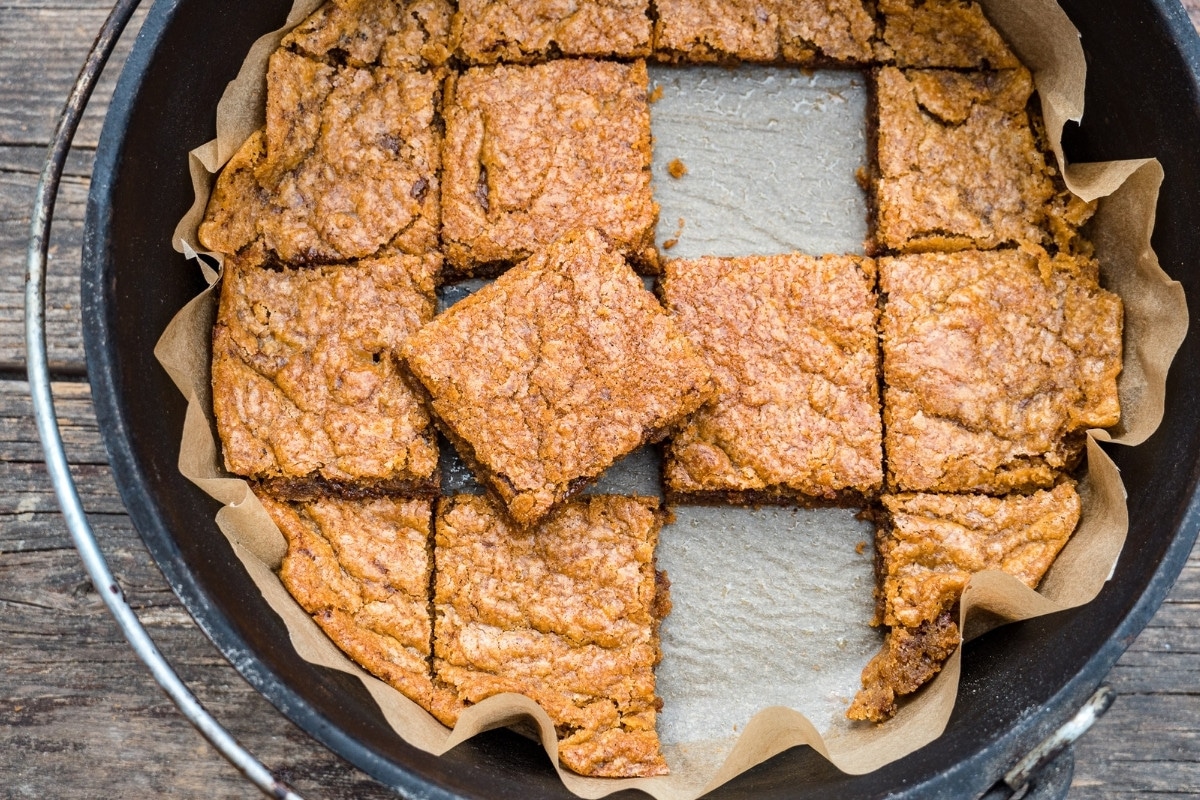
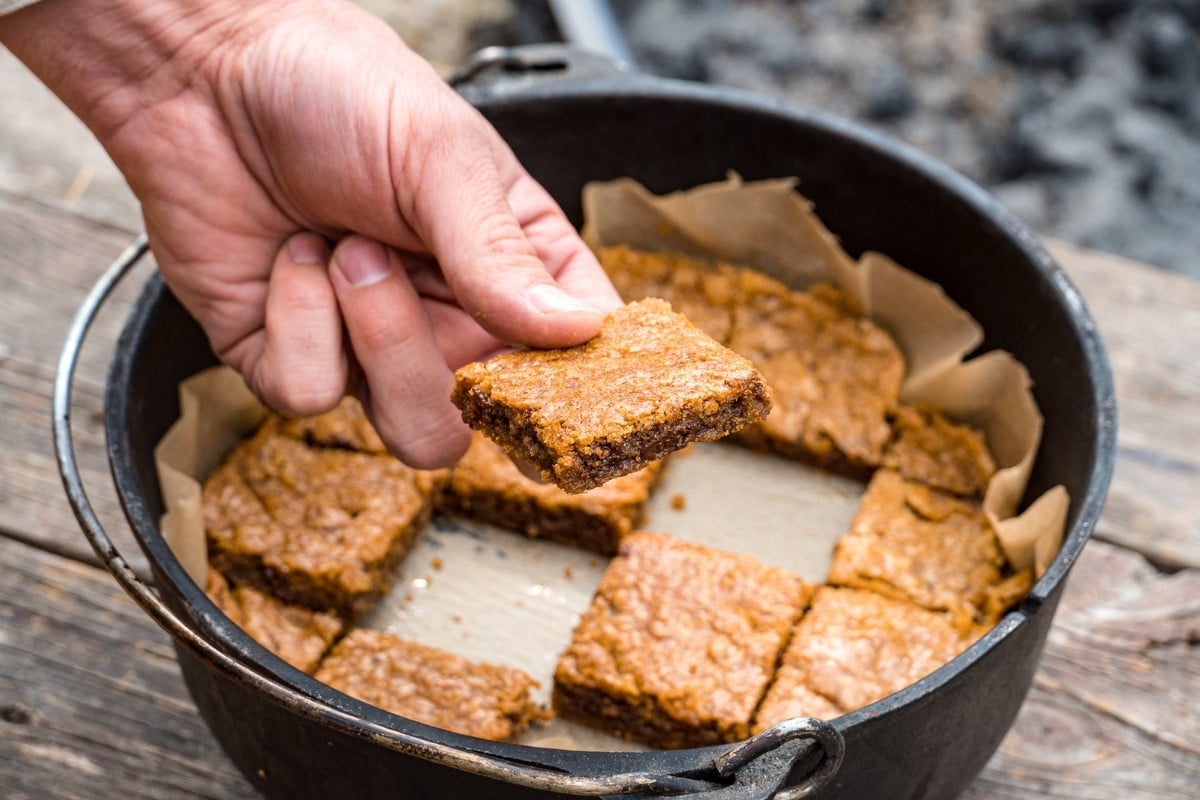
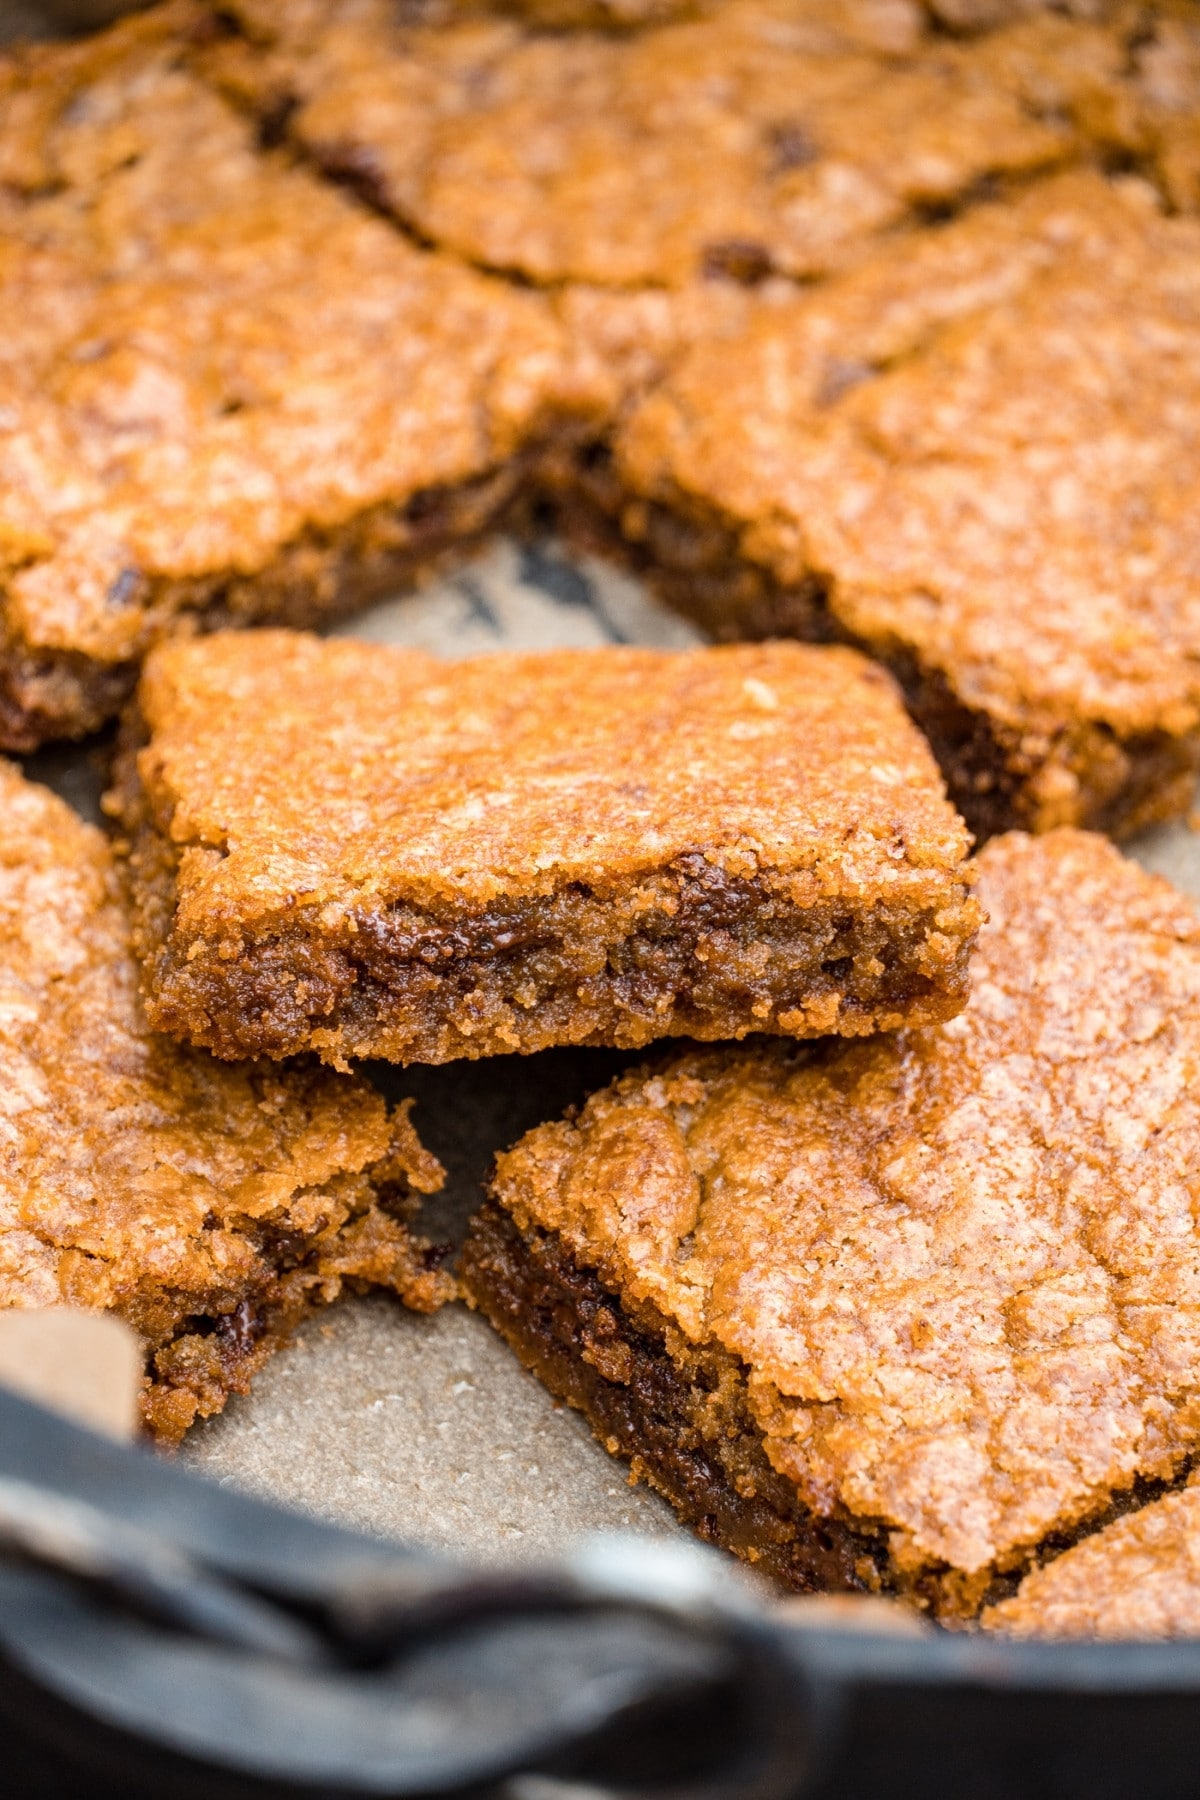
Crispy on top, soft and chewy in the middle, with delicious caramel dark chocolate chunks, these Dutch Oven Blondies are going to be your new favorite camping dessert.
The recipe was developed in partnership with Endangered Species Chocolate
In the shape and form of a brownie, but with the taste and texture of a chocolate chip cookie, blondies are a delightful dessert hybrid and perfectly suited for camp cooking.
While brownies often taste like a wall of chocolate, blondies actually allow you to appreciate each pop of melty, fudgy, chocolatey deliciousness. Being able to taste and distinguish the chocolate is all the more important if you’re using a high-quality chocolate bar… like one of the many offered by this post’s sponsor, Endangered Species Chocolate 😉
A crisp, glossy top, soft and chewy inside, and big pockets of delicious chocolate, this is exactly what the type of dessert we want while sitting around the campfire!
Why We Love Them
- Super easy to make the dough, just mix everything in a bowl
- The dough can be made entirely ahead of time and stored in a cooler
- Fun campfire dessert that’s not s’mores
So if you are looking for a make-mostly-ahead campfire dessert that is sure the knock the socks off your campmates, these Dutch oven blondies are for you!
Ingredients
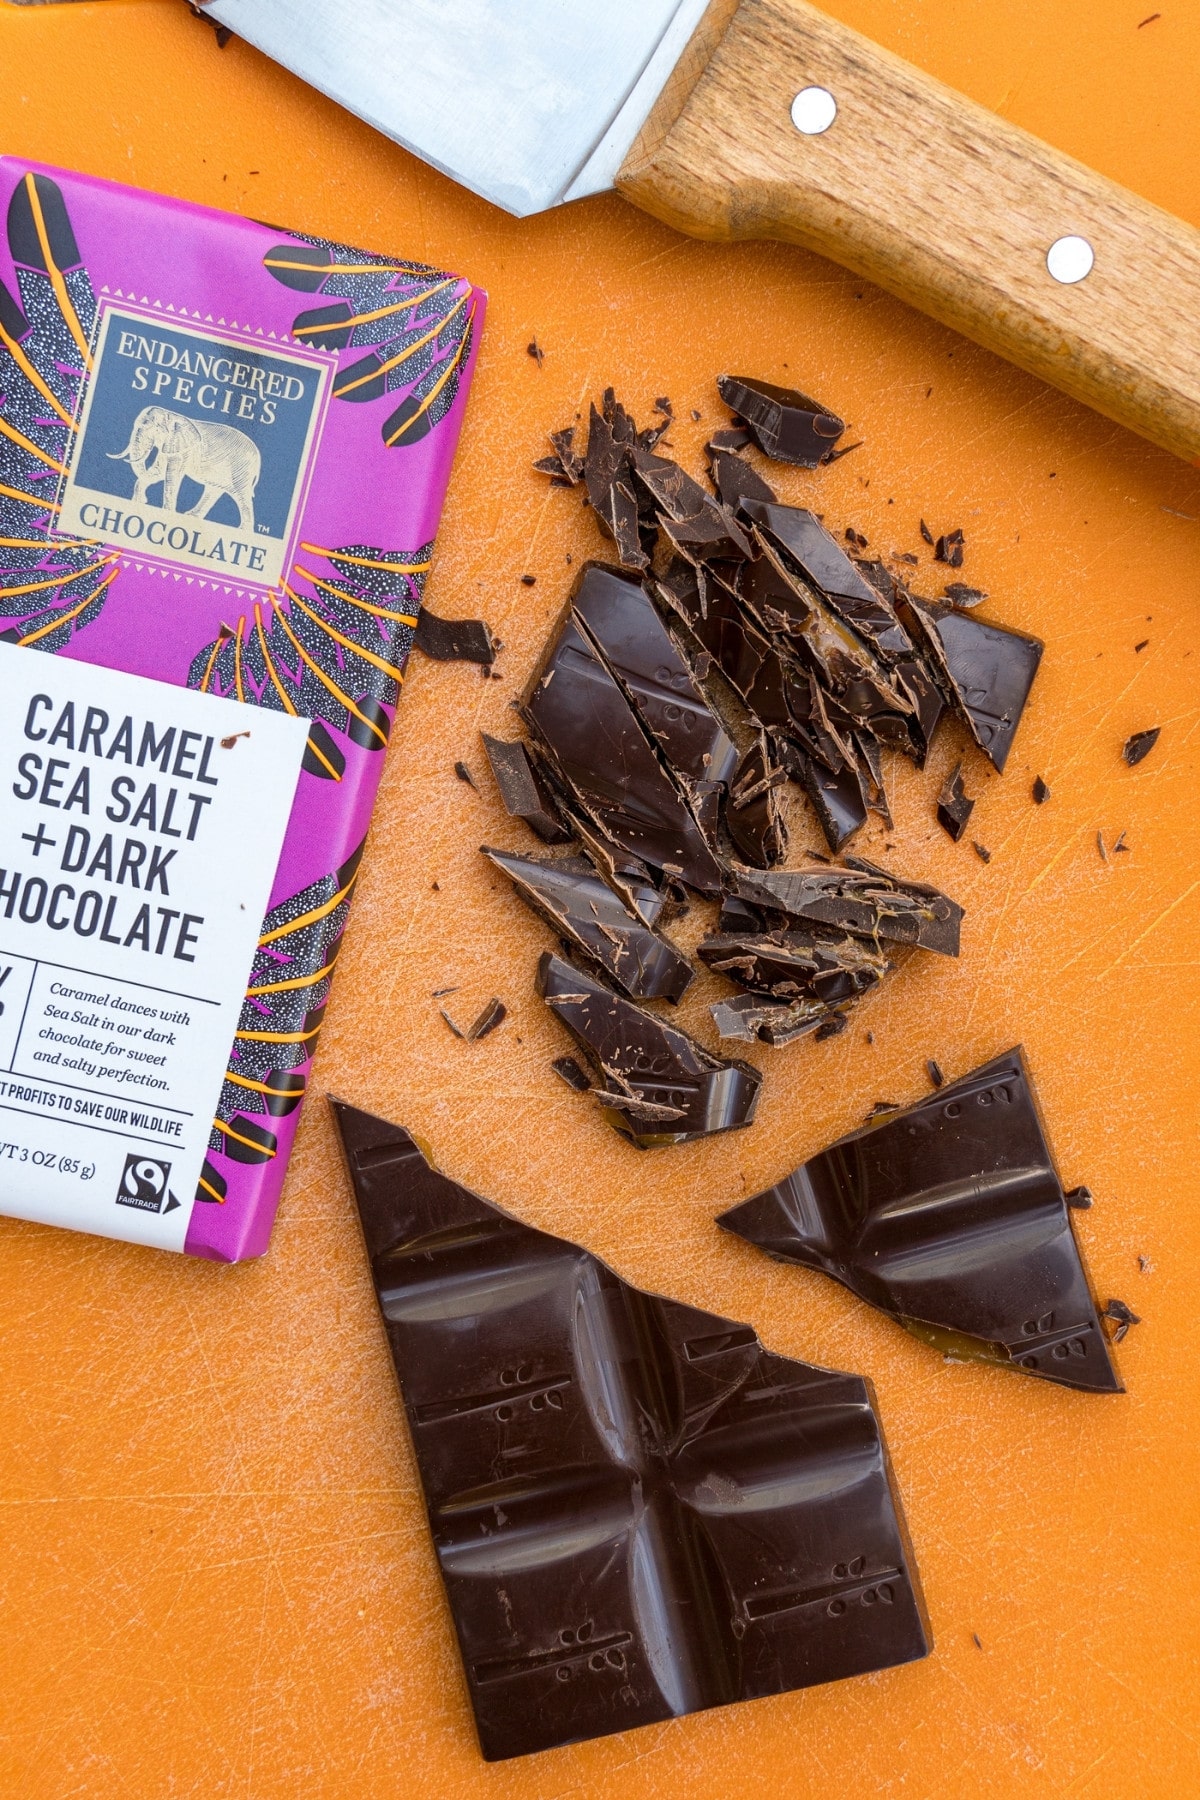
Endangered Species Caramel Sea Salt Dark Chocolate: In addition to being a great mission-driven company, Endangered Species Chocolate has a chocolate bar that we think is absolutely perfect for making blondies: Caramel Chocolate. It has small pockets of caramel, which makes the blondies delightfully chewy.
Butter: You want the butter to be soft or partially melted. Cold butter won’t integrate well with the other “wet” ingredients, and hot melted butter risks cooking the egg. We suggest leaving the butter out of the cooler before you start making dinner and it should be perfect when it comes time to make dessert.
Brown Sugar: We recommend transferring your brown sugar into a sealable container, like these reusable Ziploc containers. It just takes a little bit of air to turn brown sugar from soft and fluffy to a literal brick.
Egg: This is your binder, which gives the blondies their structure and texture. If you had to melt your butter because you forgot to take it out of the cooler (whoops!), be sure to add the brown sugar and butter together first, then add the egg. This ensures you don’t accidentally cook it and end up with scrambled egg blondies.
Flour: Plain-jane AP flour works great. If you need to make this recipe gluten-free, Bob’s Red Mills 1-for-1 flour is a great substitute. There isn’t a lot of gluten development in Blondies so you won’t be missing out on anything.
Baking Powder: Try to find the baking powder without aluminum in it. Bob’s Red Mills or Rumford makes aluminum-free baking powder.
Salt: Don’t forget this vital ingredient. Slightly salty chocolate is such a good combo.

Essential Equipment
Dutch oven: We baked this recipe in a 10” 4-quart camping Dutch oven. If you are using a 12” 6-quart Dutch oven, your blondie might not fill the entire base, which is fine (or, double the recipe!). Learn more about cooking with a Dutch oven.
Long-Handled Metal Tongs: The best (and safest) way to move individual charcoals around is with a pair of long-handled metal tongs.
Lid Lifter: We have this 4-in-1 lid lifter from Lodge that makes rotating and lifting our Dutch oven lid super easy. It also functions as a lid trivet, lid stand, and pot stand.
Charcoal Chimney: We like to use traditional charcoal (non-match light version). To get them started, we use this collapsible charcoal chimney.
Parchment Paper: A cheap alternative to a Dutch oven liner is to use parchment paper. Place the lid of the Dutch oven on the sheet and cut a circle around it about 1-2 inches from the lid. This prevents sticking and makes it easy to lift the blondies out.
Silicone Spatula: The blondie dough mix is going to be very sticky, so it’s a great idea to have a silicone spatula on hand to help scrape every last bit out of your mixing bowl.
Tips on Making Dutch Oven Blondies
- Recommended: The dough for blondies can be prepared in full at home, stored in a resealable container, and then refrigerated. Just toss it in your cooler before your camping trip and you’ve got a ready-to-bake dessert all prepped and waiting for you!
- If you want to make the dough at camp, no problem! You will just need a large mixing bowl.
- Start your charcoal 20-30 minutes before you want to start baking. Waiting for the coals to get ready is always the thing that holds us up. So get a start on it early.
- While an exact coal number and top/bottom ratio is a good starting point, you might need to augment based on real-world conditions. It’s always a good idea to have more charcoal available than necessary.
- Don’t be afraid to check—there is a thin line between golden brown and browned to a crisp. A sneak peek here and there might prolong the cooking time (by letting heat escape), but it’s well worth it in order to avoid a total calamity. The emotional rollercoaster from “we’re having blondies for dessert!” to “sorry, dessert is ruined” is a ride nobody wants to take.
- If you can’t use a Dutch oven (ie, fire bans or no available fire rings), you can make this recipe using an Omnia Oven. Make the batter as the recipe directs, then, using a silicone mold, place it in the Omnia oven. Bake over medium heat (350F). For more information, check out how to bake with an Omnia oven.
How to Make Dutch oven Blondies: Step-by-step
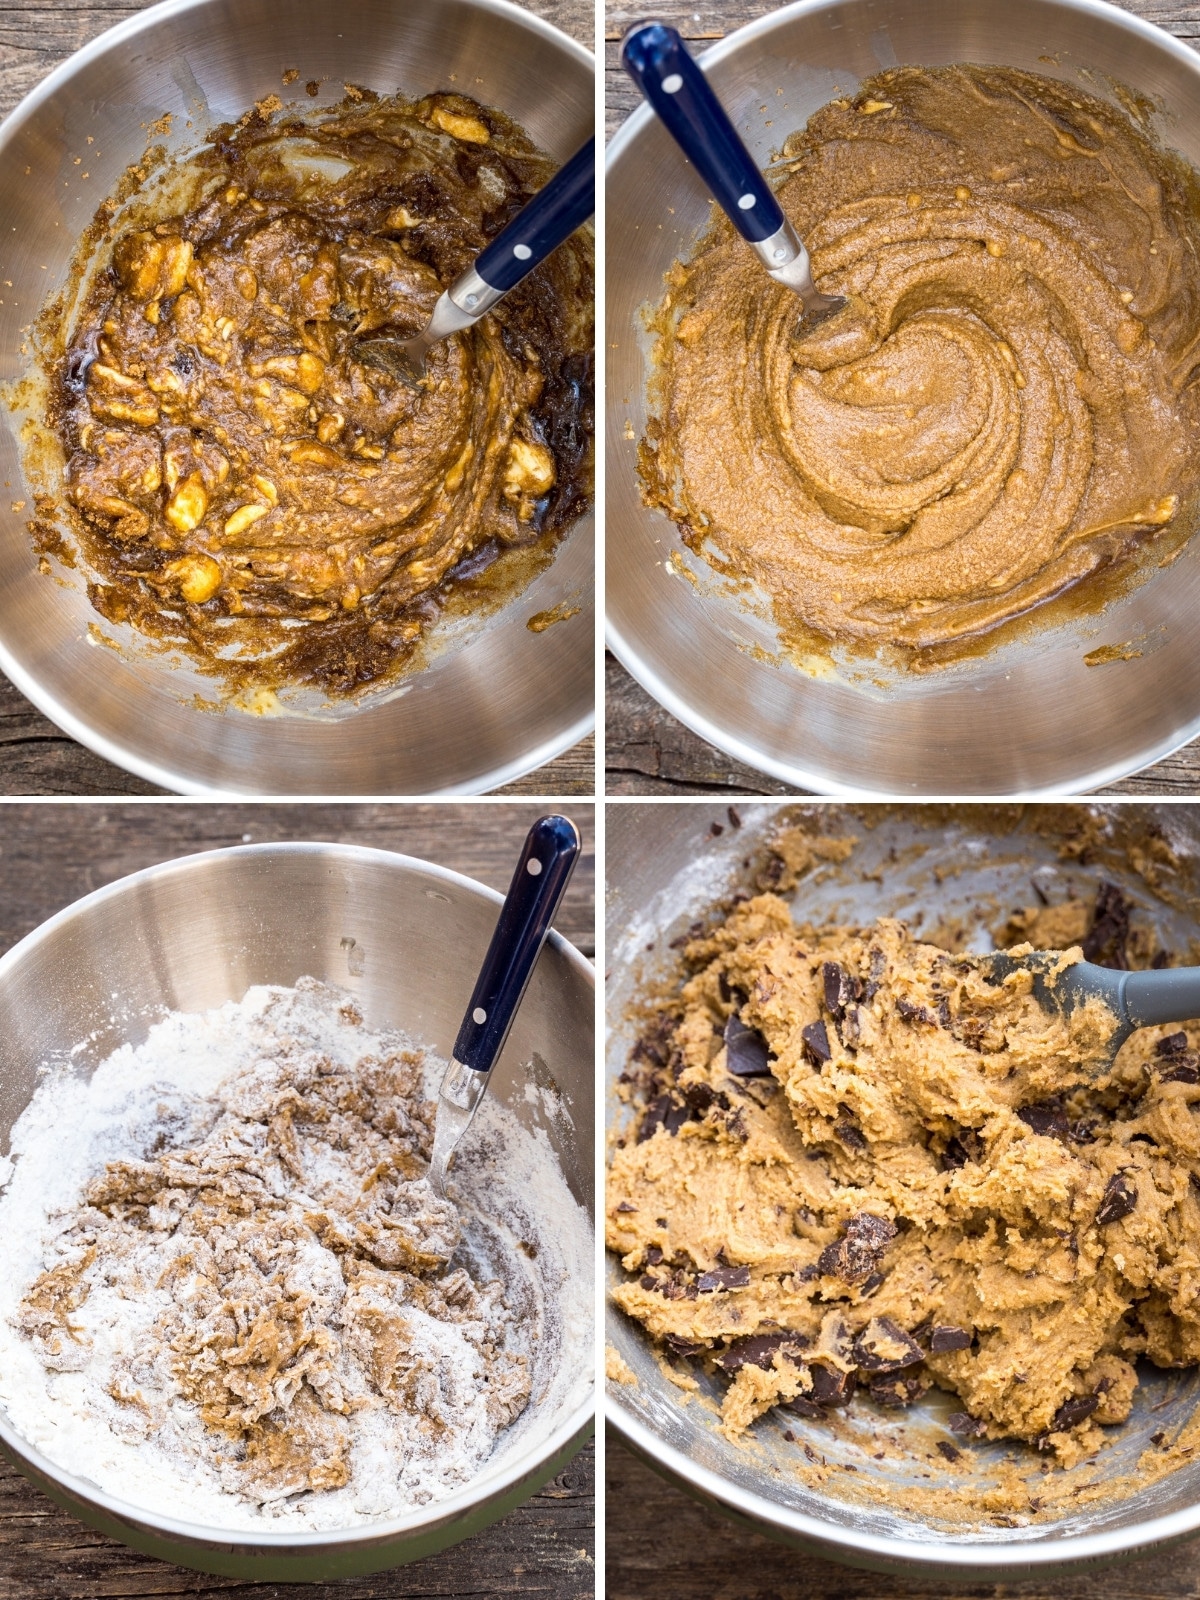
In a large mixing bowl, add your softened butter, brown sugar, and egg and mix thoroughly with a fork. You want the egg smoothly beaten and the butter fully incorporated into a wet paste-like consistency.
Next, add in your flour, baking powder, and salt. Using the same fork as before, gently mix together until all the “dry ingredients” have been incorporated into the dough. This might take a minute or two, but you want to make sure there are no pockets of flour left. The end result should be a sticky dough.
On a cutting board, chop your Endangered Species Chocolate bar into rough chunks approximately ¼ inch by ¼ inch, but really it’s up to you. This process will produce both large chunks and smaller shards of chocolate. Add all of it to the mixing bowl and gently stir until the chocolate is evenly distributed throughout.
If you are making this recipe at home ahead of time, transfer the dough from the mixing bowl into a resealable container and place it in the refrigerator until your trip (up 2-3 days). At the campsite, store the sealed dough in your cooler. Remove it 1 hour before you want to use it to allow it to warm up slightly.
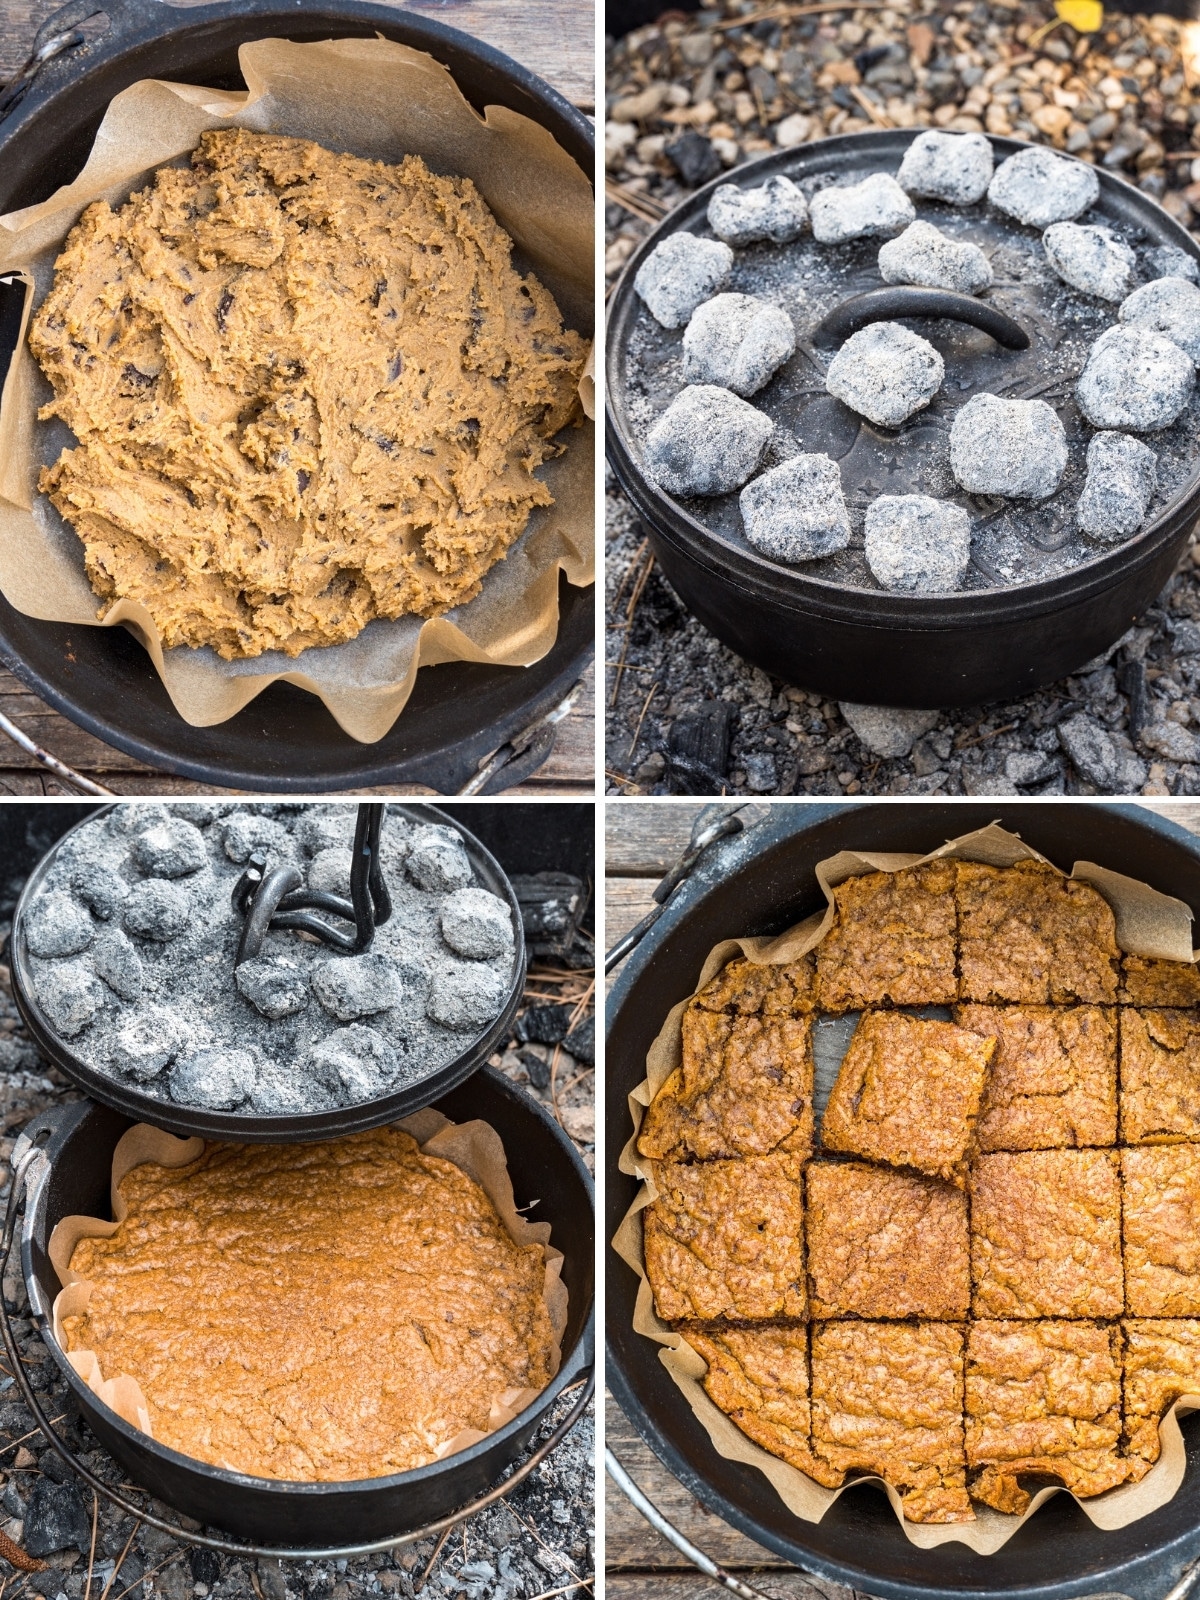
You will want to line your Dutch oven with parchment paper. The easiest way to do this is to take a sheet of parchment, place the lid of the dutch oven on top of it, and then using a pair of scissors, cut a circle roughly 1-2” larger than the lid.
Place the parchment liner in the bottom of the Dutch oven, folding the edges up the side where needed. Transfer the dough into the middle of the parchment paper. The dough is going to be sticky and possibly quite firm – depending on the outside air temperature.
Using a silicone spatula, patiently but persistently try to spread it out so it is roughly ½ inch thick. If you are using a 10” 4-quart Dutch oven, the dough should cover the entire surface. If you are using a 12” 6-quart Dutch oven, the dough will be about 1 inch away from the edge – which is fine.
Ideally, you want the interior temperature of the Dutch oven to be at or around 350F. A specific number of coals and top/bottom ratios are helpful places to start, but you might need to adjust. (e.x. if it’s really cold outside)
For our 10” 4-quart Dutch oven, we started with 7 coals on the bottom and 14 on top (although we ended up adding another 4 to the top).
Cook time will range between 20-30 minutes, depending on the outside air temperature. So we suggest giving it an occasional peek now and again. You will start to smell it once it starts to brown.
Once the top is golden brown, it’s done. Remove from the coals and set aside to cool. You will want to let it cool down for at least 5 minutes before trying to remove it from the Dutch oven. This will allow it to “set” and allow it to be lifted up and out of the Dutch oven without cracking.
Then slice with a knife and serve!
Dutch Oven Blondies
Ingredients
- 1 stick butter (½ cup)
- 1 cup brown sugar
- 1 egg
- 1 cup flour
- ½ teaspoon baking powder
- ¼ teaspoon sea salt
- 1 Endangered Species Caramel Dark Chocolate Bar chopped
Instructions
- In a mixing bowl, combine the softened butter, brown sugar, and egg and mix until smooth.
- Add the flour, baking powder, and salt and stir into the wet ingredients until well combined. Chop the dark chocolate and fold into the batter.
- Spead the batter into an even layer in a lined 10" Dutch oven and cover with the lid.
- Place the Dutch oven on a bed of 7 prepared coals (see note) and place 14 coals on the lid. If your coals are on the small side or it's cold out, you can increase the number of coals on the lid.
- Bake for about 20 minutes — exact baking times will depend on the conditions, so check at 15 minutes and then ever 5 minutes after. The blondies are dones when a toothpick inserted in the center comes out clean.
- Remove from the heat and let cool slightly before cutting into squares. Enjoy!