Pie Iron Pizza Pockets
This post may contain affiliate links.

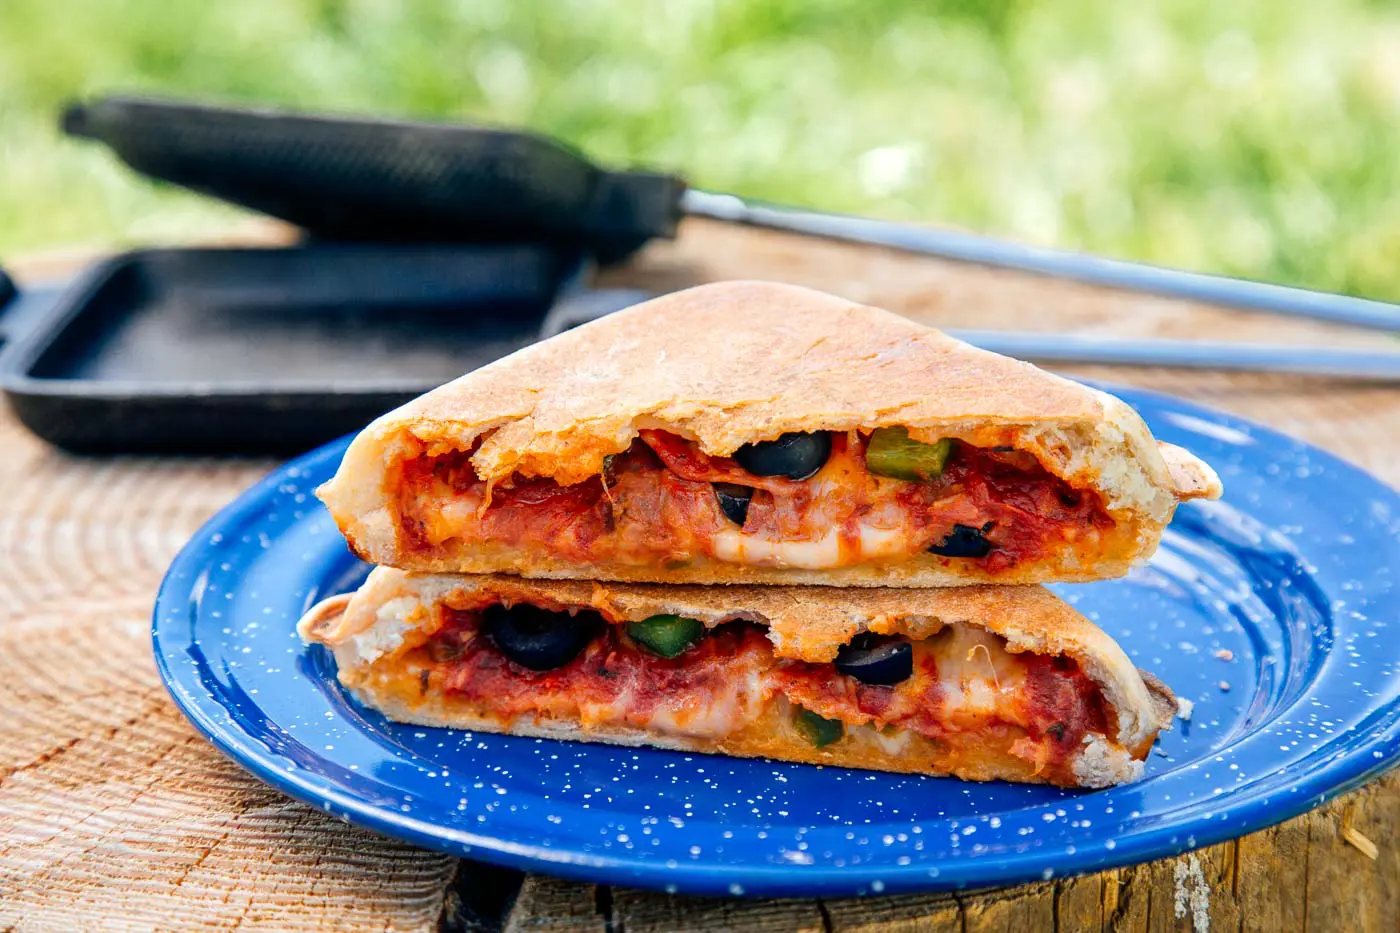
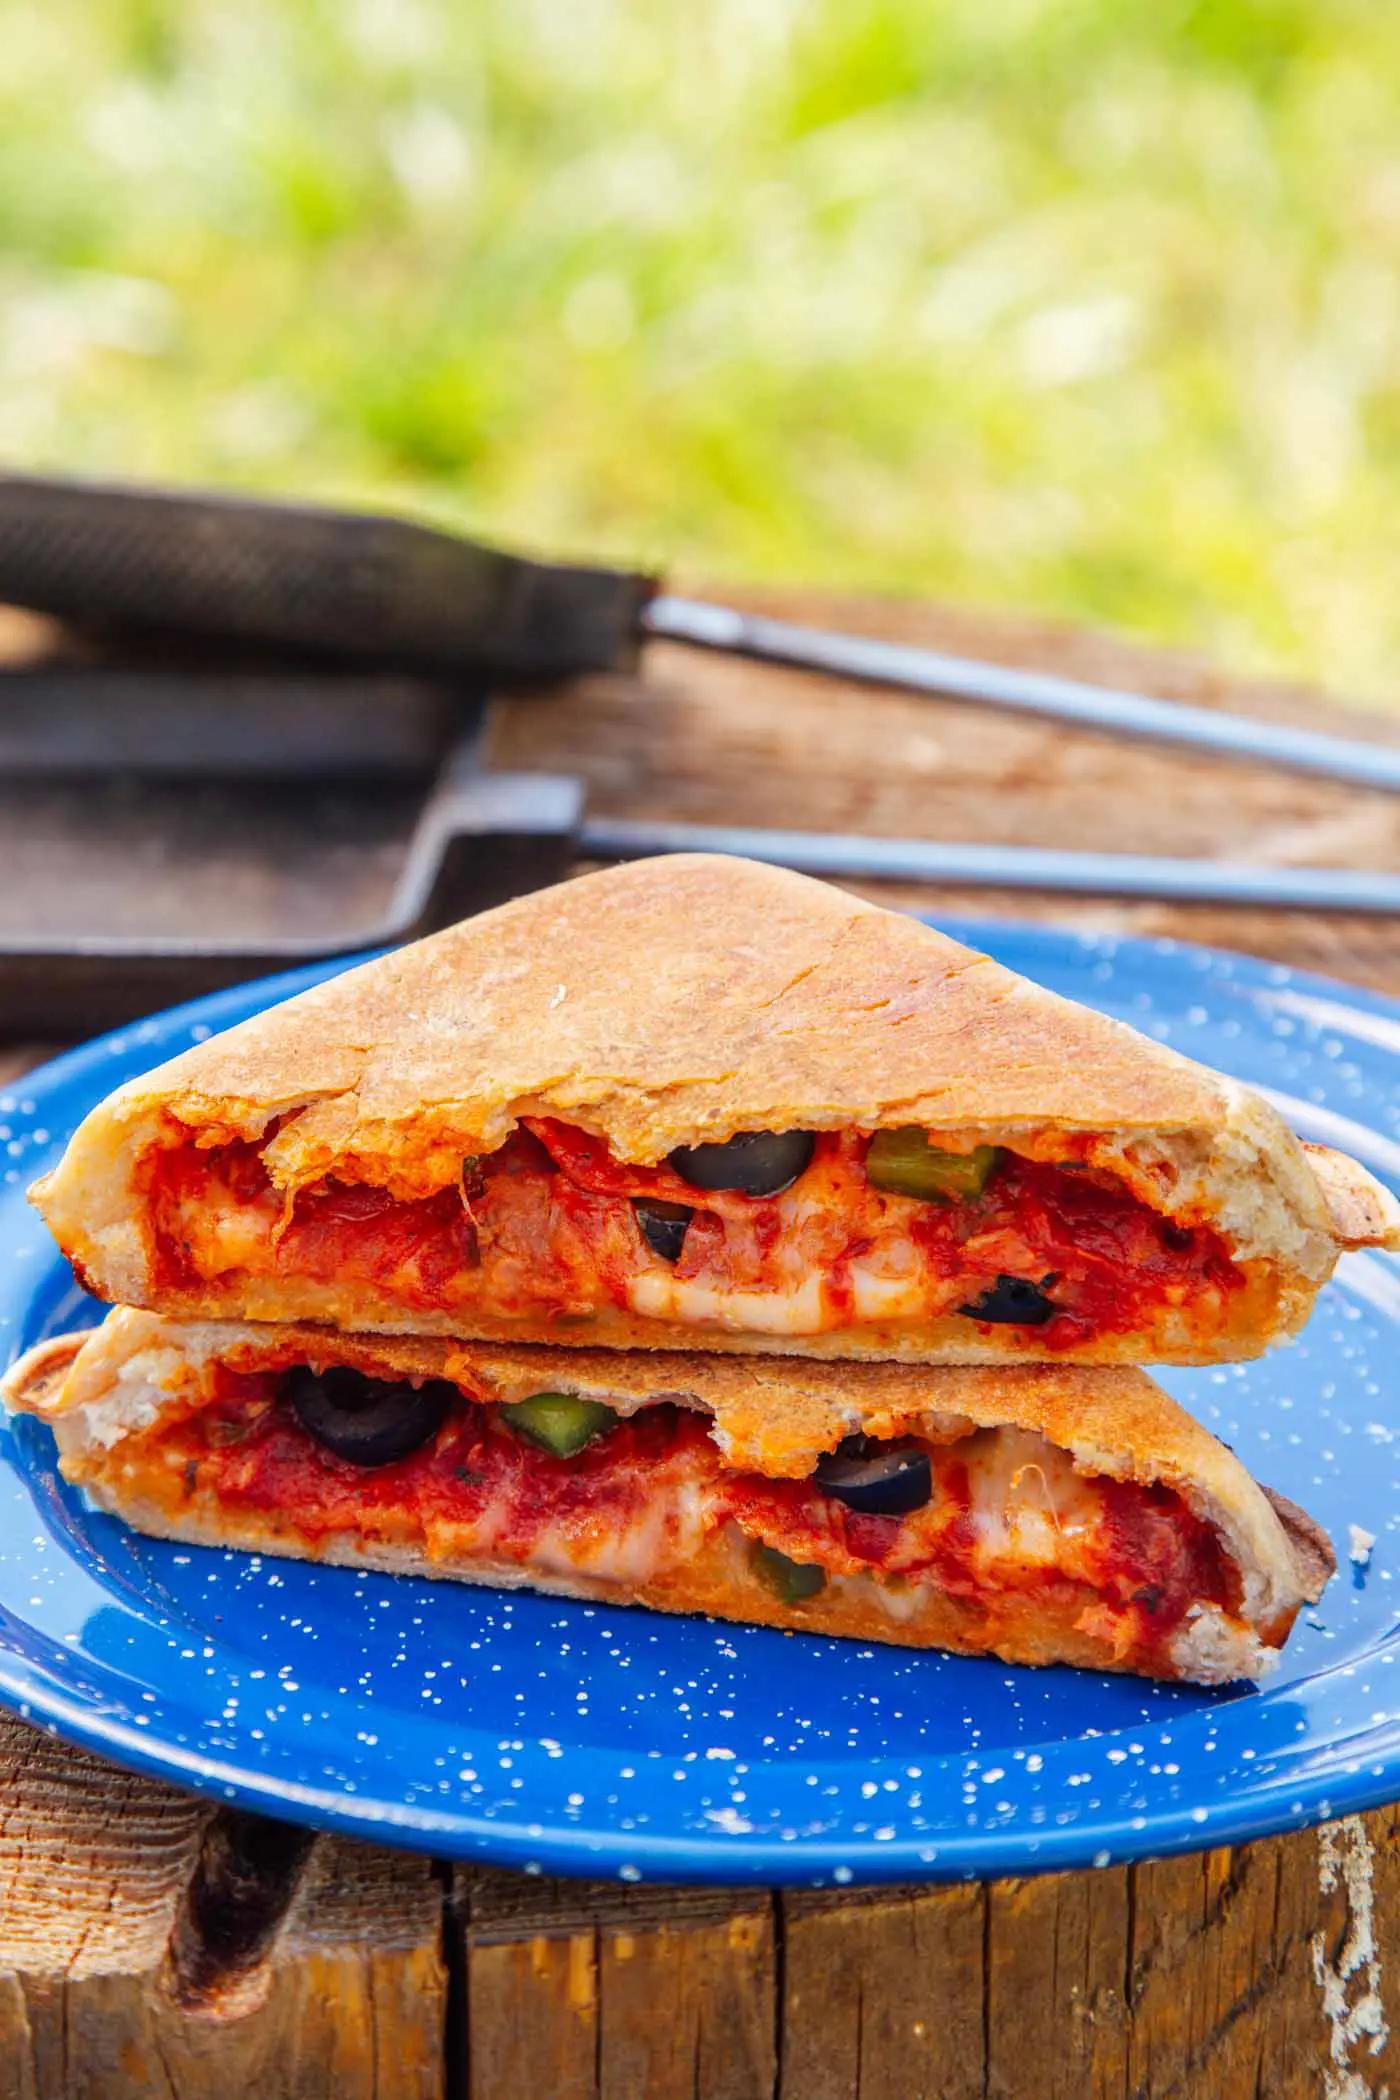
A personal pizza in a handy little pocket, these campfire pie iron pizza pockets represent everything we love about camp cooking. They’re quick, easy, and so much fun to make. Crispy crust, melty mozzarella, and any topping your heart desires. Sign us up!
 A pie iron can be more than just a piece of camping equipment. For many, it brings back memories of family camping trips, good friends around a fire, and all sorts of wholesome outdoor fun. If you grew up using one of these things, then you know what I’m talking about.
But if you’ve never cooked with a pie iron before, it won’t take long to see the appeal! They’re super versatile and can be used to make a near-endless number of pie iron recipes. But a great place to start is right here with this pizza pocket.
We love Pie Iron Pizza Pockets because:
↠ They’re super fun to make
↠ Toppings can be completely personalized
↠ Can be cooked over flames or embers
↠ Satisfies a deep urge to poke something in the campfire
↠ Pizza. Seriously, what’s not love?
So if you really want to have some fun around the campfire, pick up a pie iron and start making pizza pockets (and memories) on your next camping trip!
How to make pie iron pizza pockets & step by step video
Making pie iron pizza is easy! Watch this (60 second) video to see how it’s done.
For this recipe, we made our own pizza dough, but these directions will work just as easily (actually, more easily!) if you use pre-made store-bought pizza dough.
Start by lightly oiling the inside of the pie iron. A silicone brush dabbed in some olive oil works nicely. This will prevent the dough from sticking and gives you a nice golden crust.
Shape a piece of dough into a rough square that’s slightly larger than your pie iron (fig 1). Pie irons have a concave shape, like a shallow cup, so you’ll need the extra size to run the dough up the sides.
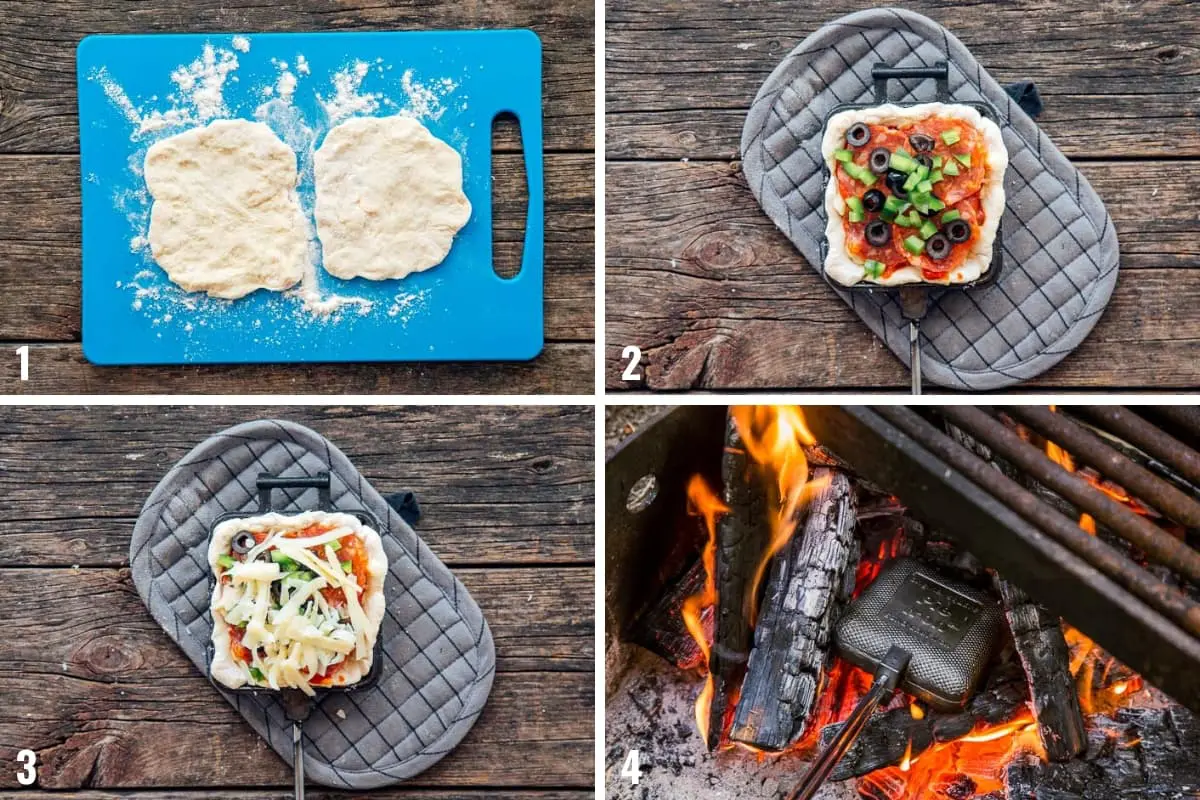
Place the dough on one side of the iron, add the cheese, sauce, toppings, more cheese, and then your top piece of dough (fig 2-3). Try your best to tuck the top piece of dough inside your bottom piece. You really want to enclose the entire pocket. Then close the lid and you’re ready to go.
From here on out, the goal is to warm pie iron evenly over medium heat. Not only top and bottom, but also front to back (fig 4). Depending on how your fire is set up this can be accomplished in a variety of different ways. You might place your pie iron on top of a grill grate over the fire. You might also try to nestle it into some embers. Get creative with it.
Our suggestion is to pull it out and check often until you get a feel for the heat of the fire. Once the dough is golden on both sides, pop the pocket out. While the first one cools down, we suggest you start building the next one. Because we all know there will be a next one!
Equipment needed
↠ Pie Iron: We have a single square pie iron from Rome. They also make a double square and a circle. Which size and shape you chose is totally up to you.
↠ Silicone Brush: We love these little brushes for applying olive oil, marinades, and sauces.
↠ Heat Resistant Gloves: If you’re making a campfire, we highly suggest these heat resistant gloves. You can pick up cookware, move the grill grate, and rearrange logs with your hands.
More campfire recipes you’ll enjoy
↠ Dutch Oven Pizza
↠ Campfire Banana Boats
↠ Bacon & Date Campfire Pizza
↠ Dutch Oven Lasagna
Ingredients
Pizza Dough
- 2 ¾ cups all-purpose flour
- 1 packet rapid rise yeast
- 2 teaspoons salt
- 1 cup warm water
- 2 tablespoons olive oil
Fillings
- ½ cup pizza sauce
- 1 cup low-moisture shredded mozzarella cheese
- 1 green bell pepper, diced
- 4 oz can sliced black olives, drained
- 16 slices pepperoni
- oil
Instructions
- Make the dough (can be done ahead of time!): In a mixing bowl, stir together the flour, yeast, and salt. Add the oil and water. Using a spoon or fork, mix the ingredients until a dough forms. Add additional flour if it seems too wet, then knead until a ball forms. Cover and let rise 20 minutes. *Alternatively, use pre-made dough.
- Divide the dough into 8 pieces. Working with two pieces at a time, stretch and flatten the dough into roughly 4 ½ x 4 ½ inch squares.
- Oil the pie iron and press one square of dough into the bottom plate. Load up your ingredients: 2 tablespoons of sauce followed by the ¼ cup cheese, ¼ of the bell pepper, 1 oz olives, and 4 pepperonis. Top with a second square of dough. Close & lock the pie iron.
- Cook over the fire or on top of your campfire embers until the crust is golden brown, flipping as needed to ensure even heat. Exact timing will be variable depending on your campfire intensity, but generally, this will only take 2-3 minutes. Check often!
- Remove from the heat, then carefully unlock the pie iron and turn the pizza pocket out.
- Repeat with the remaining ingredients. Be mindful that the iron will be HOT when prepping subsequent pizza pockets. Wait until the iron has cooled, or take extreme care when reloading the iron.
Seems so tasty! I love pizza! Thanks for sharing this recipe 🙂
You’re welcome, Noemi! Hope you enjoy it!
Awesome and easy! tks.